
Next.js, Nuxt, SvelteKit, and others consistently innovate their solutions based on the server-side rendering paradigm. This paradigm generates web content on the server side for each request, leading to improved web application performance, SEO, and user experience.
Beyond simply outputting and generating content on the web page, a notable addition in the Next.js 14 release is the support for Server Actions and Mutations. This feature allows us to define functions that run securely on the server and can be called directly from a client or server component for submitting forms and data mutations. This is a game-changer because it eliminates the need to define a directory for the API, create an endpoint, and then consume it in a component.
In this post, we will learn how to use Next.js’s Server Actions to create a basic todo application using the Xata serverless database platform. The project repository can be found here.
Prerequisites
To follow along in this tutorial, the following are required:
Project setup
In this project, we'll use a prebuilt UI to expedite development. To get started, let’s clone the project by navigating to a desired directory and running the command below:
git clone https://github.com/Mr-Malomz/server-actions.git && cd server-actions
Running the project
Next, we’ll need to install the project dependencies by running the command below:
npm i
Then, run the application:
npm run dev

The components in the codebase follow the normal Next.js/React pattern of creating components. Notably, the src/components/ui/Button.tsx and src/components/ui/DeleteButton.tsx components have been modified. They have the useFormStatus hook for managing form submissions (disabling and enabling clicks).
Setup the database on Xata
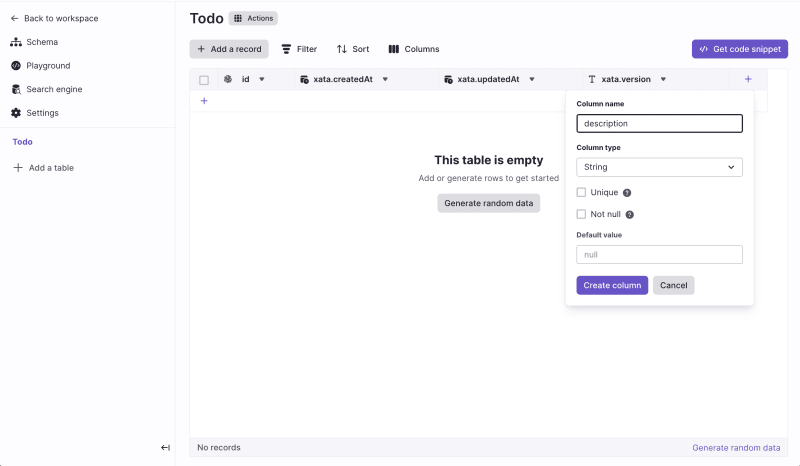
To get started, log into the Xata workspace and create a todo database. Inside the todo database, create a Todo table and add a description column of type String.
Get the Database URL and set up the API Key
To securely connect to the database, Xata provides a unique and secure URL for accessing it. To get the database URL, click the Get code snippet button and copy the URL. Then click the API Key link, add a new key, save and copy the API key.


Setup environment variable
Next, we must add our database URL and API key as an environment variable. To do this, create .env.local file in the root directory and add the copied URL and API key.
XATA_DATABASE_URL= <REPLACE WITH THE COPIED DATABASE URL>
XATA_API_KEY=<REPLACE WITH THE COPIED API KEY>
Integrate Xata with Next.js
To seamlessly integrate Xata with Next.js, Xata provides a CLI for installing required dependencies and generating a fully type-safe API client. To get started, we need to run the command below:
xata init
On running the command, we’ll have to answer a few questions. Answer them as shown below:
Generate code and types from your Xata database <TypeScript>
Choose the output path for the generated code <PRESS ENTER>
With that, we should see a xata.ts file in the root directory.
A best practice is not to modify the generated code but to create a helper function to use it. To do this, create a utils/xataClient.ts file inside the src folder and insert the snippet below:
import { XataClient } from '@/xata';

export const xataClient = () => {
    const xata = new XataClient({
        databaseURL: process.env.XATA_DATABASE_URL,
        apiKey: process.env.XATA_API_KEY,
        branch: 'main',
    });
    return xata;
};
The snippet above imports the XataClient class from the generated code and configures the client with the required parameters.
Finally, we must create utils/types.ts to manage our application from the state.
export type FormResponseType =
    | { type: 'initial' }
    | { type: 'error'; message: string }
    | { type: 'success'; message: string };
Building the todo application
In our todo applications, we will use Server Actions to do the following:
- Create a todo
- Update a todo
- Delete a todo
Create a todo
To create a todo, we need to create an actions/createTodo.ts inside the app folder and insert the snippet below:
'use server';

import { FormResponseType } from '@/utils/types';
import { revalidatePath } from 'next/cache';
import { xataClient } from '@/utils/xataClient';

export const createTodo = async (
    _: FormResponseType,
    formData: FormData
): Promise<FormResponseType> => {
    const xata = xataClient();
    const description = String(formData.get('description'));

    const response = await xata.db.Todo.create({ description });

    if (response.description) {
        revalidatePath('/');
        return {
            type: 'success',
            message: 'Todo created successfully!',
        };
    } else {
        return {
            type: 'error',
            message: 'Error creating todo!',
        };
    }
};
The snippet above does the following:
- Uses the
use serverdirective to mark the function as a Server Action - Imports the required dependencies
- Creates a
createTodofunction that extracts the required information and uses thexataClientto create a todo. The function also uses therevalidatePathfunction to refresh the homepage when a todo is created successfully
Update a todo
To update a todo, we need to create an actions/updateTodo.ts and insert the snippet below:
'use server';

import { FormResponseType } from '@/utils/types';
import { xataClient } from '@/utils/xataClient';
import { redirect } from 'next/navigation';

export const updateTodo = async (
    _: FormResponseType,
    formData: FormData
): Promise<FormResponseType> => {
    const xata = xataClient();
    const description = String(formData.get('description'));
    const id = String(formData.get('id'));

    const response = await xata.db.Todo.update(id, { description });

    if (response?.description) {
        redirect('/');
        return {
            type: 'success',
            message: 'Todo updated successfully!',
        };
    } else {
        return {
            type: 'error',
            message: 'Error updating todo!',
        };
    }
};
The snippet above performs an action similar to the create todo functionality but updates the todo by searching for the corresponding todo and updating it. Then, redirect users to the homepage when it is successful.
Delete a todo
To delete a todo, we need to create an actions/deleteTodo.ts and insert the snippet below:
'use server';

import { xataClient } from '@/utils/xataClient';
import { revalidatePath } from 'next/cache';

export const deleteTodo = async (formData: FormData) => {
    const xata = xataClient();
    const id = String(formData.get('id'));

    await xata.db.Todo.delete(id);
    revalidatePath('/');
};
The snippet above also uses the xataClient to delete the corresponding todo and refreshes the homepage when a todo deletion is successful.
Putting it all together!
With that done, we can start using the actions in the UI.
Update the create todo component
To do this, we need to modify the src/components/TodoForm.tsx file as shown below:
'use client';

import { Button } from './ui/Button';
import { useFormState } from 'react-dom'; //add
import { createTodo } from '@/app/actions/createTodo'; //add

export const TodoForm = () => {
    const [formState, action] = useFormState(createTodo, { type: 'initial' }); //add
    return (
        <form action={action}>
            {formState.type === 'error' && (
                <p className='mb-6 text-center text-red-600'>
                    {formState.message}
                </p>
            )}
            <textarea
                name='description'
                cols={30}
                rows={2}
                className='w-full border rounded-lg mb-2 p-4'
                placeholder='Input todo details'
                required
            />
            <div className='flex justify-end'>
                <div>
                    <Button title='Create' />
                </div>
            </div>
        </form>
    );
};
The snippet above uses the useFormState hook to update the form state based on the createTodo action. Then use the action and formState to submit the form and manage the UI state.
Update the edit todo component
First, we must modify the src/components/EditTodoForm.tsx file to update a todo as shown below:
'use client';

import { Button } from './ui/Button';
import { useFormState } from 'react-dom';
import { updateTodo } from '@/app/actions/updateTodo';
import { TodoRecord } from '@/xata';

export const EditTodoForm = ({ todo }: { todo: TodoRecord }) => {
    const [formState, action] = useFormState(updateTodo, { type: 'initial' }); //add
    return (
        <form action={action}>
            {formState.type === 'error' && (
                <p className='mb-6 text-center text-red-600'>
                    {formState.message}
                </p>
            )}
            <textarea
                name='description'
                cols={30}
                rows={2}
                className='w-full border rounded-lg mb-2 p-4'
                placeholder='Input todo details'
                required
                defaultValue={todo.description!}
            />
            <input type='hidden' name='id' value={todo.id} />
            <div className='flex justify-end'>
                <div>
                    <Button title='Update' />
                </div>
            </div>
        </form>
    );
};
The snippet above does the following:
- Imports the required dependencies
- Modify the
EditTodoFormcomponent to accept atodoprop - Uses the
useFormStatehook to update the form state based on theupdateTodoaction. Then use theactionandformStateto submit the form and manage the UI state. - Uses the
todoprop to display the required information
With this, we will get an error about props. We will solve it in the next step.
Lastly, we need to modify the src/app/[edit]/page.tsx file to get the value of a matching todo and pass in the required prop to the EditTodoForm component.
//other imports goes here
import { xataClient } from '@/utils/xataClient';

const xata = xataClient();

export default async function Page({ params }: { params: { edit: string } }) {
    const todo = await xata.db.Todo.read(params.edit);

    return (
        <div className={`relative z-10 open-nav `}>
            <div className='fixed inset-0 bg-gray-500 bg-opacity-75 transition-opacity'></div>
            <div className='fixed inset-0 z-10 w-screen overflow-y-auto'>
                <div className='flex min-h-full items-end justify-center p-4 text-center sm:items-center sm:p-0'>
                    <div className='relative transform overflow-hidden rounded-lg bg-white text-left shadow-xl transition-all sm:my-8 sm:w-full sm:max-w-lg'>
                        <div className='bg-white px-4 pb-4 pt-5 sm:p-6 sm:pb-4'>
                            <Link href='/' className='flex justify-end mb-2'>
                                <X className='cursor-pointer' />
                            </Link>
                            <EditTodoForm todo={todo!} />
                        </div>
                    </div>
                </div>
            </div>
        </div>
    );
}
Update the homepage to get the list of todos and delete a todo
To do this, we first need to modify the src/components/TodoComp.tsx file as shown below:
//other imports
import { deleteTodo } from '@/app/actions/deleteTodo';
import { TodoRecord } from '@/xata';

export const TodoComp = ({ todo }: { todo: TodoRecord }) => {
    return (
        <div className='flex border p-2 rounded-lg mb-2'>
            <div className='ml-4'>
                <header className='flex items-center mb-2'>
                    <h5 className='font-medium'>Todo item {todo.id}</h5>
                    <p className='mx-1 font-light'>|</p>
                    <p className='text-sm'>
                        {todo.xata.createdAt.toDateString()}
                    </p>
                </header>
                <p className='text-sm text-zinc-500 mb-2'>{todo.description}</p>
                <div className='flex gap-4 items-center'>
                    <Link
                        href={todo.id}
                        className='flex items-center border py-1 px-2 rounded-lg hover:bg-zinc-300'
                    >
                        <Pencil className='h-4 w-4' />
                        <p className='ml-2 text-sm'>Edit</p>
                    </Link>
                    <form action={deleteTodo}>
                        <input type='hidden' name='id' value={todo.id} />
                        <DeleteButton />
                    </form>
                </div>
            </div>
        </div>
    );
};
The snippet above does the following:
- Imports the required dependencies
- Modify the
TodoCompcomponent to accept atodoprop - Uses the prop to display the required information
- Uses the
deleteTodoaction and thetodo.idto handle the deletion form.
Lastly, we need to update the src/app/page.tsx file as shown below:
//other imports
import { xataClient } from '@/utils/xataClient';

const xata = xataClient();

export default async function Home() {
    const todos = await xata.db.Todo.getAll();
    return (
        <main className='min-h-screen w-full bg-[#fafafa]'>
            <Nav />
            <div className='w-full mt-6 flex justify-center'>
                <div className='w-full lg:w-1/2'>
                    <TodoForm />
                    <section className='border-t border-t-zinc-200 mt-6 px-2 py-4'>
                        {todos.length < 1 ? (
                            <p className='text-sm text-zinc-500 text-center'>
                                No todo yet!
                            </p>
                        ) : (
                            todos.map((todo) => (
                                <TodoComp todo={todo} key={todo.id} />
                            ))
                        )}
                    </section>
                </div>
            </div>
        </main>
    );
}
The snippet above gets the list of todos, maps it through the TodoComp, and passes in the required prop.
With that done, we can test our application by running the following command:
npm run dev
Check out the demo below:

Conclusion
This post discusses Next.js 14 Server Actions for form submissions and data mutation on client and server components. Server Actions eliminate the need for users to manually create API routes for running applications securely on the server. Instead, they can simply define a function.
Check out these resources to learn more:

Top comments (0)