
In computer programming, we come across various data types supported by most programming languages. A data type is nothing but an attribute of data that specifies which type of value a variable has and what type of operation can be performed without causing an error. A string is a basic data type used for storing and manipulating a sequence of characters.

In this Selenium JavaScript tutorial, we will have a detailed walkthrough of strings in JavaScript along with its uses and in-built methods. Additionally, we’ll also explore using JavaScript strings with Selenium WebDriver over cloud-based Selenium Grid for demonstrating Selenium automation testing.
Let’s get started!
What are Strings in JavaScript?
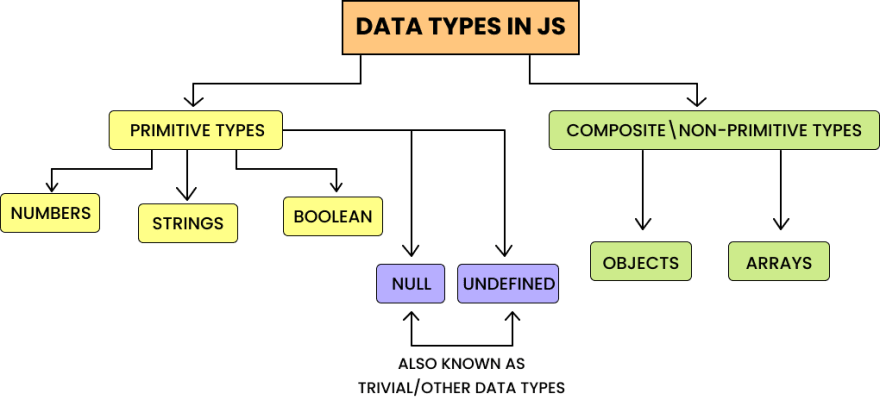
In JavaScript, data types are classified into three main categories:
Primitive Data Types
Non-Primitive (Composite) Data Types
Trivial or Special Data Types
Primitive Data Types are built-in or primary to a language. They can hold only one value at a time. Numbers, String, and Boolean, come under primitive type in JavaScript.
Composite Data Types are derived from primitive data types. They can hold collections of values and more complex entities. Objects and Arrays come under this type.
Trivial Data Types include null and undefined. Each of these defines only a single value.
Before moving ahead in this Selenium JavaScript tutorial, let’s understand more about the strings.
Akin to other programming languages, string in JavaScript is a data type that is used to hold a sequence of characters that represent textual data. They are written within quotes (single or double) to recognize them as a string value.
They are also immutable, i.e., if you process a string, you will always get a new string. The original string will remain unmodified. The JavaScript string can be of both primitive and composite data types.
How to Initialize Strings in JavaScript?
There are two ways to initialize a string in JavaScript:
By string literal
By string object using “new” keyword
By string literal
Here, we directly assign the value of the string to the variable. This method enables us to declare primitive strings.
var message= “Hello World”; // Double quotes
var message= ‘Hello World’; // Single quotes
By string object using “new” keyword
Here, we pass the string value as a parameter to the constructor of the “String” class. The new keyword creates an instance of the String.
var message= new String (“Hello World”); // Double quotes
var message= new String (‘Hello World’); // Single quote
Let us see an example for creating a string using the two methods through a simple code.
<script>
        var lineBreak= "</br>";

        var str1="This string is created using string literal";
        document.write(str1);

        document.write(lineBreak);

        var str2= new String("This string is created using string object")
        document.write(str2);
 </script>
Output:

Note: JavaScript automatically converts primitives to String objects so that it’s possible to use String object methods for primitive strings.
JavaScript Strings In-built Properties and Methods
JavaScript provides in-built support for various string properties and methods to perform specific operations on them. Let’s check out a few!
Properties
- length
The length property returns the length, i.e., the number of characters present in a string. It is read-only. Spaces, escape sequences (like \n,\t), etc., are treated as a single character.
let str = "This is a paragraph";
        console.log(str.length);  //Output =>  19
Methods

- charAt(index)
This method returns the character at the specified index of the string. A string can be considered as an array of characters starting from index position 0,1,2..(string.length-1).
let str = "Hello world!";
        console.log(str.charAt(1)); //Output => e
- charCodeAt(index)
This method returns the Unicode value of the character at the specified index of the string.
let str = "Hello world!";
        console.log(str.charCodeAt(1)); //Output => 101
- indexOf(searchString,position)
This method allows you to locate a string (or a substring) within a string. It searches for a string from the provided position and returns the index of the first occurrence.
If the position parameter is not specified, it searches from the beginning of the string. If no result is found, -1 is returned.
let str = "My name is John Doe!";
        console.log(str.indexOf('is')); //Output => 8
- lastIndexOf(searchString,position)
Similar to indexOf(), this method returns the index of the last occurrence of the searchString from the specified position. Returns -1 if no result is found.
let str = "Hello world!";
        console.log(str.lastIndexOf("l")); //Output => 9
- search(RegExp)
Similar to indexOf(), this method also allows you to search for a specified value within a string and returns the position of occurrence. The search() enables you to perform a search for powerful values like Regex.
let str = "The search methods allows you to search for a value   within the string"
        console.log(str.search('search')); //Output => 4
- toUpperCase(), toLowerCase()
These methods convert the characters in the given string into uppercase and lowercase letters, respectively.
let str = "My name is John Doe";
        console.log(str.toUpperCase()); //Output => MY NAME IS JOHN DOE
        console.log(str.toLowerCase()); //Output => my name is john doe
- concat([string1,string2,…stringn])
This method is used to concatenate or combine two or more strings and return a new string. We can also use “+” or “+=” operators to combine multiple strings.
let str1="I"
        let str2="love"
        let str3="programming"

        let newStr=str1.concat(" ",str2," ",str3);
        console.log(newStr); //Output =>  I love programming
        console.log(str1+" "+str2+" "+str3); //Output =>  I love programming
- trim()
This method is used to remove whitespaces from the left and right sides of the string.
let str= " John Doe "
        console.log('Before trimming:',str.length) //Output => Before trimming: 10
        console.log('After trimming:',str.trim().length) //Output => After trimming: 8
- split(separatorString)
Using the split(), you can convert a string into an array by passing the separator as an argument.
var fruits="apple,mango,strawberry,orange"
var fruitArray=fruits.split(',');  // Split on commas
console.log(fruitArray); // Output => ["apple", "mango", "strawberry", "orange"]

var message="Hello";
messageArray=message.split(""); // Split in characters
console.log(messageArray); // Output => ["H", "e", "l", "l", "o"]

var str = "My name is John"
strArray=str.split(" "); // Split on spaces
console.log(strArray); // Output => ["My", "name", "is", "John"]
- toString()
The toString() method returns a string representation of the calling object.
var num=123;
console.log(typeof num); // Output=> number
console.log( typeof num.toString()); // Output=> string
- match(RegExp)
This method is used to find a match for a value within a string. If global flag g is included, an array of matches are returned. Otherwise, only the first complete match and its additional properties like index, input, group, etc., are returned.
var str="The quick brown fox jumps over the lazy dog!It barked!"

console.log(str.match("!")); // Output => ["!", index: 43, input: "The quick brown fox jumps over the lazy dog!", groups: undefined]

console.log(str.match(/!/g)); // Output => ["!", "!"]
- replace(searchValue, replaceValue)
The replace(), as the name suggests, replaces a value in a string with another value. RegEx can also be passed as the search value.
var str="Hello User"
console.log(str.replace("User","John")); // Output => Hello John
- slice(startNumber, endNumber)
This method is used to extract part of a string and return the extracted part. The start and end positions are passed as parameters. If the second parameter is omitted, this method will slice out the rest of the string.
To count the position from the end of the string, pass the parameters as negative.
var str="The quick brown fox jumps over the lazy dog"
console.log(str.slice(4,9)); // Output=> quick
console.log(str.slice(4)); // Output=> quick brown fox jumps over the lazy dog
console.log(str.slice(-4)); // Output=> dog
- substring(startNumber, endNumber)
The substring() method is used to create a substring out of a string. It retrieves a range of characters from start and end positions passed as arguments.
This method is similar to slice(), but the difference is that it cannot accept negative indexes as parameters.
var str="The quick brown fox jumps over the lazy dog"
console.log(str.substring(16,19)); // Output=> fox
console.log(str.substring(16)); // Output=> fox jumps over the lazy dog
- substr(startNumber, length)
This method is similar to substring(). The difference is that the second parameter specifies the length of the extracted part from the starting position.
var str="The quick brown fox jumps over the lazy dog"
console.log(str.substr(4,15)); // Output=> quick brown fox
Using JavaScript Strings with Selenium WebDriver
Automation testing has become an integral part of software development. With ever-expanding user expectations, it becomes crucial for every development project to deliver high-quality products with increased velocity. Top-notch software plays a vital role in user on-boarding as well as user retention. Automation testing allows you to ensure the application UI is working as expected.
Selenium WebDriver is a widely popular tool, often the first choice, for automation testing of web applications. And when it comes to scripting, JavaScript is the most in-demand technology loved by programmers (as suggested by the Stack Overflow 2020 annual survey).
Note: InvalidCookieDomainException The WebDriver does not allow setting cookies for domains different from the domain of the current browsing context’s document’s domain.

In this section of the Selenium JavaScript tutorial, we will learn how to write automation test scripts using JavaScript and Selenium WebDriver. We’ll also explore a few practical implementations of JavaScript strings through beginner-friendly examples.
Let’s jump into it!
Prerequisites
To get started, install Node.js, NPM, and Visual Studio Code as IDE on your system.
- Install Node.js and NPM
Ensure that your system is equipped with Node.js and NPM. You may install the latest LTS version from the official Node.js website.
NPM will be installed along with Node.js. So no need for separate installation. In the terminal, give the following command to verify Node.js and NPM are successfully installed in your system.
node -v
npm -v

2. Install Visual Studio Code as IDE (or any IDE of choice)
In this article, we will be using VSC. You may download Visual Studio from its official website.
Project Setup
With the expectation that the prerequisites are installed, let’s deep dive into the project set-up. Step-by-step instructions are detailed below. Follow along with me!
Step 1: Create a project folder in the desired location in your system. Open the folder in your IDE.
Step 2: Next, we need to initialize our project with the package.json file.
Open the terminal in IDE and verify that it is pointing to the project folder location.
Give the command:
npm init -y
You will notice that the package.json file is created in your project folder, containing all the project configuration details.
Step 3: Time to install the project dependencies. We need to install:
Selenium WebDriver
-
Browser drivers for chrome, firefox, etc. ( in this example, we will work with chrome browser)
npm install –save selenium-webdriver chromedriver
The ‘node_modules’ folder will be added to your project root. Also, package.json will be updated with these dependencies.

Step 4: Finally, it’s time to write some code!
Note: We are not working with any framework like Nightwatch.js or WebdriverIO here.
Note: InvalidSelectorExceptionthe webdriver error - invalid selector-error, happens when an element fetch is tried with an unknown web element selection method.
Writing our first test script
Create a file named index.js (any name of your choice) in the project root folder. The folder structure now looks like this:

Inside this index.js file, let’s write our first test script. We will be writing a simple and straightforward test case which will:
Launch the Chrome browser.
Go to www.google.com.
Search for a string value.
Verify the string value is present in the resulting URL.
Step a: Pull all the required functions from node_modules.
const {By,Key,Builder} = require("selenium-webdriver");
require("chromedriver");
Step b: Create a function example(), which will be containing your test script. Feel free to provide any function name of your choice.
async function example(){
 }
example();
Step c: Inside the function, let us write our test script using Selenium and JavaScript. We are lavishly making use of the string methods we learned.
async function example(){
 // The string variable containing value to search
 var searchString = "Javascript strings with Selenium webdriver";
     //To wait for browser to build and launch properly
 let driver = await new Builder().forBrowser("chrome").build();
    //To fetch [http://google.com](http://google.com) from the browser with our code.
 await driver.get("[http://google.com](http://google.com)");
    //To send a search query by passing the value in searchString.
 await driver.findElement(By.name("q")).sendKeys(searchString,Key.RETURN);
     //To fetch the value of currentUrl and storing it into a variable by converting it to string
 var url= (await driver.getCurrentUrl()).toString();
   //To find the start and position of query string
 var start = url.indexOf("?q=");
 var end = url.indexOf("&");
 //To extract the query string wrt the start and end positions
 var queryString = url.slice(start+3,end);
 //To get an array containing all keywords by splitting with '+'
 queryStringArray = queryString.split("+");
 console.log("ACTUAL-",queryStringArray);
 //To get an array containing words of original searchString
 expectedArray=searchString.split(" ");
 console.log("EXPECTED-",expectedArray);
 //To compare the expectedArray with the Actual query string array
 console.log("Match Status:",JSON.stringify(queryStringArray)==JSON.stringify(expectedArray));
    //It is always a safe practice to quit the browser after execution
 await driver.quit();
}
Step d: Now, write the function call. Overall code will look like this.
const {By,Key,util, Builder} = require("selenium-webdriver");
require("chromedriver");
 async function example(){
 // The string variable containing value to search
 var searchString = "Javascript strings with Selenium webdriver";
     //To wait for browser to build and launch properly
 let driver = await new Builder().forBrowser("chrome").build();
    //To fetch [http://google.com](http://google.com) from the browser with our code.
 await driver.get("[http://google.com](http://google.com)");
   //To send a search query by passing the value in searchString.
 await driver.findElement(By.name("q")).sendKeys(searchString,Key.RETURN);
     //To fetch the value of currentUrl and storing it into a variable by converting it to string
 var url= (await driver.getCurrentUrl()).toString();
   //To find the start and position of query string
 var start = url.indexOf("?q=");
 var end = url.indexOf("&");
 //To extract the query string wrt the start and end positions
 var queryString = url.slice(start+3,end);
  //To get an array containing all keywords by splitting with '+'
 queryStringArray = queryString.split("+");
 console.log("ACTUAL-",queryStringArray);
  //To get an array containing words of original searchString
 expectedArray=searchString.split(" ");
 console.log("EXPECTED-",expectedArray);
  //To compare the expectedArray with the Actual query string array
 console.log("Match Status:",JSON.stringify(queryStringArray)==JSON.stringify(expectedArray));
    //It is always a safe practice to quit the browser after execution
 await driver.quit();
}
 example();
Step e: Run the test!
In the terminal, give the following command to run the js code using Node.
node index.js
The test execution begins, and the Chrome browser gets launched. Observe the terminal for logs.

We have successfully executed our test.
If you are new to JavaScript and want to get started with your first test script, check out the video below from LambdaTest YouTube Channel.
Running Selenium JavaScript tests on the Remote Selenium Grid
In the earlier section of the Selenium JavaScript tutorial, we completed the test execution on the local Selenium Grid. In real-world testing scenarios, it is critical to verify that our application works seamlessly across multiple platforms, browsers, and browser versions. This task is hectic to achieve through our local system alone which also requires frequent maintenance. This is where cross browser testing on cloud-based Selenium Grid can drive more value to the overall testing methodology.
LambdaTest is a popular cloud-based cross browser testing platform trusted by 500,000+ users worldwide. LambdaTest provides you access to 2000+ browsers for mobile and desktop to help you gain the maximum test coverage during automated browser testing.
Cloud-based Selenium Grid is known for running test cases on different versions of browsers and different operating systems simultaneously. LambdaTest facilitates you to perform automated browser tests on a scalable, secure, and reliable online Selenium Grid effortlessly.
Since we have come this far, why don’t we achieve this as well? All it requires are a few minor code changes in our previous script. Let’s look into it step by step.
Step 1: Create your free account or log in to your LambdaTest account. Fetch your unique username and access key from the LambdaTest profile section.
Step 2: Create a new test file (index2.js or any name of choice) in the project folder.
I will be copying the previous code here. Now both test files contain the same code. Let’s make the required configuration changes in the second file.
-
Provide the username and access key (from Step 1) as string values.
const USERNAME = 'YOUR_USERNAME'; //replace with your username
const KEY = 'YOUR_KEY'; //replace with your accesskey -
Provide the host corresponding to the LambdaTest platform.
const GRID_HOST = 'hub.lambdatest.com/wd/hub';
Now we should provide the required browser and OS configuration as capabilities. Within seconds we can generate this by making use of the LambdaTest Desired Capabilities Generator tool.

Provide this object inside the test function.
async function example(){
 var capabilities = {
        "build" : "JavaScript Strings and Webdriver",
        "name" : "Google search",
        "platform" : "Windows 10",
        "browserName" : "Chrome",
        "version" : "90.0",
        "selenium_version" : "3.13.0",
        "chrome.driver" : "90.0"
    }
     //...
}
-
Provide the gridUrl. You can also find this value from the Automation Dashboard.
const gridUrl = 'https://' + USERNAME + ':' + KEY + '@' + GRID_HOST;
-
Finally, edit the code to build and launch the browser. Also, don’t forget to remove the chromedriver requirement as we are executing our tests remotely.
let driver = await new Builder()
.usingServer(gridUrl)
.withCapabilities(capabilities)
.build();
The final code will look like this.
- That’s it, guys! Now it is time to run the script. node index2.js
We can observe the live running status from the Automation Dashboard.

We can access the individual report containing video and logs from Automation Logs.

We can also observe the logs in the Terminal.

How effortless and hassle-free was that! We have successfully run our test script using the Remote Selenium Grid provided by LambdaTest.
Conclusion
While Selenium WebDriver continues to be the first choice in Automation Testing, JavaScript is celebrated as the most in-demand language by programmers over the last 7+ years. WebDriver, together with JavaScript, offers a favorable combination to perform automated UI testing of applications.

We did a detailed walkthrough of Strings in JavaScript along with various in-built functions through this Selenium JavaScript tutorial. Equipped with this knowledge, we wrote test cases utilizing JavaScript strings and Selenium WebDriver over cloud-based Selenium Grid using Selenium automation testing.
As an additional touch, we also leveraged our test execution by achieving test coverage and cross-browser testing employing the online Grid provided by the LambdaTest platform. I am hoping that this blog has benefited you. To deliver applications with optimal user experience with the backing of cross browser testing, check out the LambdaTest platform.

Latest comments (0)