
Agenda
- Introduction
- What are SSH Keys?
- Generating SSH keys
- Passing a public SSH key to GitHub
- Testing SSH connection
- Conclusion
Introduction.
Doesn't it get boring that each time you have to identify yourself to GitHub you must provide your username and password? Well mate, you don't have to go through all the hustle of using password authentication just to identify yourself. In this article, you'll learn an alternate password-less way to identify yourself. No need to use your username and password every time. Follow along with this article to get how it's done.
The article is focused on teaching you how to use an alternate way of authenticating to GitHub using SSH keys.
What are SSH keys?
To understand what SSH Keys are, first, you have to know a Secure Shell or SSH for short. Simply put, SSH is basically a secure way of communication used between two nodes (client and host). SSH is a secure communication protocol used in a communication link. In this context, GitHub is the host and your PC the client.
Your PC (client) and GitHub (host) will use this secure SSH protocol in their communication link to securely authenticate you without the use of a password.
But, the question remains, what are SSH Keys?
Like shoes, SSH keys come in pairs consisting of one public and private key, forming a public-private SSH key pair. SSH keys play a vital role in maintaining security in SSH protocols. The SSH protocol uses asymmetric encryption as its security basis. SSH keys are then used in the protocol separately for encryption and decryption.
Okay then, enough of the chit-chat. It's time you create your own pair of SSH keys.
Generating SSH keys;
Copy and paste the command below in your terminal to generate a new SSH key pair;
ssh-keygen -t rsa -b 4096 -C 'Your_Email_Address'
- Press enter, you will see a prompt to enter a "passphrase".
- A passphrase is not mandatory. However, it is recommended that you specify a passphrase to protect your private key against unauthorized use (press enter to skip this for now).
Congrats, the command above generated an SSH key pair for you and saved it in a specific path. This key is of rsa type.
Note;
-trefers to SSH key type (in this case we're using thersaSSH key type).
-brefers to size of SSH key in bits. The minimum bit length is 768 bits and the default length is 2048 bits. So in the command above you're setting the SSH key to a size of 4096 bits.
Passing a public SSH key to GitHub;
From your pair of SSH keys, GitHub should have one key. You are going to give it the public key instead. The other key, the private one, you are going to keep it in a program called ssh-agent.
"The ssh-agent is a helper program that keeps track of users’ identity keys and their passphrases. The agent can then use the keys to log into other servers without having the user type in a password or passphrase again. This implements a form of single sign-on (SSO)." read more from SSH Academy
Paste the command below to start the ssh-agent;
eval `ssh-agent -s`
Done?
Okay now you can go on to adding that private SSH key to ssh-agent using the command below;
ssh-add ~/.ssh/id_rsa
Awesome!
Note;
The public rsa SSH key filenameid_rsa.pubhas a.pubextension and the private has no extension.
Remember, you are supposed to give GitHub your public key. Copy the public SSH key to clipboard by running the command below;
Mac;
pbcopy < ~/.ssh/id_rsa.pub
Windows;
clip < ~/.ssh/id_rsa.pub
Now you have to paste the key to your GitHub account. Sign in to your account and follow the steps below to add a key.
Step 1 - Settings;
Once you sign in to your GitHub, click on your account avatar, found at the top right corner of your screen. A dropdown will show.
Now, click on Settings from that dropdown menu.
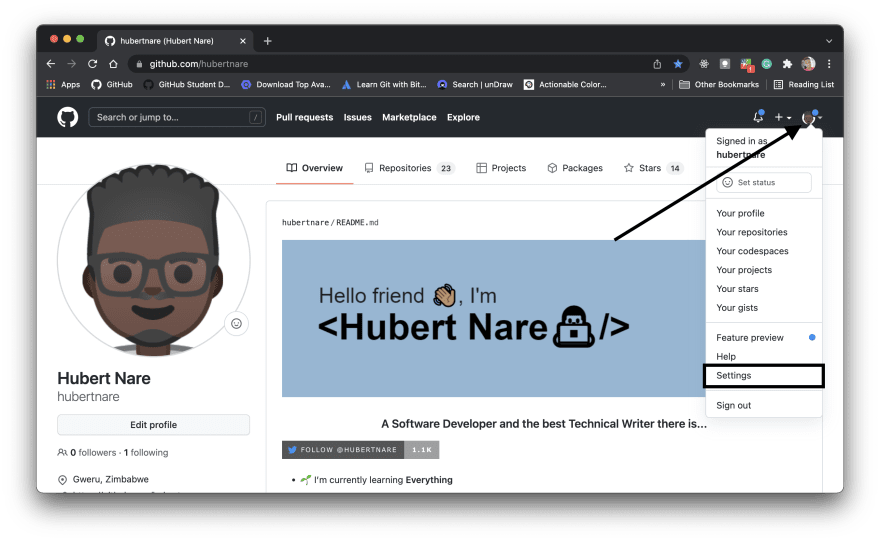
Step 2 - SSH and GPG keys.
In Settings, there is a menu at your left. Click on SSH and GPG keys tab from that left menu. You will see a page like below;

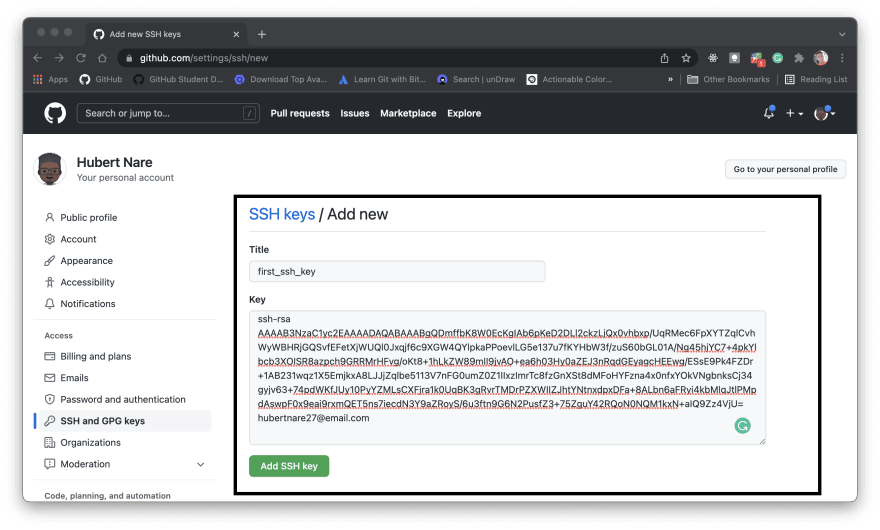
On this page, click the button New SSH Key. The button will redirect you to a page where you are going to add your public SSH key.
Head over to the following step to do that.
Step 3 - paste public SSH key.
Now, its time you give that public key to GitHub.
Here is what you have to do;
There is a textbox for a title. Enter SSH key title of your own choice.
Paste in the public SSH key you copied to clipboard from your terminal.
Finally, click on Add SSH key button.
Step 4 - confirm
GitHub will ask for your password as confirmation. Type in your password to proceed.

Done?
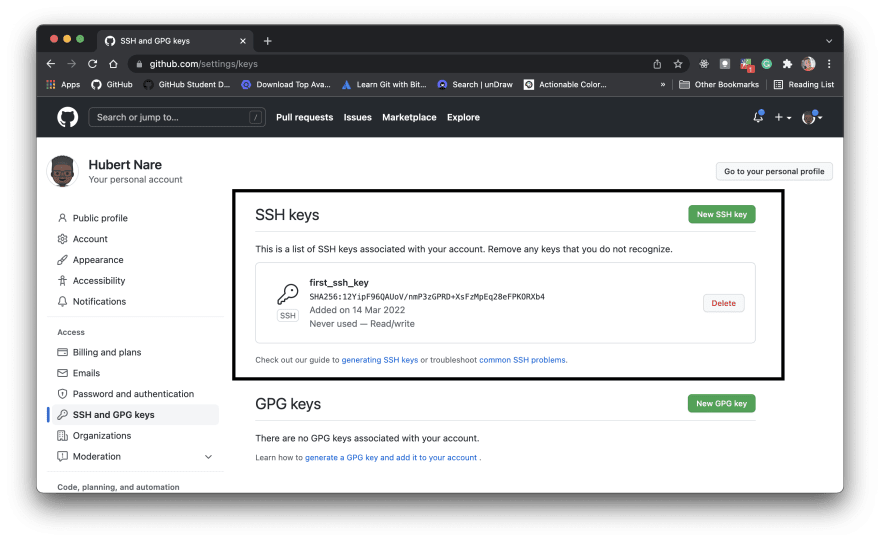
You will see your public key added on to a list of SSH keys on the SSH and GPG keys page like below;
Wrapping up!
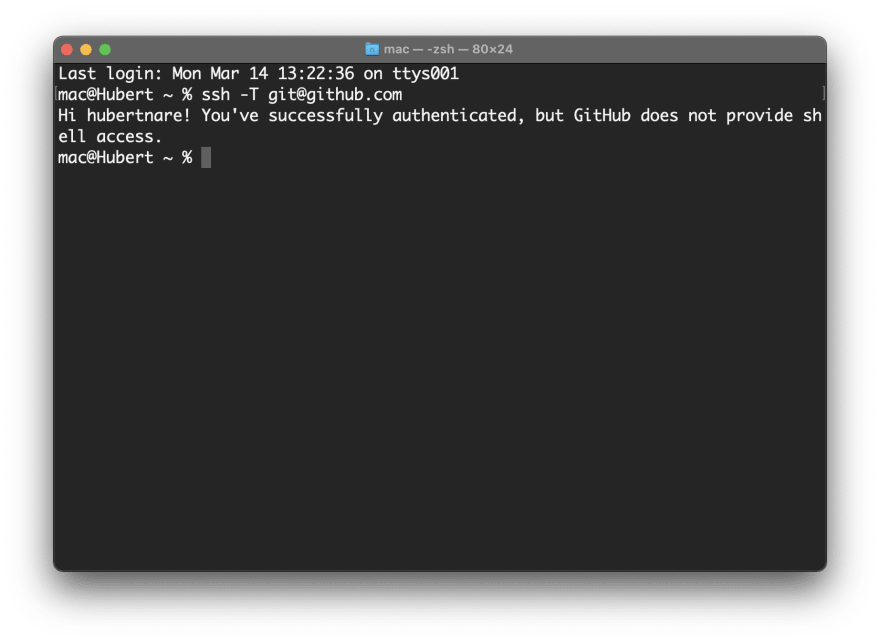
Run this last command below you to test for connection.
ssh -T git@github.com
You should get results similar to that below;
Nicely done!
Now let's take our new SSH keys for a test drive, shall we?
Head over to this GitHub repo and copy the SSH link of the repo to your clipboard.

Now in your terminal, type the command;
git clone "paste_in_the_copied_SSH_repo_link_without_qoutes"
and press enter. The code above will clone that repo using SSH connection.
And that my friend is one use case of GitHub SSH keys.
Conclusion;
Great job! You have successfully added a new SSH key to your Github profile. For further reading, I recommend this article which is a deep-dive on SSH. If you have any questions feel free to ping me.
Till we meet again mate.

Top comments (0)