
In this post, I’ll walk through how I deployed a static website using Amazon S3 and distributed it globally with CloudFront. Then, I applied security hardening using AWS Web ACL to defend against common threats.
Step 1: Build the Static Site
I created a simple HTML and CSS layout:
index.html

<!DOCTYPE html>
<html lang="en">
  <head>
    <meta charset="UTF-8" />
    <meta name="viewport" content="width=device-width, initial-scale=1.0" />
    <title>CloudFront Static Site</title>
    <style>
      body {
        background-color: #0e0e0e;
        color: #f4f4f4;
        font-family: sans-serif;
        display: flex;
        justify-content: center;
        align-items: center;
        height: 100vh;
        margin: 0;
      }
      .container {
        text-align: center;
      }
    </style>
  </head>
  <body>
    <div class="container">
      <h1>Hello, CloudFront!</h1>
      <p>This site is served from an S3 bucket and distributed globally with AWS CloudFront.</p>
    </div>
  </body>
</html>
style.css

body {
  background-color: #0e0e0e;
  color: #f4f4f4;
  font-family: sans-serif;
  display: flex;
  justify-content: center;
  align-items: center;
  height: 100vh;
  margin: 0;
}

.container {
  text-align: center;
}
I then uploaded both files to a new S3 bucket named:
javier-static-site-2025

Step 2: Enable Static Website Hosting on S3
In the S3 bucket settings, I enabled static website hosting:

Selected “Host a static website”
Entered index.html as the index document
Left the error document blank
Step 3: Configure Bucket Policy for Public Read Access
To allow CloudFront (and users) to access the files, I added a bucket policy:
{
  "Version": "2012-10-17",
  "Statement": [
    {
      "Sid": "PublicRead",
      "Effect": "Allow",
      "Principal": "*",
      "Action": "s3:GetObject",
      "Resource": "arn:aws:s3:::javier-static-site-2025/*"
    }
  ]
}

Step 4: Preview the Website on S3
After applying the policy, I accessed the site directly via the S3 static hosting endpoint:
http://javier-static-site-2025.s3-website-ap-southeast-2.amazonaws.com

The site loaded correctly, showing the custom “Hello, CloudFront!” message.
Step 5: Set Up a CloudFront Distribution
I created a CloudFront distribution to globally accelerate and cache content:
Origin Domain: S3 website endpoint (not the default bucket domain)
Origin Access: Public (since I allowed public access in the S3 bucket policy)
Viewer Protocol Policy: Redirect HTTP to HTTPS
Allowed Methods: GET, HEAD (default)
Compression: Enabled


Step 6: Link CloudFront to Web ACL (WAF)
I created a Web ACL named CloudFrontWebACL and associated it with the CloudFront distribution.

Adding AWS WAF Rules
With the Web ACL CloudFrontWebACL created and associated with my CloudFront distribution, I added several rules to strengthen the site’s security posture.
Managed Rule Sets Added
AWSManagedRulesCommonRuleSet
Covers a wide range of common threats like LFI, bad bots, size restrictions, and more.AWSManagedRulesAmazonIpReputationList
Blocks traffic from known malicious IPs.AWSManagedRulesSQLiRuleSet
Specifically targets SQL injection attempts.Custom Rate Limiting Rule – LimitRequestsByIP
Blocks any IP that makes more than 10 requests in a 5-minute window.
For all managed rules, I set the action override to “Block” to ensure they actively drop malicious traffic rather than just counting matches.

Testing the Web ACL
This is the part where studying for the eJPT certification came in handy. To validate the effectiveness of each rule, I ran several tests using curl.
1. Rate Limiting
for i in {1..25}; do
  curl -s -o /dev/null "https://<CloudFront URL>" &
done
wait

Result:
Requests beyond the 10-request threshold were blocked as expected. I confirmed this via the WAF metrics panel in CloudWatch, which showed exactly 25 blocked requests.


2. SQL Injection Attempt
curl "https://<CloudFront URL>/?id=1%27%3B%20DROP%20TABLE%20users--"
Result:
The request was blocked with a 403 error, showing that the SQLiRuleSet triggered correctly.
3. SQLMap User-Agent Fingerprint
curl -A "sqlmap/1.0" https://<CloudFront URL>
Result:
Blocked with a 403 error. This confirmed that malicious User-Agent headers were being filtered properly by the common rule set.

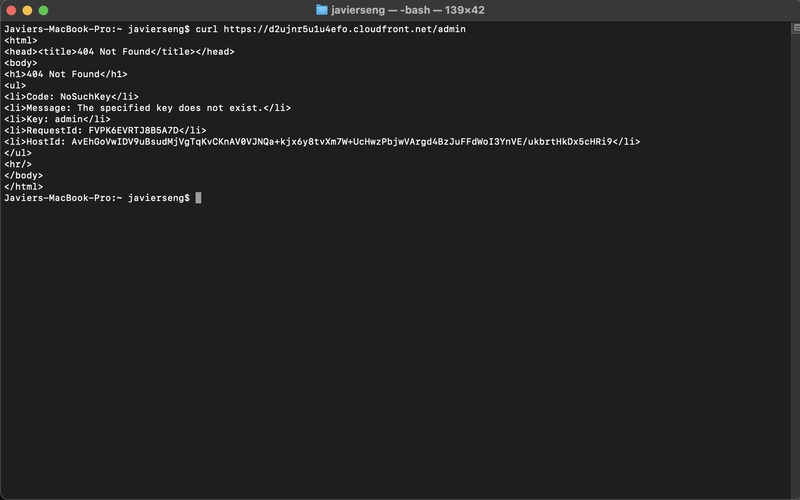
4. Path-Based Recon
curl https://<CloudFront URL>/admin

Result:
Returned a 404 error from S3 (object not found), but was not blocked by WAF. This is expected — WAF only triggers on known threat patterns, not missing pages.
CloudWatch Logs Verification
To confirm that the WAF rules were actively blocking traffic, I reviewed the metrics and charts under the “WAF > Web ACLs > CloudFrontWebACL” section.
The rate limiting rule showed 25 blocked requests at the exact timestamp of my curl loop test.
SQLi and User-Agent tests were also reflected in blocked request counts under the relevant rules.
Final Thoughts
This project helped me understand how to:
Deploy a static site via S3 and accelerate it globally with CloudFront
Configure bucket permissions and static hosting
Set up and customize AWS WAF rules
Simulate attacks and observe real-time block metrics in CloudWatch
The final result is a minimal, fast, and well-protected static site — an ideal foundation for future personal projects.

Top comments (6)
Been meaning to set up CloudFront with WAF myself, always felt a bit boring but seeing the step-by-step like this is straight up helpfulmight actually go for it next weekend.
That is so cool that you can do this entirely in AWS, did you need a CloudFlare account to setup the distribution?
Awesome tutorial, thank you!
Hi Adam! Nope, no Cloudflare account needed—everything was done directly within the AWS Console using native services like S3, CloudFront, and WAF. Super seamless once you get the hang of it. Appreciate the kind words—glad you found the tutorial helpful!
Good read!
Try including the table of contents.
You can refer to my post : dev.to/pkkolla/amazon-rds-unlocked...
This is good. Thanks
It is a good one