
Overview
This project builds on my previous work where I deployed a static website using Amazon S3 and CloudFront. In this phase, I extended the setup to serve the site on a custom domain (javierlab.com) with full HTTPS support, DNS configuration, and a custom 404 error page. The goal was to transform the existing setup into a polished, production-grade deployment.
Why This Project Matters (Business Value)
A custom domain with HTTPS isn't just a nice-to-have—it's a standard for any serious business or professional online presence. This project demonstrates:
- Secure delivery with AWS Certificate Manager (ACM)
- Professional branding with Route 53 and domain configuration
- Improved UX with a custom error page
- Scalability and performance using AWS's global edge network via CloudFront
- Hands-on knowledge of DNS, SSL/TLS, and error routing
All these are critical for roles in cloud security, DevOps, and infrastructure automation.
What Was Already Set Up
From the previous project:
- A static website was hosted in an S3 bucket: javier-static-site-2025
- A CloudFront distribution was set up to serve the S3 content globally
This project extends that setup without duplicating it.
Step-by-Step Breakdown
Step 1: Purchase and Register the Domain
Domain javierlab.com was purchased via AWS Route 53
A public hosted zone was automatically created
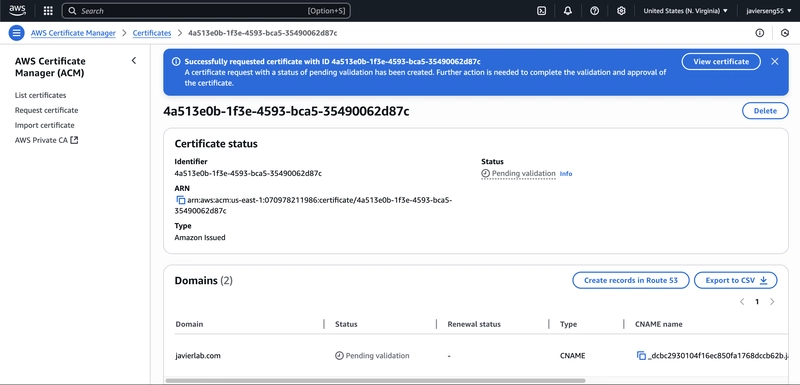
Step 2: Request SSL Certificate in ACM
Region used: us-east-1 (N. Virginia) (required for CloudFront SSL)
Added both javierlab.com and www.javierlab.com as domain names
Selected DNS validation (recommended for automation)


Step 3: Validate Domain Ownership
Used "Create records in Route 53" to automatically add the necessary CNAME records
Waited for AWS to validate the domain (takes a few minutes)
Step 4: Upload Custom 404 Error Page
Reused the existing S3 bucket (javier-static-site-2025)
Uploaded error.html with styling and a link back to the homepage

Step 5: Configure CloudFront to Use SSL and Serve Custom Errors
Attached the validated ACM certificate to the CloudFront distribution
Added alternate domain names:
- javierlab.com
- www.javierlab.com
Configured a custom error response:
HTTP error code: 404
Custom error page path: /error.html
Response code: 404
TTL: 10 seconds

Step 6: Set Up Route 53 Alias Records
Created A records to route traffic to CloudFront:
javierlab.com → CloudFront
www.javierlab.com → CloudFront


Step 7: Test the Setup
Opened https://javierlab.com and confirmed successful HTTPS delivery

Tested a non-existent page (/thispagedoesnotexist) and confirmed custom 404 handling

(Optional) Step: Redirect www.javierlab.com to javierlab.com using S3
To ensure consistent traffic routing and avoid duplicate content across subdomains, I configured a redirection bucket:
- Created an S3 bucket named www.javierlab.com
- Enabled static website hosting, but selected “Redirect requests”
- Target: javierlab.com
- Protocol: https

- Created an A record in Route 53 for www.javierlab.com
- Type: A – IPv4 address
- Alias: Yes → Targeted the S3 static website endpoint

This ensures all traffic going to www.javierlab.com is redirected cleanly to the root domain javierlab.com.
Final Thoughts
This project refined an existing S3+CloudFront deployment by layering on key production features: HTTPS, domain management, and UX-focused error handling. It’s a clear, job-ready demonstration of practical AWS architecture and hands-on cloud implementation. Perfect foundation for my next move: infrastructure-as-code with Terraform and CI/CD automation.
Stay tuned.

Top comments (0)