Hello world! In today's article, we're going to go into how you can automate onchain actions with rig-onchain-kit, Rig's companion crate in collaboration with listen-rs that lets you execute actions onchain. By the end of this article, we'll have a CLI tool that you can use to trade onchain with Kraken using natural language.
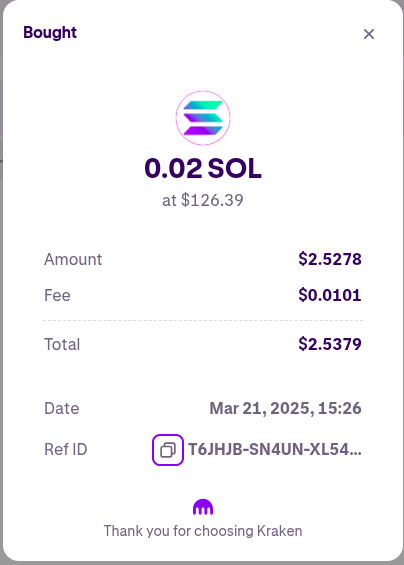
In the screenshot below, we simply ask the bot to buy 0.02 SOL from Kraken at current market price:
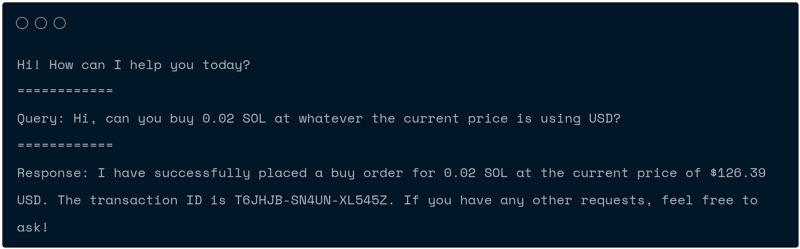
Of course, that's not the only thing we can showcase - here is the real transaction that we've done on Kraken!
Note that although rig-onchain-kit supports both Solana and EVM, we will be focusing on Solana as our onchain network.
Interested in just running the project? Check out the GitHub repo.
Getting started
Pre-requisites
To get started, you'll need a Solana wallet private key as well as a Solana RPC URL if you want to execute code related to transferring Solana to and from your wallet. You will also need to create your own Kraken API key and secret if you don't already have one.
You will also need an OpenAI API key.
Note that we will need to export all of these to environment variables:
export OPENAI_API_KEY=<openai-api-key>
export SOLANA_RPC_URL=<solana-rpc-url>
export SOLANA_PRIVATE_KEY=<solana-private-key>
export KRAKEN_API_KEY=<kraken-api-key>
export KRAKEN_API_SECRET=<kraken-api-secret>
Project creation
To create your project, let's start by using cargo init:
cargo init kraken-trading-cli
cd kraken-trading-cli
Next, let's add our dependencies. You can use the one-liner below to add everything:
cargo add rig-onchain-kit tokio rig-core@0.9 anyhow \
kraken_rest_client rig-tool-macro serde serde-json thiserror --features \
rig-onchain-kit/solana,tokio/macros,serde/derive
cargo add rig-onchain-kit --no-default-features
What did we just add?
-
rig-onchain-kit: The companion crate torigfor executing actions onchain. We enable thesolanafeature as well as enabling no default features, which gets rid of some unnecessary features (for our application). -
rig-core: The core crate for Rig. -
tokio: An async runtime for Rust. Themacrosfeature is enabled so we can use the#[tokio::main]macro. -
kraken_rest_client: The unofficial community Kraken Rust SDK, which interacts with Kraken's REST API. -
anyhow: A convenient error handling crate that can convert any error type intoanyhow::Error. -
rig-tool-macro: A macro crate for automatically generating tools from functions. Requiresserde-json,serdewith thederivefeature andthiserroradded as dependencies to work. -
serde: A de/serialization crate, with thederivefeature enabled for easy implementation. We don't use this crate directly but it is required byrig-tool-macroto work. -
serde-json: A crate for convertingserde::Deserializeandserde::Serializetypes to and from raw JSON. Required byrig-tool-macroto work. -
thiserror: A convenient error handling crate. Required byrig-tool-macroto work.
Building our project
So now that we're set up, let's dive into how you can build with the rig-onchain-kit crate. The crate itself already has a lot of tools which we'll be covering, but we'll also talk about how you can create your own tools and use them with the kit to make even more powerful AI agents!
Executing onchain actions with rig-onchain-kit
Executing actions onchain is quite simple. Using create_solana_agent creates an agent which has access to mostly every single tool that is already pre-existing in the crate (for the sake of simplicity). The signer context will then use an async closure to allow for scoped thread-local execution - see below for an example of swapping SOL to mocKJUP on Jupiter:
use rig_onchain_kit::agent::create_solana_agent;
use rig_onchain_kit::signer::SignerContext;
use rig_onchain_kit::signer::solana::LocalSolanaSigner;

#[tokio::main]
async fn main() -> anyhow::Result<()> {
    let private_key = std::env::var("SOLANA_PRIVATE_KEY")?;
    let signer = LocalSolanaSigner::new(private_key);

    SignerContext::with_signer(Arc::new(signer), async {
        let agent = create_solana_agent();
        let response = agent.prompt("Please swap $5 worth of SOL from my wallet to mockJUP on Jupiter")?);
        println!("{}", response);
    });

    Ok(())
}
Simply by adding your Solana private key as well as the URL of the RPC you want to use as environment variables, you can now swap $5 worth of Solana from your wallet to $mockJUP (Jupiter Swap's testing token) by simply using cargo run. That's pretty much it - nothing else required.
Authenticating on Kraken's REST API
Kraken's REST API by default requires a number of different variables to authenticate manually. Thankfully, the kraken_rest_client crate does this for us already and we just need to provide our API key and secret! Note that creating an API key and secret requires you to sign in to Kraken via Kraken Pro.
Before we start work, let's make a function for quickly spinning up our HTTP client which will be used in all of our related tools that we'll be creating:
fn create_kraken_client() -> kraken_rest_client::Client {
    let kraken_api_key = env::var("KRAKEN_API_KEY").expect("KRAKEN_API_KEY env var to exist");

    let kraken_api_secret = env::var("KRAKEN_API_SECRET").expect("KRAKEN_API_SECRET env var to exist");

    Client::new(
        &kraken_api_key,
        &kraken_api_secret
    )
}
Building your own tools for trading
By leveraging the #[tool] macro (from rig-tool-macro), we can generate tools that implement the rig::tool::Tool trait - which is important for us as we'll require that trait to be implemented for our types later on.
The first tool we'll make is a tool for price checking ticker pairs. The logic itself is relatively simple: just spin up a new Kraken client, then get a ticker and return the price.
#[tool(description = "
Attempts to check the price of a ticker pair on Kraken.

The ticker MUST be correct as this can lead to other tool calls you make being wrong if this is not right.

Input parameters:
- pair: The liquidity pair (for example: BTC to USD would be BTCUSD).
")]
async fn fetch_ticker_price_from_kraken(pair: String) -> Result<String, anyhow::Error> {
    let client = create_kraken_client();
    let res = client
        .get_ticker(&pair)
        // expire the order after an hour to prevent stale orders
        .send()
        .await
        .unwrap();

    // the response comes back as a HashMap<String, Ticker>
    // in this case we should simply iterate through the values
    // find the first value, then iterate on the inner array and find the first value - which is the current price
    let price = res.values().next().unwrap().a.iter().next().unwrap();

    Ok(price.to_string())
}
Next is the fun part: writing a tool to place buy orders! We need to explicitly tell the LLM that this function is dangerous and can lead to loss of funds if incorrect parameters have been set.
#[tool(description = "
Attempts to place a buy order for a token using the Kraken API given a token ticker, a volume and a price. The order will expire after one hour to ensure that the order doesn't go stale.

This function is dangerous, as it can lead to loss of funds if the price is incorrect. The price and volume MUST be correct as this can lead to a loss of funds.

Ensure you double check the address, the price & volume as well as the token ticker before you execute this function.

Input parameters:
- token_ticker: The token ticker.
- purchase_currency_ticker: The ticker of the token the user wants to make the purchase with.
- volume: How much of the token to buy.
- price: The price to buy the token at.
")]
async fn buy_token_from_kraken(
    token_ticker_to_buy: String,
    purchase_currency_ticker: String,
    volume: f64,
    price: f64,
) -> Result<String, anyhow::Error> {
    // .. some code here
}
Now we just need to implement the rest of our logic which means adding a limit order and then sending it and returning the . That's pretty much it.
use kraken_rest_client::{Client, PairName, OrderSide};
use std::env;

#[tool(description = "
Attempts to place a buy order for a token using the Kraken API given a token ticker, a volume and a price. The order will expire after one hour to ensure that the order doesn't go stale.

This function is dangerous, as it can lead to loss of funds if the price is incorrect. The public Solana key must be correct or the API call won't go through. The price and volume MUST be correct as this can lead to a loss of funds.

Ensure you double check the address, the price & volume as well as the token ticker before you execute this function.

Input parameters:
- token_ticker: The token ticker.
- purchase_currency_ticker: The ticker of the token the user wants to make the purchase with.
- volume: How much of the token to buy.
- price: The price to buy the token at.
")]
async fn buy_token_from_kraken(
    token_ticker_to_buy: String,
    purchase_currency_ticker: String,
    volume: f64,
    price: f64,
) -> Result<String, anyhow::Error> {
    let client = create_kraken_client();

    let pair = format!("{token_ticker_to_buy}{purchase_currency_ticker}");
    let resp = client
        .add_limit_order(
            &pair,
            OrderSide::Buy,
            volume.to_string().as_ref(),
            price.to_string().as_ref(),
        )
        // expire the order after an hour to prevent stale orders
        .expire_after(60 * 60)
        .userref(231421)
        .validate_only()
        .send()
        .await
        .unwrap();

    println!("{resp:?}");

    let txn_ids = if let Some(transactions) = resp.txid {
        transactions.join("\n")
    } else {
        "none".to_string()
    };

    Ok(format!(
        "Order successfully placed! Transactions IDs: {txn_ids}"
    ))
}
Note that the AddOrderRequest struct which gets generated from the add_limit_order request offers a validate_only() function. If you don't want to generate real buy orders, feel free to turn this on! An example of this can be found below:
    let resp = client
        .add_limit_order(
            &pair,
            OrderSide::Buy,
            volume.to_string().as_ref(),
            price.to_string().as_ref(),
        )
        .expire_after(60 * 60)
        .userref(231421)
        // we add it here before sending
        .validate_only()
        .send()
        .await
        .unwrap();
Note that the use of the Kraken API key means that the funds will be going into your Kraken account rather than your original Solana account. Thankfully, Kraken already has a method in their REST API to be able to withdraw funds to a pre-authorized wallet (so that you don't have to do this manually!) - let's have a look at the code:
use kraken_rest_client::{Client, PairName, OrderSide};
use std::env;

#[tool(description = "
Attempts to withdraw an asset from Kraken to a wallet that has been whitelisted on the given Kraken account. This method MUST be used if you are withdrawing from Kraken as due to being a centralized exchange, Kraken does not provide a private key for users to use.

Ensure you double check the key, the price & volume as well as the token ticker before you execute this function as the transaction won't go through (or will lead to loss of funds due to gas fees on the user's part).
")]
async fn withdraw_from_kraken(
    token_ticker: &str,
    wallet_key: &str,
    amount: &str,
) -> Result<(), Box<dyn std::error::Error>> {
    let client = create_kraken_client();

    let resp = client
    .withdraw_request(token_ticker, wallet_key, amount)
    // expire the order after an hour to prevent stale orders
    .send()
    .await?;
}
As you can see, pretty easy. This does however require that we have a pre-authorized wallet to withdraw to (with an associated key).
Integrating custom tools with your AI agent
Now that we've created some tools, let's add them to our agent. While create_solana_agent() does provide an agent with a variety of tools, we should ideally include as few tools as possible with our agent to prevent the LLM getting confused.
We also want to make our application competent: it should be fully capable of incorporating tool responses, as well as returning an answer from the LLM without the user needing to do anything.
Before we start, let's create a couple of helper methods. The first one will simply be a message that converts an ID and a content field into a UserContent::tool_result.
fn tool_result_from_text_response(id: impl Into<String>, content: String) -> UserContent {
    let content = OneOrMany::one(ToolResultContent::Text(content.into()));
    UserContent::tool_result(id, content)
}
The next function we'll implement is a function for converting a rig::message::Message into a String (ie, the text content that's within the message).
fn get_content_from_user_message(message: &Message) -> Result<String, anyhow::Error> {
    match message {
        Message::User { content } => match content.first() {
            UserContent::Text(text) => Ok(text.text),
            UserContent::ToolResult(ToolResult { content, .. }) => match content.first() {
                ToolResultContent::Text(text) => Ok(text.text),
                _ => Err(anyhow!(
                    "Expected text from tool result, got something else"
                )),
            },
            _ => {
                return Err(anyhow!(
                    "Expected text or a tool result, received something else"
                ));
            }
        },
        _ => Err(anyhow!(
            "Expected a user message, got an assistant message in prompt"
        )),
    }
}
The last helper function we'll write is a short function that simply returns tool definitions, using the prompt (and then returns a Vec<ToolDefinition> which we can use as part of our completion request):
async fn tool_definitions(message: &Message) -> Result<Vec<ToolDefinition>, anyhow::Error> {
    let prompt_as_string = get_content_from_user_message(&message)?;
    let buy_or_sell_token_on_kraken_tool = BuyOrSellTokenOnKraken
        .definition(prompt_as_string.clone())
        .await;
    let withdraw_from_kraken_tool = WithdrawFromKraken
        .definition(prompt_as_string.clone())
        .await;
    let transfer_sol_tool = TransferSol.definition(prompt_as_string.clone()).await;
    let fetch_ticker_price_from_kraken_tool = FetchTickerPriceFromKraken
        .definition(prompt_as_string.clone())
        .await;

    Ok(vec![
        buy_or_sell_token_on_kraken_tool,
        withdraw_from_kraken_tool,
        transfer_sol_tool,
        fetch_ticker_price_from_kraken_tool,
    ])
}
Now we can implement our response loop! This is a relatively long function, so buckle up. Here's what the function will do:
- Initialise a toolset
- Create a
CompletioRequestBuilderand fill it out with all required items including tool definitions, prompts and chat history. - Send the completion request.
- Match the latest message:
- If it's a text message, add prompt and assistant message to chat history then just return the text
- If it's a tool call, attempt to call the function (using the toolset we initialised)
- If the tool call results in an error, set the tool call error as the the prompt (explained below)
- If it was successful, push both the original prompt and assistant message to the chat history, then set the prompt as the tool call result (explained below)
When we're sending a completion request to the model, the tool prompt resolves to a message with the tool role. This allows us to continue the conversation without us explicitly having to send a prompt ourselves.
Now for the code! Let's begin by initialising our toolset and filling out the completion request, then sending it. Note that although the function does use generics, we don't need to specify what these are when we're actually calling this function as there is only one model we're using (the OpenAI one):
async fn call_until_response<M: CompletionModel>(
    mut prompt: Message,
    model: &M,
    preamble: &str,
    chat_history: &mut Vec<Message>,
) -> Result<String, anyhow::Error> {
    let toolset = ToolSet::builder()
        .static_tool(BuyOrSellTokenOnKraken)
        .static_tool(WithdrawFromKraken)
        .static_tool(FetchTickerPriceFromKraken)
        .static_tool(TransferSol)
        .build();

    let tool_defs = tool_definitions(&prompt).await?;
    let request = CompletionRequestBuilder::new(model.clone(), prompt.to_owned())
        .preamble(preamble.to_owned())
        .messages(chat_history.clone())
        .temperature(0.0)
        .max_tokens(1024)
        .tools(tool_defs)
        .build();

    // call model
    let resp = model.completion(request).await.unwrap();

    // rest of code goes down here!
}
Next, we need to match the response and see what type the response is. If it's text, return it; otherwise, try to execute the function. If the function fails, set the prompt to be the tool call result and recursively call the function again to get a string response and return the string. Otherwise, the variable assignment works as normal and we can continue.
// keep calling tools until we get human readable answer from the model
match resp.choice.first() {
    AssistantContent::Text(text) => {
        let text = text.text;
        chat_history.push(prompt.clone().into());
        chat_history.push(Message::assistant(&text));
        return Ok(text);
    }
    AssistantContent::ToolCall(tool_call) => {
        // Call the tool
        let tool_response = toolset
            .call(
                &tool_call.function.name,
                tool_call.function.arguments.to_string(),
            )
            .await;

        let tool_response = match tool_response {
            Ok(res) => res,
            Err(e) => {
                prompt = Message::User {
                    content: OneOrMany::one(UserContent::ToolResult(ToolResult {
                        id: tool_call.id.to_string(),
                        content: OneOrMany::one(ToolResultContent::Text(rig::message::Text {
                            text: e.to_string(),
                        })),
                    })),
                };
                let res =
                    call_until_response(prompt.clone(), model, preamble, chat_history).await?;
                return Ok(res);
                }
            };
        }
    }
}
Finally, we convert the text returned from the tool to a tool response message, then push the original prompt & assistant message to the chat history. We then (optionally) print the tool response message, as well as setting the "user" prompt to be the tool response message and then call the call_until_response function recursively to get our String result (and then return the String).
let tool_response_message =                tool_result_from_text_response(tool_call.id.clone(), tool_response);

let tool_call = OneOrMany::one(AssistantContent::ToolCall(tool_call));

// add tool call and response into chat history and continue the loop
chat_history.push(prompt.clone().into());
chat_history.push(Message::Assistant { content: tool_call });

println!("{tool_response_message:?}");

let tool_result_message = Message::User {
    content: OneOrMany::one(tool_response_message),
};

prompt = tool_result_message;

let res = call_until_response(prompt.clone(), model, preamble, chat_history).await?;

Ok(res)
Completing the loop
Finally, we need to adjust our main function so that we have a full application. Because we already created all of the previous code, we can keep our main function relatively short:
#[tokio::main]
async fn main() -> Result<(), anyhow::Error> {
    let preamble = format!(
        "You are a bot designed to assist users with trading on Kraken and withdrawing them to a pre-whitelisted wallet.
        Users may also ask you to send coins from their own wallet to a given Kraken deposit address.

        Note that when placing an order using the buy_or_sell_token_on_kraken tool call, no transaction IDs may be returned.
        If this is the case, remind the user to turn off 'validation only' as this is primarily for the cases of debugging."
    );

    let openai_client = rig::providers::openai::Client::from_env();
    let model = openai_client.completion_model("gpt-4o");

    let mut chat_history = Vec::new();

    let private_key =
        std::env::var("SOLANA_PRIVATE_KEY").expect("SOLANA_PRIVATE_KEY env var to exist");

    println!("Hi! How can I help you today?");
    loop {
        let prompt = take_user_input();

        let signer = LocalSolanaSigner::new(private_key.clone());
        let res = SignerContext::with_signer(Arc::new(signer), async {
            call_until_response(prompt.into(), &model, &preamble, &mut chat_history).await
        })
        .await?;

        println!("{res}");
    }
}
Now all we need to do is use cargo run and it'll just work!
Don't forget to set your environment variables from the Prerequisites section if you haven't already.
Finishing up
Thanks for reading! Hopefully after reading this article, you have a better understanding of how we can leverage the Rig Onchain Kit to build some really cool stuff.
For additional Rig resources and community engagement:
- Check out more examples in our gallery.
- Contribute or report issues on our GitHub.
- Join discussions in our Discord community!

Top comments (0)