In the first two parts of this series, we learned a lot about how Git stores your data. I believe that just knowing this information makes Git a lot less magic and easier to understand.
In this final part, we'll discuss some more practical examples of what happens when use certain Git features. Without knowledge on how Git works, understanding these tasks seems daunting, but with our new knowledge this should be no issue at all!
Cherry-picking
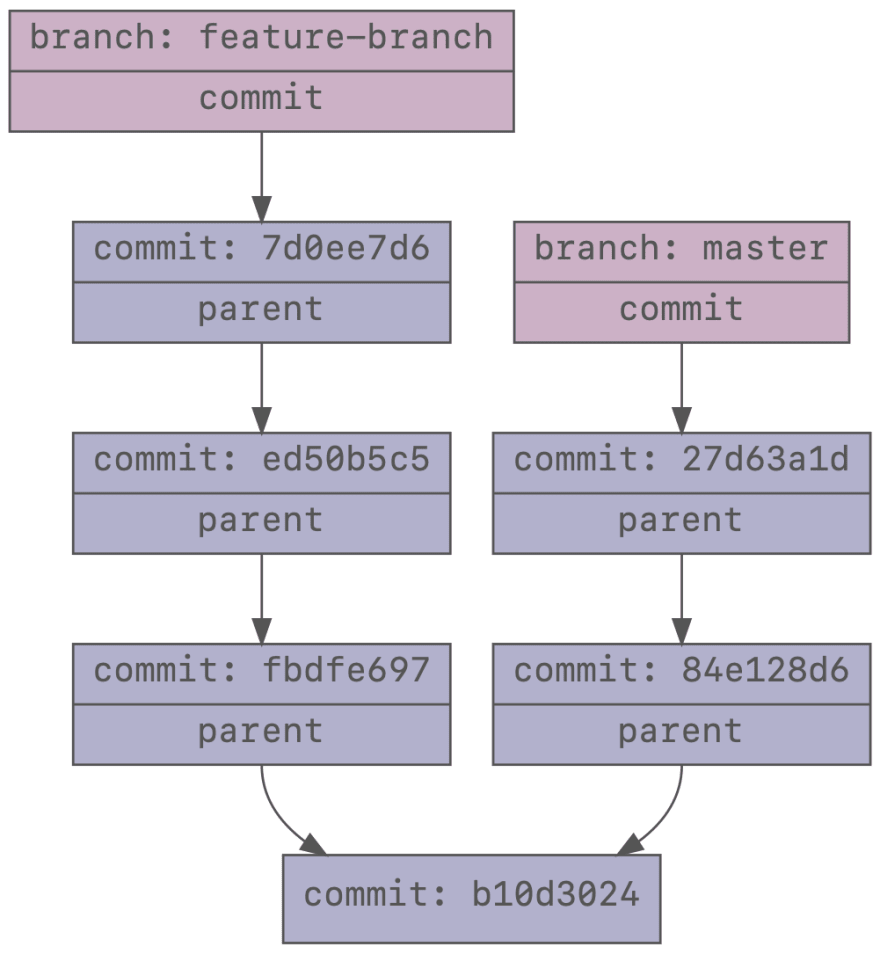
Cherry-picking is one of those things that feels a bit magic, but is quite simple once you understand what it does. First, let's start with when you would want to do cherry-picking. Say we have the following commit graph:

When we were developing a new feature on feature-branch, we found out there was a high priority bug. We fixed it in the second commit on that branch, ed50b5c5, but later we found out it also needs to be fixed in master as soon as possible. We could apply the fix by hand in master, but cherry-pick allows us to copy over the changes in this commit to master.
$ git cherry-pick ed50b5c5
git cherry-pick ed50b5c5
[master 27d63a1] Crucial bug fix
 Date: Mon May 6 14:50:24 2019 +0200
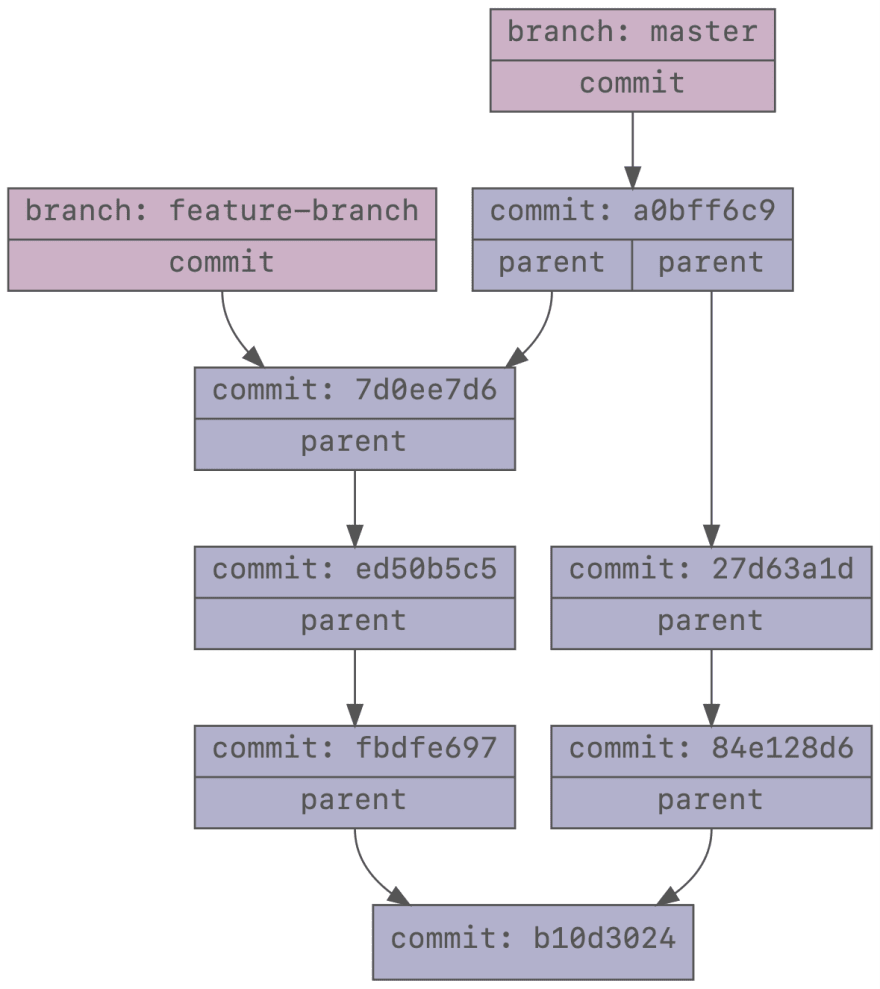
It has created a new commit with the sha 27d63a1. The parent of this commit is the original head of master and the master branch has moved to this new commit. Visually, it looks like this:
Note that while ed50b5c5 and 27d63a1d contain the same changes, but they are not the same commit. That would not be possible, since they represent a different state of the repository with a different tree. In 27d63a1d, the parent of ed50b5c5 is not present and vice versa. Also, they were committed at different time, with a different message, and possibly by a different person.
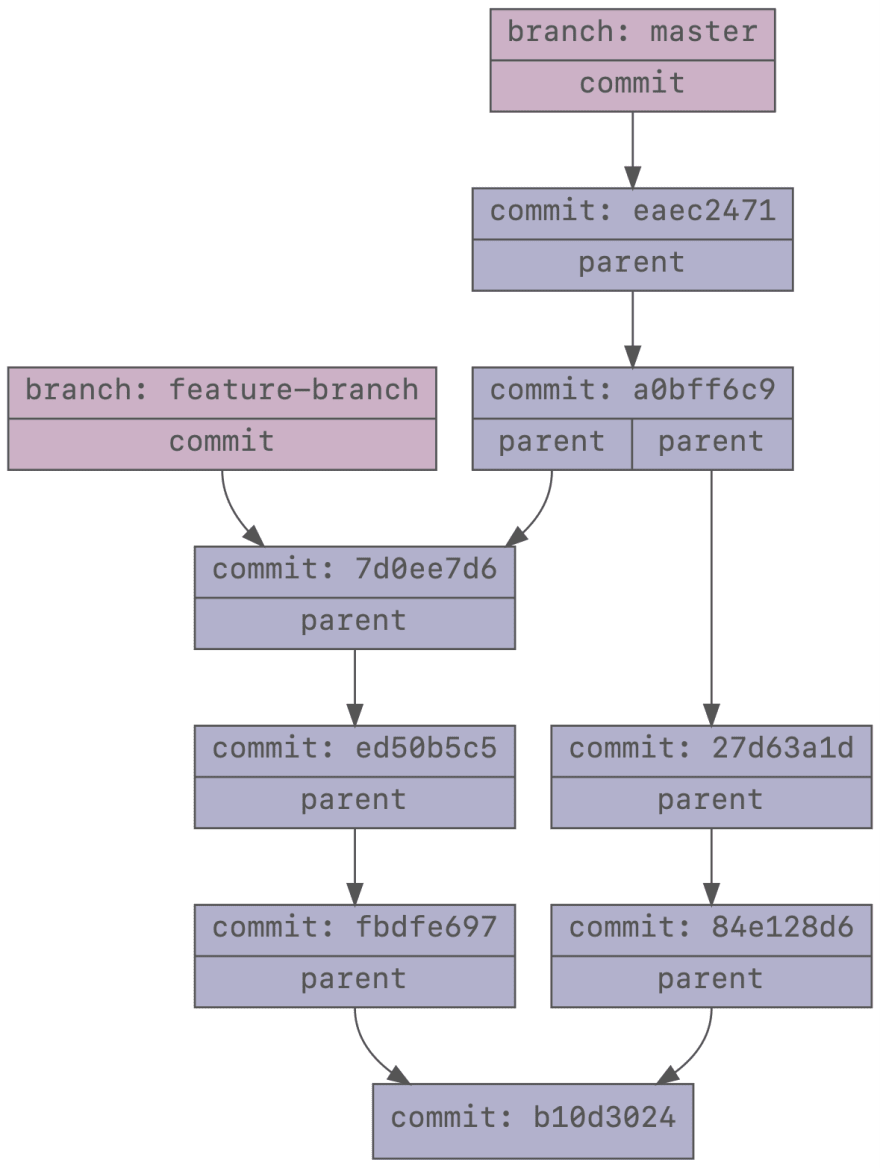
Later on, we decide that the new feature looks good and we want to merge it into master. Merging means that both the commits from feature-branch and the current master need to be present in the new master branch. This can be done with a merge commit:
Since ed50b5c5 and 27d63a1d are different commits, both will be part of this updated master branch, even though they do contain the same changes.
Fast forwards
Have you noticed when merging, sometimes Git will tell you it has done a fast forward? What is a fast forward exactly?
Luckily, the end state of the previous example is a perfect example of when a fast forward might happen. Merging two branches means that all commits present in both branches have to be reachable from the end result (the merge commit), via their parents. Normally, this is done by creating merge commit that has the heads1 of both branches as parents.
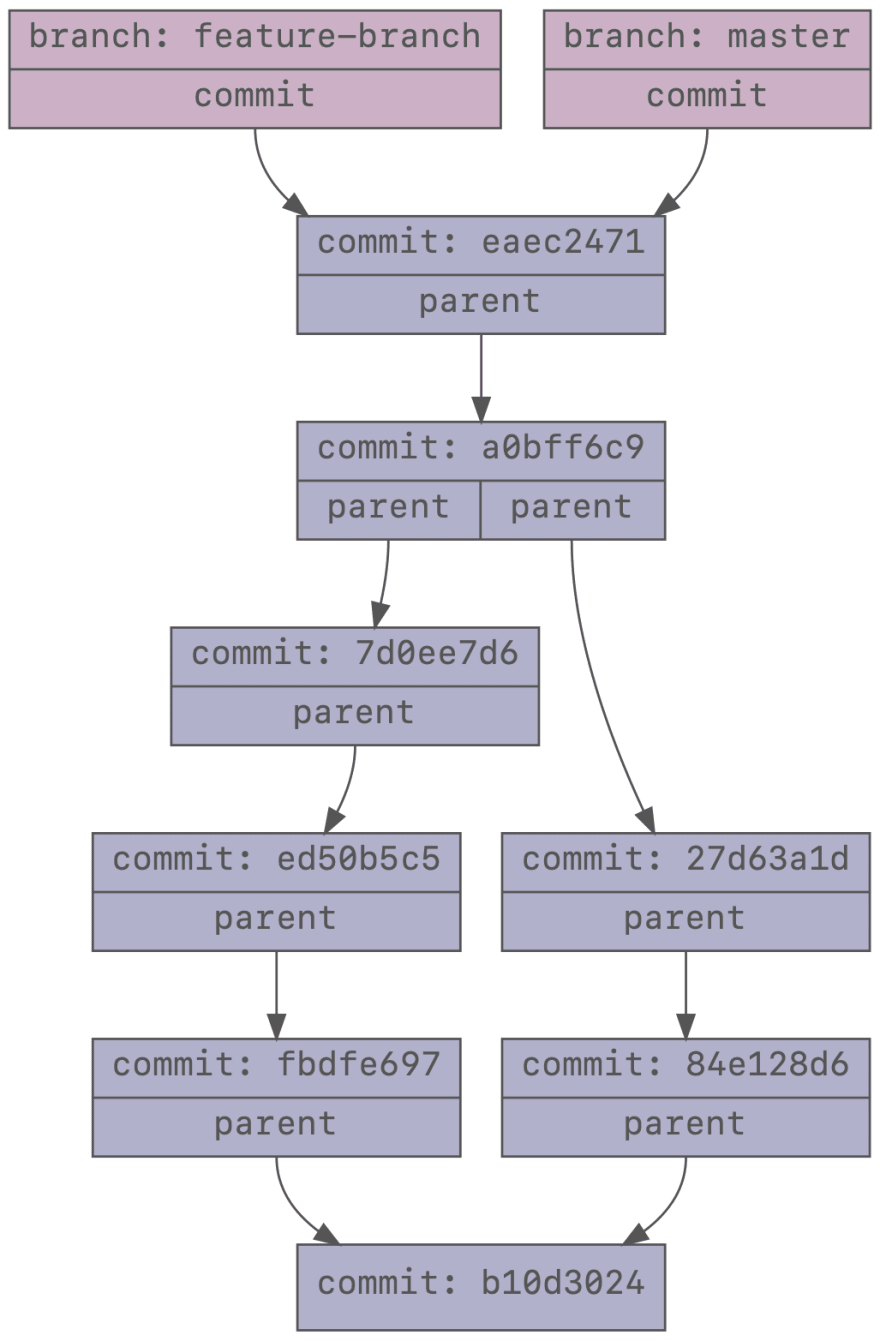
But sometimes this is not necessary. There might be a commit that satisfies this requirement already. Say we are happy with the feature developed on feature-branch, but there are some minor improvements we want to add. We want to continue on feature-branch. We would like to merge master into feature-branch first, since another commit has been created on master.
A merge commit with parents 7d0ee7d6 and eaec2471 satisfies the requirement that it includes all other commits, but actually commit eaec2471 also satisfies that requirement!
So just pointing feature-branch to commit eaec2471 does the trick. That is exactly what a fast-forward is:
$ git checkout feature-branch
$ git merge master
Updating 7d0ee7d..eaec2471
Fast-forward
This is the end result, no merge commit:
Sometimes you want to keep track of the fact that a merge has happened at a certain point in time, and a merge commit carries that information. If a fast forward occurs, you do not have that merge commit. If you want the merge commit anyway, just use the --no-ff option and a merge commit will always be created. Even when a fast forward is possible2.
Rebasing
Once you learn about the hammer that is called rebasing, everything looks like a nail. git rebase does lots of things and it is very useful. The main use of rebasing is changing the "base" of the branch.
This is an example of when you would use git rebase: say you were working on a feature on feature-branch. After a while, you have created two commits on feature-branch and this feature is done. You create a pull request to master. You start working on another feature and do a git checkout second-feature-branch and develop some more, adding two more commits. After a while, you realize you made a mistake. All changes related to the previous feature are also part of this branch. You should have created this new branch starting from master, but you started on feature-branch instead!
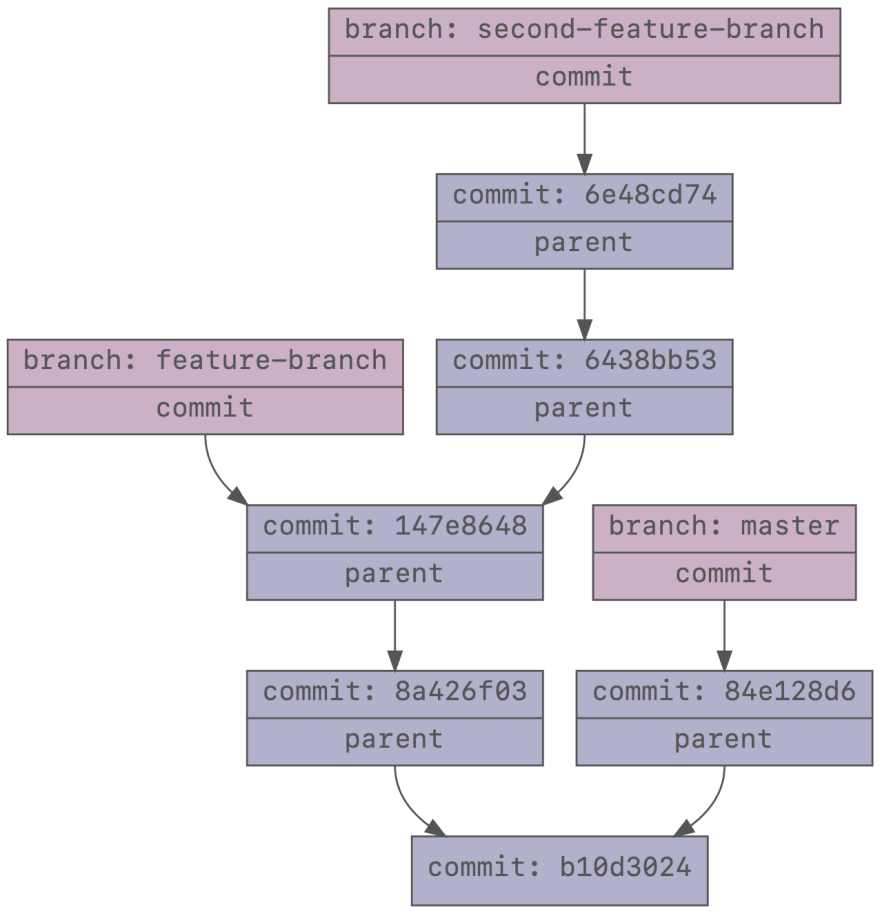
Now we want to change the base of second-feature-branch from feature-branch to master. This is how we do that:
$ # git rebase --onto <new-base> <old-base> <branch-to-rebase>
$ git rebase --onto master feature-branch second-feature-branch
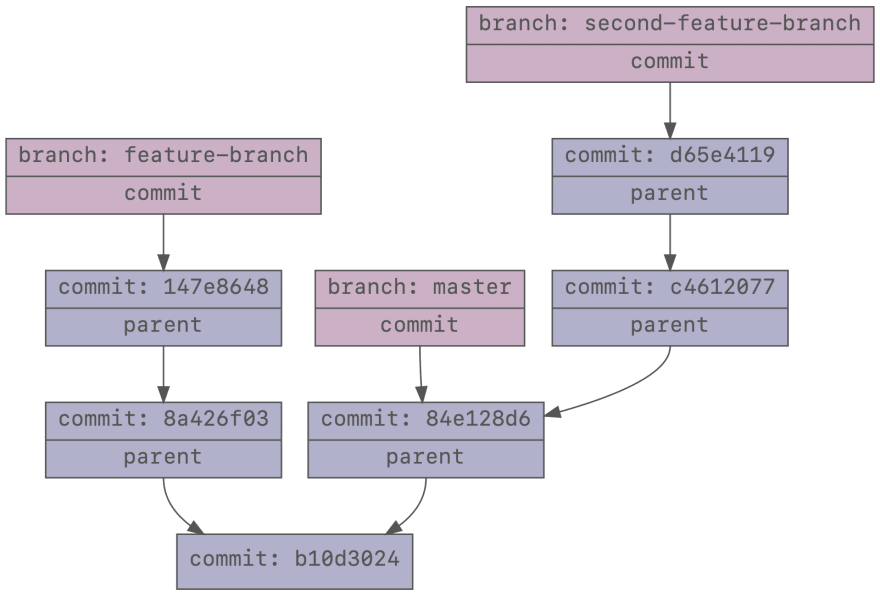
And the result is that we now have a clean second-feature-branch that no longer includes the commits that were part of feature-branch. It does include the latest changes on master now.
Rebase can do a lot more than just this. If you want to learn more about rebasing be sure to check out the man pages for git-rebase. Especially the --interactive flag can be very useful if you want to change the history of your commits. Just remember that changing history and then force pushing the results is often considered bad practice and can lead to issues for other people if they pull your changes. Please consult your team if they are ok with it before force pushing.
Resetting
Sometimes you make a mistake and you want to go back to where you came from. That is when git reset comes in handy, it can reset your repository to a certain state. First, let's distinguish between the three modes of resetting: hard, soft and mixed.
In the case of a hard reset, we can set the head of our current branch to a given commit. The file in .git/refs/heads is updated, our working directory is restored to what it was in that commit, as well as the staging area (where we git add files to is updated as well). This can for instance be convenient when you want to undo the last commit: git reset --hard head~3.
A soft reset also updates the current branch (i.e. the file in .git/refs/heads), but it does not touch your working directory or staging area. They will remain the same. This means that your staging area will contain changes compared to the commit that is your current head and you can immediately commit these changes withing git adding them first.
A mixed reset is somewhere in between, as the name suggests. It also updates the current branch and it resets your staging area, but it does not change your working directory. If you want to commit the changes, you will have to add them first.
The last two modes can be useful when you want to undo the last commit to add more changes, but you don't want to lose the changes you already made. Just use git reset --mixed head~ or git reset --soft head~, add your changes, and commit again.
If you ever mess up and you think you have lost a commit, don't worry. An object in the object store is not immediately deleted if your branch no longer references that object. Git keeps a history of everything that happens on every branch called the reflog. Use git reflog to see every change on the current branch. You can also use git reflog head if you want to see how your current head has changed, so that includes when checkout out an other branch for instance. See the man pages for git-reflog for more information.
Octopus merges 🐙
This final trick is something you will probably never use, but it is a very cool party trick to show to your friends! In the first blog post of this series, we learned that commits have zero or more parents. The first commit of a repository has no parents, a regular commit has a single parent, and most merge commits have two parents. But a commit can have more than two parents.
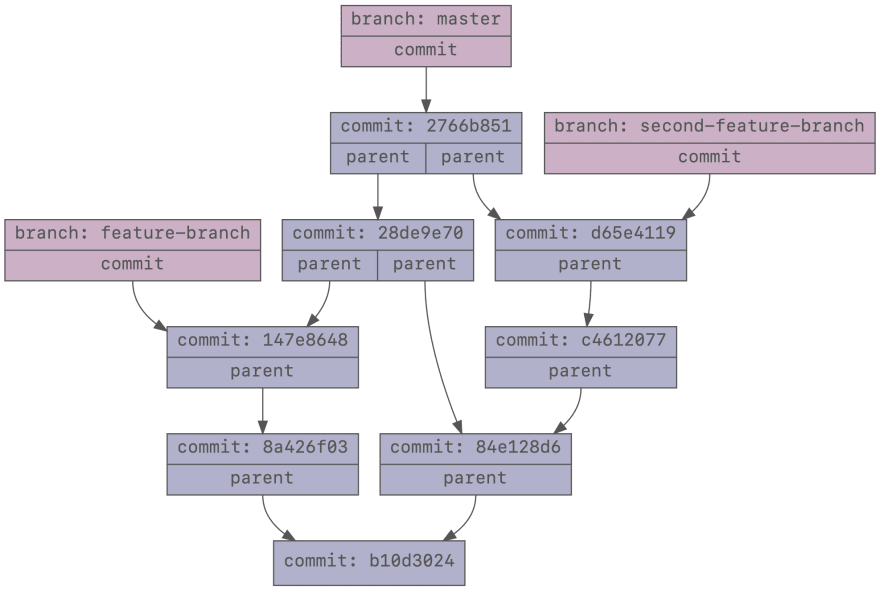
Say we want to merge both feature branches from the previous example:
$ git merge feature-branch
$ git merge second-feature-branch
The end result would have two new merge commits, both with two parents, on master:
We can actually merge both branches into master at once, meaning we only create a single merge commit. This is often referred as an octopus merge and this what it looks like:
$ git merge feature-branch second-feature-branch
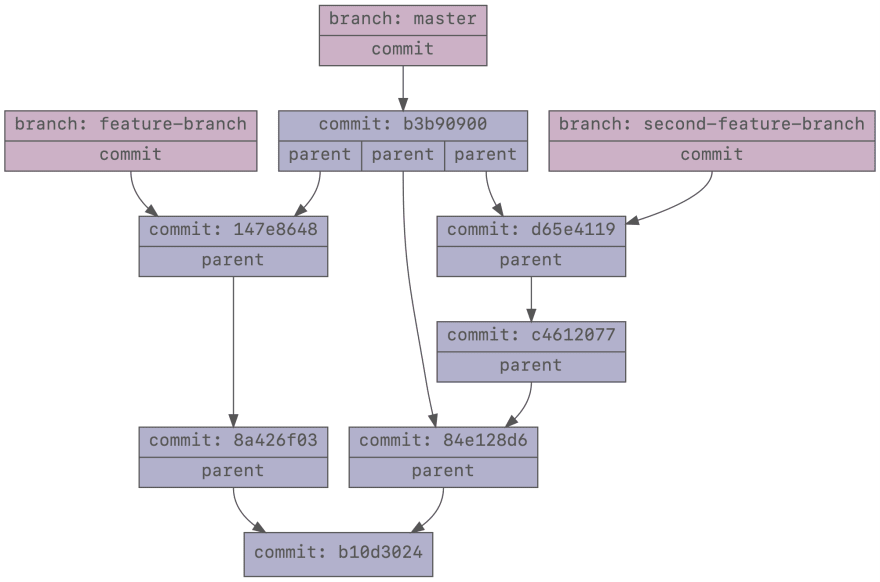
That single commit with three parents looks a lot cooler, right? Octopus merges are not often used in practice, they can become quite complicated if you merge a lot of branches.
The only repository that I know of that contains quite some octopus merges is the Linux kernel repository. This repository even has this monster octupus merge commit4 with 66 parents! 😵
Conclusion
This is the end of our adventure with Git. I hope you learned a lot about the internals of Git and I hope that, just like me, you feel a lot more comfortable using all the capabilities that Git has.
If you have any questions, suggestions or your own Git tips and tricks, feel free to leave them in the comments!
Further learning
There are some concepts that we did not look into in this series of blog posts. The most important one is the staging area or index. I can recommend a blog post called Git: Understanding the Index File for more information on the index.
Another interesting topic is how Git discards unused objects and compresses lots of objects into a packfile. The man pages for git-gc and git-pack-objects are a good starting point for learning about these topics. Your knowledge on the object database is very useful for understanding these topics.
In general, I can recommend looking at the man pages (e.g. man git-commit) when you want to know more about what a certain command does. Often it contains the information you are looking for, as well as a lot of interesting information that you would never learn about otherwise.
-
The head of a branch is the commit that the branch points to, i.e. the latest commit on the branch. ↩
-
There is also a
--ffflag. If you want a fast forward, you can use this flag and the merge will fail unless a fast forward is possible. ↩ -
headrefers to the last commit,~means the parent of that commit. Check out the man pages for git-rev-parse if you want to learn more about how you can specify revisions. ↩ -
Or as Linus Torvalds calls it, a Cthulhu merge. ↩


Top comments (0)