
For my Capstone project with Flatiron Bootcamp one of the requirements was learning a new technology. Since I have an affinity for backend data I wanted to take a stab at Django. While researching I noticed a lack of step-by-step guides and thought I'd write one!
To start off you will need to download django and pip(which is a package management system for django). If you are a Mac user, like myself, you will already have python installed. Make sure you have the most recent version of python before starting your project!
Additionally, you will need to install pip3. Run: install pip3.
Once you have confirmed you have the most recent version of python and pip, create a directory for your project. Once in your project, there are several commands you will need to execute.
You will need to first create a venv, which stands for virtual environment. This ensures that any changes made to your website won't affect other websites you're developing. You will want to create the venv with the most recent version of pip, pip3. Run: pip3 install virtualenv.

Once completed, I ran an additional code snippet to change the name python3 to just python in the venv. When running commands you must have python included prior to your command. You will see what I'm talking about later in this guide. Run: virtualenv --python=python3 venv.

After creating your venv and renaming python3 to python, you will need to activate your venv. When it's installed, it includes a bin folder that you need to activate. Run: source venv/bin/activate. Once activated, it should look like this, where it has (venv) before the command line:

Next, you will want to install Django in your venv. Run: pip install django.

Then install the django restframework:

Once these steps are completed, you can create your project folder. Run: django-admin startproject [your_project_name].

Your file structure should now look like this:

cd into your new project folder and rename the folder src:

cd into your src folder once it has been renamed.
WARNING/EDIT: If you are creating a Database with Users/Auth, you will need to do these steps, BEFORE migrating for the first time! If you have already gone too far, I will show how to remedy this in my Django Auth Blog.
Directly from Django Docs:
Due to limitations of Django’s dynamic dependency feature for swappable models, the model referenced by AUTH_USER_MODEL must be created in the first migration of its app (usually called 0001_initial); otherwise, you’ll have dependency issues.
You will need to put this in your Settings.py in your Project Folder. It should be AUTH_USER_MODEL = [your_app_name.user]:

Additionally, add this to your Models(You can customize further later on, I will be going into detail in my Django Auth installment):

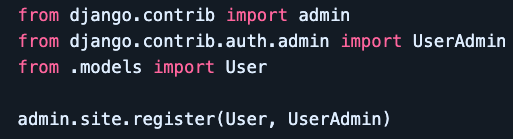
Then, you will need to register your user model in your Admin.py:
Ok...back to the standard set up....
Once you are in your project src folder, you will need to run: python manage.py migrate. This will migrate over all of the Django admin and user information that comes pre-packaged with Django!

Then, create a super user- this will be your admin information for you to access and change your backend data on the web browser. Run: python manage.py createsuperuser.

It will prompt for a user, email and password. The email is optional.Once completed the terminal will say: SuperUser created successfully.
To confirm, run: python manage.py runserver click on the localhost site provided in the terminal and login using the credentials you just made!

Finally, you can start your app! Run: python manage.py startapp [app_name]. This is where you will begin to use python manage.py at the beginning of each command you run.

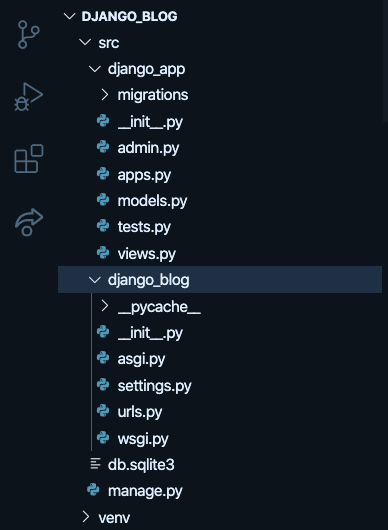
Your file structure should look like this:
Install cors headers using: pip install django-cors-headers.

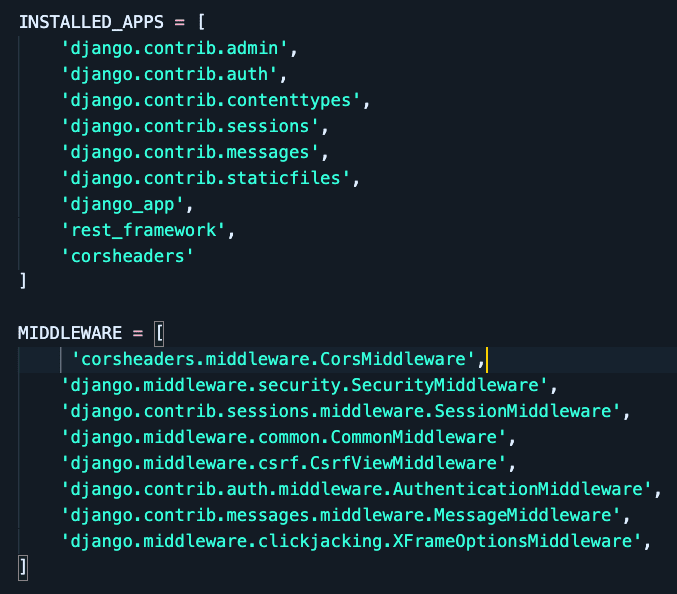
Once your app is created, be sure to add your app name, rest framework and cors headers to the list of installed apps in settings.py.
Include cors headers information in your middleware in settings.py:
Once that is completed the fundamentals of your django database are set up! This is part 1 of (at least) 2 blogs I will be creating to show how to set up and create your Django DB.
EDIT/TIP: You may want to name your app folder with additional clarification such as: [app_name_app]. In order to differentiate between the project and app folders. You will always need to run commands from your project folder in order to access the manage.py file, so it helps to have a distinction between the two!
Happy Coding!

Oldest comments (3)
Your Article is helful but instead of screenshot use markdown for code. Like -
It will look more clean.
Thank you so much! I was really struggling to figure out why other blogs code snippets looked different. I will use that for my next blog!
It's easy with backtick and also will be useful for the readers so they can easily copy codes.
check more information for python code in markdown:
python-markdown.github.io/extensio...