
We've made it! Now that your DB is set up(for the most part). I'm going to dive into Django Auth.
First, you will need to install rest framework simple jwt:

Next, you are going to make two directories for your seed.py file. These will need to be located in your app folder:

For now, that is all we will be doing with the seed.py.
You will need to include 'auth' in your admin(project folder) urls like this:

Next is Permissions classes, these essentially outline what data your end users can access. There are a few different permissions classes and I will go over the most popular ones:
If this is an at-home project/test environment, you may be interested in AllowAny (this basically alleviates all the permissions for a specific class).
ReadOnly allows for the user to access the data, but not change the information and IsAuthenticated allows the user to access and change the data, as long as they've been authenticated. There is the option to have ReadOnly and IsAuthenticated together, since you will want to authorize most of your end users and just allow them to view the data.
You can have a global permissions class listed in your settings.py and then have custom permissions in your views(maybe you want most models to have authentication, but a few classes to have no authentication)!
If you want default global permissions classes you add them in your settings.py like so:

Then, for custom permissions in your views, you will need to import permissions and include the permissions class in the specified model's view:

I chose AllowAny for mine, but use whatever works best for your project.
You will need to update your CORS permissions in settings.py, this will determine which sites are allowed to access your backend data.

Next you will want to add the Token and Refresh Views in the project folder in the urls.py file:

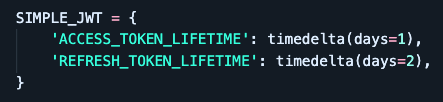
The TokenPairView brings in JWT and Refresh tokens, refresh is used if JWT is expired. That way, the user does not have to re-login. The JWT Token expires relatively quickly, in order to change the token lifetime you can update it in settings.py:
First, import timedelta at the top of your settings.py:

Then update this below in your settings.py file:
Once that is completed, you will want to start seeding data to confirm your permissions and auth tokens are working! My next blog will go into Admin View and checking Tokens in Postman.
If you are seeding from an external API, check out this great blog:
https://medium.com/@chilinski.a/how-to-seed-a-django-api-with-data-from-an-external-api-b577b6e6ad54
If you had followed this blog previously/did not create your User model first that points to the Django Auth. Follow these steps!
These next steps should ONLY be used if you are in the early development stages and NOT in production.
First, you will need to delete all your migration files in the migrations folder-- except the init__py and pycache folder.
Delete your dbsqlite3.
Re-run your migrations:

Thanks for reading!
Note: Throughout this process, it is a good idea to continually run your server to confirm that everything is working! It makes it much easier to debug, one at a time instead of having multiple errors once your are ready to run your server!
Additionally, pushing your Django Repo to Github-- be sure to encrypt your SECRET_KEY in your settings.py file in a .env file and then include the .env in your .gitignore file.
In order to access stored information in your .env file, you will need to install the python-decouple package and import it into your settings.py file.
To install:

To import:

updated SECRET_KEY:

Be on the look out for the next installment in this series where I will be creating a custom User model, using Admin View and Postman to check CRUD and auth tokens!
Happy Coding!

Top comments (0)