
Overview
Recently I had the opportunity to develop and integrate an SMTP Email Server into a more extensive full-stack application. Today we will reference the code from my solution for this tutorial.
We'll primarily be using Express and Node to create this server. We’ll also integrate Nodemailer to construct a mailable object and Gmail SMTP Server to deliver our emails free of charge.
The complete codebase can be viewed here:
 killshot13
/
express-smtp-mailer
killshot13
/
express-smtp-mailer
A production-ready Node backend with an Express SMTP mail server configurable for use with contact forms, subscriptions, etc.
Features
Before we start coding, we should quantify the expected functionality of our Express mail server. We can always refer back to this list later if confusion develops.
Establish API routes to a contact form on the frontend.
Receive user data from these routes upon form submission.
Format a mailable JSON object with the data received.
Construct a transport function with Nodemailer in preparation for delivery.
Obtain authorization from Gmail using credentials stored in the server.
Call the transport function, prompting Nodemailer to hand off the email object to the Gmail SMTP Server for delivery.
Request confirmation of successful delivery and return an error message if not received.
Upon completion, we will have the perfect backend for processing contact forms. Alternatively, our server will also provide a solid base to build a full-stack MERN app with plenty of functionality.
The production version of the server we are building today powers the backend of Ormica, a real estate investment firm in S. Florida.
Prerequisites
A basic understanding of fundamental programming concepts and familiarity with at least one server-side programming language such as [
Node,Python,Ruby,PHP].A code editor such as Visual Studio
Node.js and npm locally installed. (Current LTS version preferred)
Some developers, including myself, prefer to use nvm or nvm-windows to simplify Node version management, which is perfectly fine.
For further reference, you can check out also How To Use Multiple Node Versions With NVM On MacOS - Node Version Manager
Development
Part 1. Dependencies
The moment has arrived! Time to write some code.
Begin with these terminal commands to make an empty directory wherever you wish to store your server's local version and create the first file using npm.
    mkdir smtp-email-server
    cd smtp-email-server
    npm init
Follow the terminal prompts from npm to create a package.json file. In most cases, the default values will suffice, but be sure to change the entry point to server.js instead of the proposed index.js.
Now we need to add the required dependencies (npm packages) to our project. Run the following command and notice that npm automatically creates a new directory called node_modules. This is normal, so don't change or configure anything in this folder.
npm install express nodemailer morgan dotenv
Let's glance at a brief overview of each package.
Express is a minimal and flexible Node.js web application framework that provides a robust set of features.
Nodemailer is a module designed to allow Node.js applications to send emails securely and efficiently.
Morgan is named after Dexter (a show you should not watch until completion) and provides HTTP request logger middleware for Node.js.
dotenv is a zero-dependency module that loads environment variables from a
.envfile intoprocess.env.
Part 2. Routes
Let's begin by creating a routes folder containing routes.js.
mkdir routes && cd routes && touch routes.js
Open routes.js in your code editor and establish a baseline by requiring the dependencies at the top of the file.
    require("dotenv").config();
    // routes.js
    const router = require("express").Router();
    const path = require("path");
    const nodemailer = require("nodemailer");
As you can see, Express has its own built-in router. I have opted to use this option instead of a separate npm package. This helps keep our application lightweight and efficient.
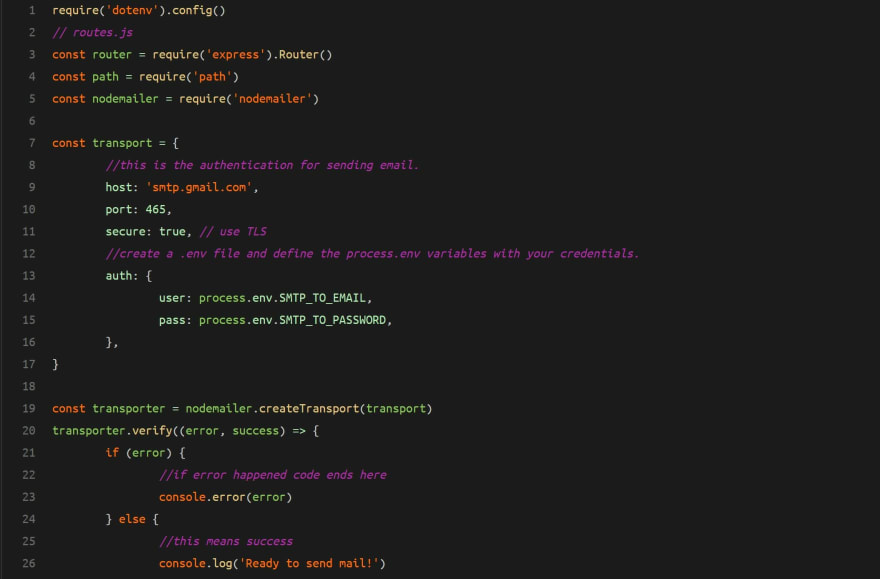
Our next order of work will involve setting up authentication using our Gmail account credentials. Don't forget to add the .env file in the root directory rather than our current location.
    const transport = {
        //this is the authentication for sending email.
        host: "smtp.gmail.com",
        port: 465,
        secure: true, // use TLS
        /* create a .env file and define your credentials. */
        auth: {
            user: process.env.SMTP_TO_EMAIL,
            pass: process.env.SMTP_TO_PASSWORD,
        },
     };
Remember the transport function we mentioned earlier? In this step, we will construct that same function. Let's have a look!
    // call the transport function
    const transporter = nodemailer.createTransport(transport);
    transporter.verify((error, success) => {
        if (error) {
            //if error happened code ends here
            console.error(error);
         } else {
            //this means success
            console.log("Ready to send mail!");
         }
    })
Now let's build the API routes. We will simultaneously define the schema for our JSON object (email).
In simple terms, we are telling Nodemailer about the form data it will be receiving from the front-end and how it should translate said data into a structured email.
Finally, we call the transporter.sendMail function, Nodemailer works its magic, and the email goes on its merry way to the recipient's inbox.
    router.get('/', (req, res, next) => {
        res.status(200).json({ msg: 'Working' })
    })
    router.post('/', (req, res, next) => {
        //make mailable object
        const mail = {
        from: process.env.SMTP_FROM_EMAIL,
        to: process.env.SMTP_TO_EMAIL,
        subject: 'New Contact Form Submission',
        text: `Contact Details:
                   Name: ${req.body.name}
                   Email: ${req.body.email}
                   Phone: ${req.body.tel}
                   Message: ${req.body.message}`
         }
         transporter.sendMail(mail, (err, data) => {
        if (err) {
            res.json({
                status: 'fail',
            })
            } else {
            res.json({
                status: 'success',
            })
        }
        })
    })
The last block of code in this file instructs Express to use the routes we have established; finally, we export the entire router to the Node server.
    // Answer API requests.
    router.use('/api', function (req, res) {
        res.set('Content-Type', 'application/json')
        res.send('{"message":"Hello from the custom server!"}')
    })
    /* All remaining requests return the React app, so it can
    handle routing. */
    router.use('*', function (request, response) {
        response.sendFile(path.resolve(__dirname, '/react-
        ui/build', 'index.html'))
    })
    module.exports = router
NOTE: If you are unfamiliar with
process.envor merely need a refresher, this Codeburst article provides a splendid reference point.

Part 3. Server
Let's create a server.js file in the root directory and open it with the editor.
Here we are just ensuring everything runs smoothly. I could write an entire article about each of the parameters defined here, but the template is pretty standard.
Let's start by defining some initial requirements.
    const express = require('express')
    const cluster = require('cluster')
    const numCPUs = require('os').cpus().length
Now we should check the environment to see if we are running in production. If so, we use a cluster of Node processes to distribute the stress of running the application as evenly as possible across the server cores.
    const isDev = process.env.NODE_ENV !== 'production'
    /* Multi-process to utilize all CPU cores. */
    if (!isDev && cluster.isMaster) {
        console.error(`Node cluster master ${process.pid} is running`)
         // Fork workers.
         for (let i = 0; i < numCPUs; i++) {
             cluster.fork()
         }
    cluster.on('exit', (worker, code, signal) => {
        console.error(`Node cluster worker ${worker.process.pid}
    exited: code ${code}, signal ${signal}`)
        })
    }
We will then connect to the frontend, priority serve our static HTML files, define some middleware for AJAX parsing, and finally call the routes we are importing from the routes.js file, all in that order.
We wrap it up with some error logging for the development environment, and voila! Our Express mail server is humming along.
     else {
    const app = express()
    const limiter = new rateLimit({
        windowMs: 1 * 60 * 1000, // 1 minute
        max: 5,
    })
    const morgan = require('morgan')
    const path = require('path')

    const PORT = process.env.PORT || 5000

    // apply rate limiter to all requests
    app.use(limiter)

    // Priority serve any static files.
    // Replace the example to connect to your frontend.
    app.use(express.static(path.join(__dirname,
        '/example/frontend.js')))

    // dev middleware
    app.use(morgan('dev'))

    // configure body parser for AJAX requests
    app.use(express.urlencoded({ extended: false }))
    app.use(express.json())

    const routes = require('./routes/routes')

    // after all middleware functions
    app.use('/', routes)

        app.listen(PORT, function () {
        console.error(
            `Node ${
                isDev ? 'dev server' : 'cluster
         worker ' + process.pid
            }: listening on port ${PORT}`
        )
    })
    }
SMTP Email Server is complete! Congratulations!
NOTE: If you encounter difficulty with the authentication process, read this Google Support documentation! It will save you hours of debugging and Excedrin.
 Michael R@killsh0t13
 Some well-hidden tips to keep in mind when setting up an SMTP server. I learned the hard way to do better research! 😅
support.google.com/accounts/answe…00:58 AM - 18 Jan 2021


Conclusion
We’ve successfully created an SMTP Email Server using Express and Node. We also learned how to integrate Nodemailer and Gmail to streamline the mailing process.
killshot13
/
express-smtp-mailer
A production-ready Node backend with an Express SMTP mail server configurable for use with contact forms, subscriptions, etc.
Feel free to clone the source code and explore your own methods of implementation. I hope you have found this tutorial useful, and thank you for taking the time to follow along!
Don't forget to 💖 this article and leave a 💭. If you're feeling extra generous, please click my name below to 🎆subscribe🎇!
-- killshot13


Top comments (5)
This implementation has several problems, first of all, it's not an SMTP server, instead it relies on Gmail SMTP server. Secondly, Gmail allows this only with a lowered security setting and even so it'll keep sending emails to check if you still want this behaviour, randomly blocking that account.
And the last one is nitpicking, but I'll mention anyway: it's better to have a service that can be scaled both vertically and horizontally, therefore you don't really need your own cluster implementation
@valeriavg I appreciate the constructive criticism, and I agree there is always room for improvement.
Sorry for any confusion regarding the usage of Gmail's built-in SMTP server; just so everyone is on the same page, this is not a fully self-sufficient application.
You are also correct that whatever Gmail account is used must employ lower security settings, so you would generally not want to use your personal email account.
For anyone wishing to use this application for a personal website, I recently updated the code to include support for ethereal.email accounts. These accounts are normally used for testing, but can also be used functionally to mitigate the security risk since the accounts are generated at random.
On the business side of things, anyone using Google Workspaces or a similar user management platform can easily generate a no-reply email endpoint based on their domain name and configure the permissions in their admin dashboard.
Hope this helps!
I would agree. Also, instead of using Gmail, hook it into the API of Amazon SES, Sendgrid, Mailgun, etc. Or, roll your own email sending server (yes, that is still possible 😎 ).
I will definitely look at expanding functionality to include various email services and update the code and this tutorial accordingly. Thank you for the feedback, @mrrcollins .
Good 🤗🌺