
Make a fully functional real estate app in minutes
Become the next Trulia, Zillow or Airbnb by releasing a real estate app for both iOS and Android in minutes. Download our functional React Native Real Estate app template, integrated with Firebase Backend, to literally launch your own app today. Crafted with extreme attention to details, this beautiful app template written in React Native represents the best way to jumpstart the development of your new mobile app.
This tutorial is part two of a project designed to help us build an AirBnB clone with React Native. Find part 1 here.
In this tutorial, we’re going to continue from where we left off in part one where we implemented the home screen UI for our AirBnB clone. Here, we’re going to create the login screen UI in the same project. So I highly recommended going through part one of the tutorial to get a better understanding of the overall React Native AirBnB clone project structure.
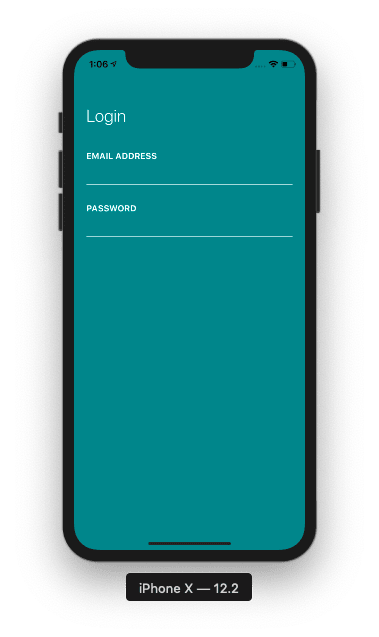
We’re just going to create a simple Login Screen clone of AirBnB as shown in the screenshot below:

So let’s get started!
Creating a Login Screen Component
First of all, we need to create a Login.js file in our screens folder. Then, we can get started with coding the Login.js component with the general starter code shown in the code snippet below:
Here, different React Native components and modules are imported from the package as well as a color CSS file for styling. The Text component with login is wrapped around the ScrollView and ViewComponents. Some styles are also added to the wrapper.
Next, we need to include Login.js in App.js by replacing the LoggedOut component. To do that, we need to first import the Login component and add it to our render function, as shown in the code snippet below:
As a result, we’ll see the following screen in our emulator:

Next, we need to bootstrap the screen wrapper with the KeyboardAvoidingView and ScrollView components to handle the form that makes the screen flexible with a virtual keyboard:
We also need to add some styles to our components:
We’re adding CSS styles to following components in the view:
- wrapper: A global wrapper that contains and integrates styles in all children components.
- scrollViewWrapper: Adding some margin to make space between the screen and device by integrating styles to scrollViewWrapper_._
- avoidView: Making space between the left, right, and top device borders by integrating styles to avoidView.
- loginHeader: Adding some font styles like weight, size, and color to the loginHeader component.
As a result, we get the following screen in the emulator:

The next revolution in mobile development? Machine learning. Don’t miss out on the latest from this emerging intersection. Sign up for weekly updates from our crew of mobile devs and machine learners.
Creating a Form Component
In this step, we’re going to create a form component to capture user credential entries in form fields. To do this, we’re going to create a form component inside the component folder. Then, we’re going to create a InputFiled.js file, bootstrap the form with simple components, and receive props and settings to the component, as shown in the code snippet below:
Next, we need to include the InputField component in our Login.js component by importing it, as shown below. Then, we need to place the InputField component after the form title:
Then, we get the following result in our emulator screen:

Now, we need to create a form to handle email and password entries. For this, we need to assign different variables to props and style:
First, we need to receive props in order to configure the form and set the default value:
Then, we use props that we receive to add them to the style, which makes for a more dynamic configuration of our form component. In the end, we export the InputField component.
Now, we go to Login.js and include InputField.js and assign our prop:
Now, we can see the result of our login screen UI below with form input fields:
Adding ‘Next’ Button
In this step, we are going to add a Next button for submitting form data. We need to create a file named NextArrowButton.js in our components/buttons directory and import all the packages shown in the code snippet below:
The highlight here is the vector icons, which we import to display the icon in the form input. The vector icons are imported as Icon from the Fontawesome package:
Here, we need to include a TouchableHighlight component that makes a button highly customizable, and then add Icon and attribute it for specifying the icon property.
Lastly, we need to manage and handle props using propTypes, as shown in the code snippet below:
For our stylesheet, we have a button container, button body, and icon with the following styling configuration:
Here, we need to include a color config in the component. And to use the vector icon angle properly, we need to put the icon at the center of the button.
Next, we need to import the NextArrowButton.js component in Login.js and then integrate the component outside the ScrollView component, wrapping it as shown below:
Here’s what this should look like now in our emulator screen:

Password Toggling
In this step, we’re going to add a password toggle button. We need to follow the design of the login screen component and complete the task to implement password toggling, i.e. show or don’t show the password characters in the password form field.
First, we need to open our InputField.js file and create a constructor and state:
We’ve named the state variable secureInput for toggling the form type between password to text or email, which reveals the true form of the password field.
In our render function — const { secureInput } = this.state—we need to define our constant from the state for use in the form.
In the form component, we need to add new TouchableOpacity and Text components to implement the show and hide text by getting state from secureInput_._ Then, we need to change this state by calling the toggleShowPassword function, as shown in the code snippet below:
And we need to remember to add styles to the two buttons we define for the TouchableOpacity and Text components:
Now we need to test to see if the password toggle is working or not. We can see the test being performed in the emulator simulation below:
As we can see, we got an error while trying to toggle the password between hiding and show. This is because we didn’t bind the new function to it. In order to solve this error, we need to bind the toggleShowPassword function, as highlighted in the code snippet below:
Let’s try the password toggle test again.

Finally, as we can see in the emulator simulation above, the password toggle is successful. This marks the end of this tutorial, as we’ve successfully cloned the AirBnB login screen UI using React Native.
Recap
In this tutorial, we learned how to implement the AirBnB login screen clone. We learned how to use props for creating a reusable component and how to construct a layout as well.
We also gained insight into how to implement password toggling. In the next part of this tutorial, we’re going to integrate login functionality with Firebase. You can get the overall code for this tutorial here.
Resource
AirBnb React Native Clone with Cubui
Looking for new ways to elevate your mobile app’s user experience? With Fritz, you can teach your apps to see, hear, sense, and think. Learn how and start building with a free account.
Editor’s Note:Join Heartbeat on Slack and follow us onTwitter andLinkedIn for all the latest content, news, and more in machine learning, mobile development, and where the two intersect.

Top comments (1)
Hi There,
Informative post! Thanks for sharing with us, Nowadays the Airbnb Clone is getting more famous among the online rental booking business industries. If you are in the search of best Airbnb clone scripts for your business venture, I would recommend you to try SpotnStay - The best Airbnb clone script. It will be well suits for all kind of rental booking business ventures. you can reach them, with your proper business plan, they will guide you technically.