Make a fully functional real estate app in minutes
Become the next Trulia, Zillow or Airbnb by releasing a real estate app for both iOS and Android in minutes. Download our functional React Native Real Estate app template, integrated with Firebase Backend, to literally launch your own app today. Crafted with extreme attention to details, this beautiful app template written in React Native represents the best way to jumpstart the development of your new mobile app.
Dynamic UI components with vector icons, props, and more
This tutorial is part one of a project designed to help us build an AirBnB clone with React Native.
To start things off, we’ll learn how to set up an Airbnb boilerplate clone using React Native and create a simple home screen UI. We all know what Airbnb is — a company that provides hospitality services in the form of traveling, booking various kinds of lodging and more.
Their services are used by millions of people worldwide. There website and apps are used widely for booking hotels, connecting with hosts, discovering locations with entire homes, etc.
In this tutorial, we’re just implementing a small part of their app UI — the home screen. We’ll cover the rest of the app’s interface and workings in upcoming tutorials.
Let’s get started!
Create a new project
We need to create a new react-native project named airbibcloneapp and run it on iOS using the following lines of code in our command line.
First, To initialize our React Native project, run the command:
react-native init airbnbcloneapp
Then, To run the project on iOS, run the command:
react-native run-ios
Construct the application structure
In terms of application structure, first, we need to create a source i.e. “src” folder containing all the app files. Inside it, we need to create components and containers. After that, we move on to the creation of screens and “img” and “style” folders for images and CSS styles.
Creating a color profile configuration
In this step, we need to create a color profile configuration for our clone app. First, we need to create a “color ” subfolder in the “style” folder and then create an “index.js ” file inside it. Then, we need to open the file and fill the color code to array keys as shown in the following code snippet:
Then, we need to add an image “airbnb-logo.png” file to the image folder, as shown in the screenshot below:

Bootstrap Home Screen
In this step, we begin implementing our home screen UI. In the “screen” folder, we need to create a “LoggedOut.js” component file, which is used for displaying a home screen when the user is in logout mode. We can do this by using the code in the following code snippet:
Then, we need to add the component to the “App.js” file as shown in the code snippet below:
Now, if we run the emulator for testing, we can see “Hello World” printed at top-left of the screen:

The next revolution in mobile development? Machine learning. Don’t miss out on the latest from this emerging intersection. Sign up for weekly updates from our crew of mobile devs and machine learners.
Change Background and Add a Logo Image
In this step, we need to include color configuration and add an Airbnb logo image to “LoggedOut.js” component. Then, we need to create a style for two wrappers main and welcome and also add style to the logo. We can implement all these by using the code in the following snippet:
Here, we have two components which are Logo image and Text that are wrapped by welcomeWrapper as we can see in the first section on the code snippet above. Then, we have a main wrapper that wraps all component on the page named wrapper.
Next, we need to add general styles following design to the component, for which we will use the styles in the code snippet below:
For wrapper: We add background color that changes the whole screen color.
For welcomeWrapper: We add margin and padding to handle the layout for two-component.
For Logo and welcomeText: Not too fancy. We just add general styles to make them look clean and nice.
Now, we need to save and reload the emulator. We’ll see the following result:

Adding Buttons
In this step, to follow up on the design, we need to add two buttons — Facebook login and a normal Register button. These two buttons share the same rounded style. Then we need to create a component name RoundedButton in the button folder inside components, as shown in the screenshot below:

Then, we need to open the “RoundedButton.js” file and use the code shown in the snippet below:
Here, we make use of the TouchableHighlight component imported from the react-native package, as shown in the code above.
Then we need to include this button component in our “LoggedOut.js” component by importing it:
As a result, we’ll get a button on our screen.
The result of our coding up until now is shown in the emulator screenshot below:

We can see that it works properly. So next, we need to style it back to RoundedButton and import prop-type and color configuration files, and we need to make a dynamic component using props.
We start by adding the PropTypes package to help control property values.
We can add this by using the following command:
Using Yarn:yarn add prop-types
And then run the command: reac-native run-ios again.
Next, we need to include it in the RoundedButton component as shown in the code snippet below:
First, we need to de-structure the prop value and use it in the Text component. Then we need to create a rule that will require a value when calling this component. We can implement this using the code snippet above.
After, the result in the emulator console will look like:

Here, when we do not assign a prop’s name text when calling the RoundedButton component, it will show the warning as seen in the above screenshot.
Next, we need to call the TouchableHighlight component to wrap the Text component in order to make it a button and add style, as shown below:
First, we need to import TouchableHighlight then extract text from props and use as Text for Button and add propTypes for control prop variable as shown in the code snippet above.
Secondly, we need to add general style to wrapper and buttonText as shown in the style code snippet above.
Now, we can see the following result in our simulator:

Next, we need to assign more props to configure our button style. We do this by using the following code snippet:
Here, we need to extract more props like textColor and backgroundColor that we pass from the parent component to make it similarly. These pieces of code are what’s been added to our previous file.
Now we need to pass an additional parameter from “LoggedOut.js”:
The result will look like this:

We need to add a default color to the textColor and backgroundColor CSS styles, as shown in the code snippet below:
Assigning Vector icons
In this step, we assign vector icons to our button, which is wrapped by our TouchableHighlight component.
We follow the design implementations and add a vector icon to a button using the following command:
Using NPM:
npm install react-native-vector-icons
Using yarn:
yarn add react-native-vector-icons
We can follow the instructions here to install this icons package. Then, we need to make sure that we re-run react-native run-ios again. Next, we add the icons to our buttons using the following code:
Here, we can see that we get an error in our emulator:

To solve this error, we add view tags wrapping our button and icon, as shown below:
Now we can see that our code works properly, and we get the following result in our emulator screenshot:

Our next step is to make the icon dynamic by using the prop again. We can implement this by using the code in the following snippet:
Then, we need to move all of our react-native-vector-icons code to the LoggedOut.js component, as shown in the code snippet below:
Next, we need to adjust the icon wrapper style:
And add some CSS styles:
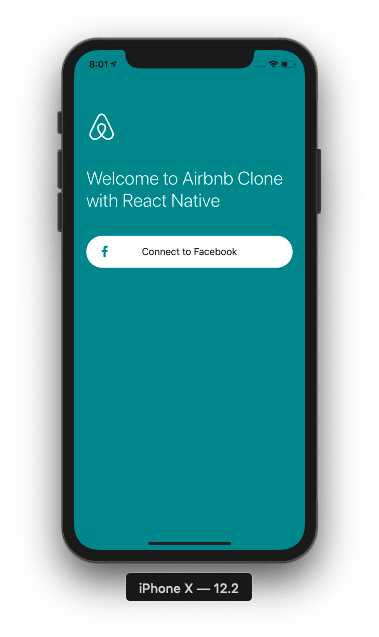
Then, we do the same for the Facebook button — we add the Facebook icon and then some CSS styles to it, as shown below:
And to edit the CSS style:
Now we can see the result of adding a Facebook icon to our button in the emulator screenshot below:
Creating an Account Button
In this step, we create an account button, much the same as we did with the Facebook button, using the RoundedButton component, as shown in the code snippet below:
\<RoundedButton text="Create Account" textColor={colors.white} /\>
The result of adding the “Create Account” button will look as follows:

Similarly, we need to add some CSS styles to this button as well. So we need to come back to Roundedbutton.js and add CSS style to a wrapper:
After reloading the emulator, we can see the following result:

Adding More Option Text
Lastly, we follow the design implementation of our home screen UI and add some more options using the Text component:
Here, we have a lot of Buttons that will link to multiple pages which we will add to the view screen later on.
Then, we need to add some CSS styles following design to those options to make it look cool clean using the following snippet:
We’ve successfully completed our implementation of the Airbnb clone home screen UI. The final result can be seen in the emulator screenshot below:

Recap
In this tutorial, we learned about how to bootstrap React Native UI with many components. We also learned how to set up and use vector icons to make our buttons look sleek. We also got an idea of “props ”in order to make dynamic components. Next, we implement a login screen that takes a lot of styling technique that you should follow in order to complete our Airbnb clone.
Resources
AirBnB Clone using React Native from Cubui
Looking for new ways to elevate your mobile app’s user experience? With Fritz, you can teach your apps to see, hear, sense, and think. Learn how and start building with a free account.
Editor’s Note:Join Heartbeat on Slack and follow us onTwitter andLinkedIn for the all the latest content, news, and more in machine learning, mobile development, and where the two intersect.

Top comments (0)