
Tic Tac Toe React
I created a Tic Tac Toe application in React. I think its perfect for starters who have little to no knowledge of React, but know their way around JavaScript.
Its a fun exercise and it teaches you to think about simple functions and how they convert into code.
Setup
If you have never used React before I'm going to take you through a quick crash course to get you setup. Its fairly straight forward and luckily their is a lot of documentation on it on the interwebs. You are going to need 3 things. These things being:
- Node.js - a backend framework for JavaScript
- NPM - A package management tool for Node.js
- Create-react-app - a bundle that will install a React application right on your PC
For the sake of keeping this article a little shorter, here is an article that will take you through the entire installation process.
https://www.liquidweb.com/kb/install-react-js-windows/
Tic Tac Toe
After running create-react-app in your terminal and seeing "happy hacking" we will start off with getting React cleaned up a little bit. It comes with a whole lot of build in stuff that we don't need for the purposes of this article.

We can start with removing the following files from our src/ folder. These are very useful when you are building bigger and more robust applications, but not necessary for tic tac toe.
Next we are going to create the file structure needed to create the application. As seen in the picture below we will be creating a components folder. This you can create inside of your code editor or inside of your terminal. Whatever works best for you. As a cheat sheet, you can create a new folder in git using mkdir <name of the folder>.

Then we will start adding all of our components as listed below:
- Board
- Endgame
- Game
- Login
- Navbar
Create all of the different JavaScript files and put them in the components folder. These components will become JavaScript classes. Because React utilizes Object Oriented Programming or OOP for short, most of its code will be written in classes.
Login
I wanted to create an opportunity for people to add their name to the page whenever they are playing together. I created a Modal with a form on it so users can add their names their.

If this is your first time using React you might be a little shocked by the syntax being used here. It kinda looks like a combination of HTML and JavaScript all mingled together.
That's kind of true, but not all the way. Its called JSX and its React's on language that processes HTML as JavaScript.
I've build a div that functions as a wrapper that basically is fixed in place and just uses an opaque color filter using rgba to function as my modal background.

here you can see the CSS for it. I used flexbox to center the children elements inside of the background. Its very easy to use and my preferred way to center items in CSS. the commands are as follows display: flex , jusitfy-content: center , align-items: center.
justify-content puts it in the center of the horizontal axis of the parent element while aling-items will center it on the vertical axis of the parent element.

Then I build the login window that basically just has a simple form and submit button. I used Bootstrap to style this part.

Now down to the functionality of the page. As you saw earlier the button and input fields had a function associated with it. On the input field it was onChange with a function of this.handleChange and the button had a onClick with a this.handleClick function. These are event handlers.
The handleChange function will keep track of the input given into the input field and saves it to the state. State is an object that we can use to store temporary data.
If you want to know more about React state check out this article
https://reactjs.org/docs/state-and-lifecycle.html
The handleClick function just grabs the information inside the state and sends it over to the next component. This is how we save and use the names given to the players.
Endgame
The Endgame component is a class very similar to the Login component. When the game ends it will show up as a Modal and show the victor of the game, or a tie whenever that happens in Tic Tac Toe.

As you can see I'm reusing some of the classNames in this file.
The wrapper and screen from the Login were reused for this component. This way I keep my code a lot cleaner and my application faster.
The state inside of endgame has a this.props.winner in it. This.props was also used inside the Login component. You might be wondering what this.props is.
It stands for properties. It is a piece of data shared down from a parent component. Whenever we import a component inside of our functions or components we can invoke it and give it properties. Which we can access and manipulate in the component. In this case the winner is being passed down from the App.js, and we send up a message saying to close the endgame modal to the App.js with this.props.endgame
Navbar
The Navbar component is basically accumulating all the info for the game.
Its gathering all the info from App.js.

I used some nice ES6 syntax to deconstruct the this.props. This way we can use the names without having to put this.props in front of every single one of them, making are code that much DRYer.
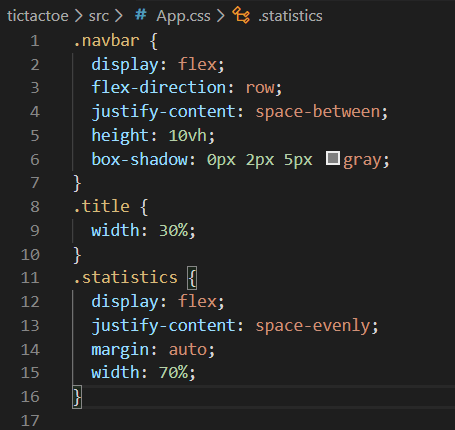
I've added the CSS code for the Navbar above. I used flexbox to position my elements the way I want to. It has some cool build in features like space-evenly or space-between. Its something to really play around with, which you can actually do right here.
Game
The Game component holds some of the game logic and functions as a wrapper for the Board.
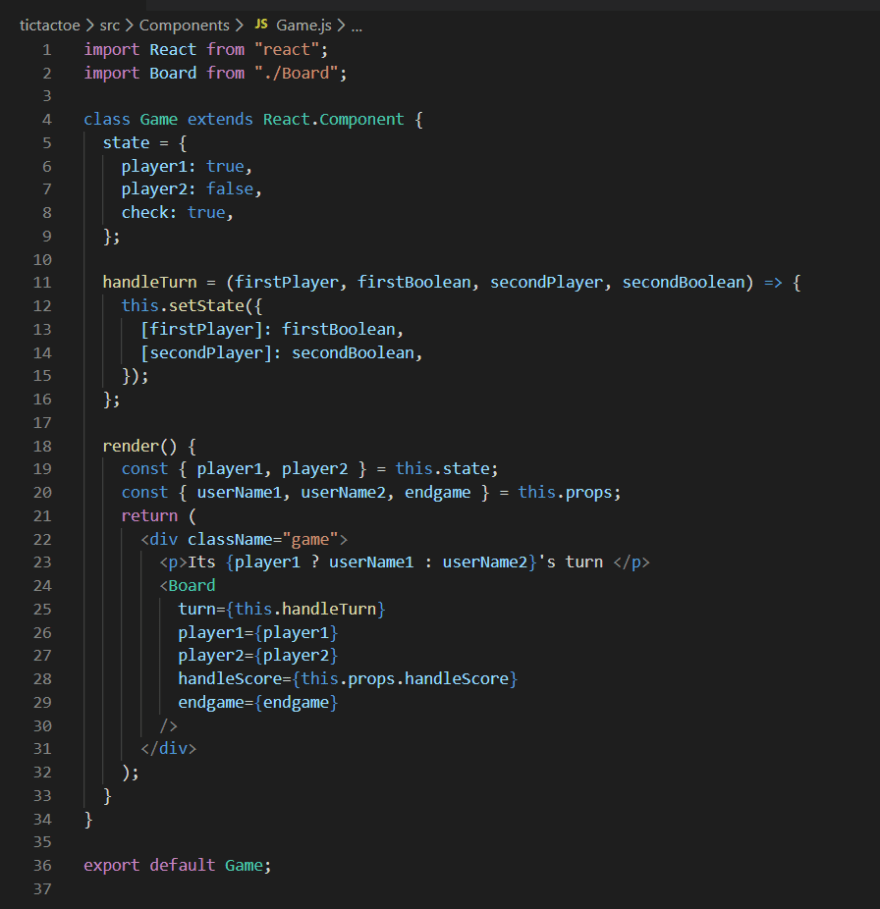
The logic keeps track of the players turn, it switches the players and send the score over to the App.js
I also added the CSS for this component below.

Board
This is the main logic of the game. I will break everything down for you in different sections.

The first part is the generating of the different tiles of the game. I decided that the easiest way to create the tiles was to utilize JavaScript's build in functionality, Map. Map is used a lot in React to generate elements from an array. I decided to use a for loop to create nine different tiles with the classNames passed into them.
The handleClick method sets off the game, it takes in the current player and sets either an X or an O inside of the tile that was clicked. This is done with a nested function called play

As explained in the top part this function checks the player and then sets an X or an O in the tile. it will also remove className so that when we click it again it doesn't add another X or O to the tile. After adding either the X or O this function will also check the diagonals, columns and rows to see if their is a winner.
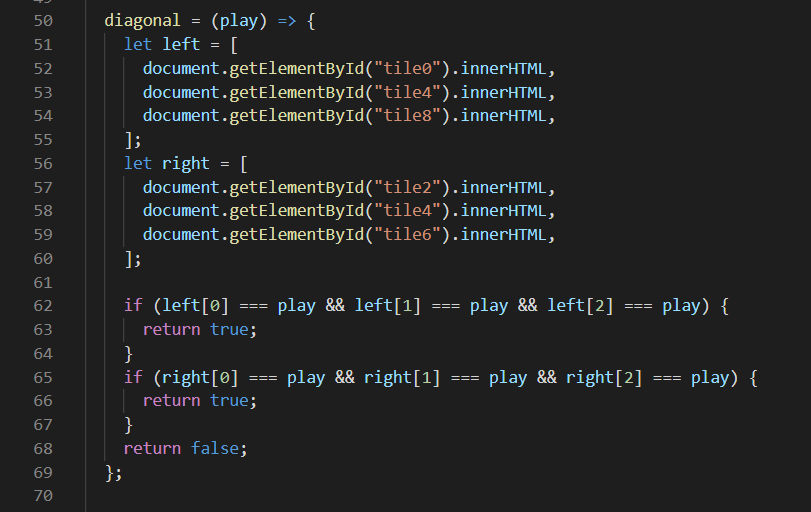
Using the Map functionality I gave all the tiles an id so I could seperate them more easily. Now I'm checking left diagonal and right diagonal whether they are all O or X.

Basically the same logic as the diagonal except now I'm taking in the rows

Basically the same logic as the rows except now I'm taking in the columns

I created a Reset function that resets all of the game scores when somebody has won or the game is tied. The return statement underneath pops out the map functionality on generateTiles.


The CSS for this page I did with the use of the different id's of the tiles and giving them borders. Sizing them up to their container so they would be squished together nice and neat.
App.js
Now for the final part of this application. I turned the App.js function into a class. The reason being is that I want it to be able to transfer data to all the different parts of the application.

First we start with importing all the different components, so we can render them and send them the needed information.
The state will hold the names of the players and the player scores. It also has a boolean on whether or not to show the login or endgame component.
The handleScore sets the winner for the endgame component so that we see the correct winner. It gets send over the information from the Board component using props.

The handleName function sets the names put into the form at the Login component into state, which is shared with Navbar so it can show the correct names. By default they are set to Player 1 and Player 2.
the handleEndGame function sets the endgame boolean to true or false depending if we want to show it (after the game) or not show it (after clicking "go again" on the endgame component).
The render function deconstructs the state. That way its less writing inside the return function

I've build a ternary statement for the endgame and login functionality, meaning that they will only show if the state boolean is set to true.
We render the Navbar and pass all the info to it.
The same goes for the Game component.
Afterword
I hope this tutorial will help you build your portfolio and teaches you how to create react applications.
I have mine deployed on heroku which you can check out here:
http://lucstictactoe.herokuapp.com/
If you like this article, please leave a comment.
If you ever want to build something together with me, leave me a comment and we can connect.
Hope you enjoyed reading this, because I enjoyed writing it for you.

Oldest comments (3)
how to change the color of the 'X','O'
The X and O are basically just strings inside of the tile class so you can change the font color on that. Or set it inline by using style
Hey, there is some CSS missing regarding board and tiles. Please reply those to my comment. I am not able to position my tiles right.