This post has been originally posted on Getform Blog.
Middleman is a static site generator using all the shortcuts and tools in modern web development. Middleman uses Ruby similar to another popular static site generator Jekyll, offering a pretty extensive set of features to build cool stuff.
Whereas Jekyll was born of the desire for a simple, static blogging engine, Middleman was built as a framework for more advanced marketing and documentation websites. It’s a powerful tool and fast to pick up if you’re coming from the world of Rails
But contact forms are a challenge in Middleman
Static site generators like Middleman are super fast and performant. However, there is one place they all fall short: form backends. Since there's no actual backend, there's no place to route your form submission data. That's where form builder and form backend platforms like Getform comes in.
In this article, we will walk you through the simple Middleman website setup, adding a working contact form powered by Getform's powerful form backend platform.
How to make a Middleman contact form using Getform and deploy it using Vercel
1- Login to your Getform account
The first step is to log in to your Getform account. If you don't have an account, sign up to Getform, it is super easy and free to get started. You don't need to provide any credit card info to create an account.
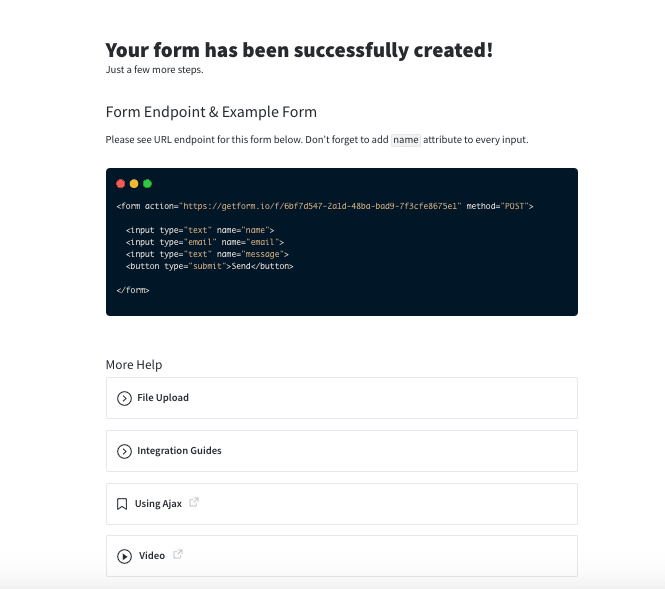
2- Create a new form on Getform
After you log in to your Getform account, click to the "+" button on your dashboard to create a new form, then name it e.g. "Contact Form for Middleman Site" and save it. With that form created, your unique form endpoint is now ready to be inserted into your Middleman contact form.
Your endpoint will be shown to you after your form is created as follows:
3- Getting Started with Middleman
We are going to be following the MacOS installation but if you are using Windows, you can follow the guide here.
To prepare and build your Middleman website, first step is to install XCode Command Line Tools. Xcode can be installed from the terminal:
$ xcode-select --install
Once you have Ruby and RubyGems up and running, execute the following from the command line:
$ gem install middleman
This will install Middleman, its dependencies and the command-line tools for using Middleman.
To start a new site on middleman, you can run the following command:
$ middleman init
builds a Middleman skeleton project in the current folder.
$ middleman init my-middleman-site
creates a subfolder my_middleman_site with the Middleman skeleton project. That's the option we will be using. After we run that,
cd my-middleman-site to open folder and run the following command to start a local dev server:
$ bundle exec middleman server
Middleman will start a development environment accessible by default at localhost:4567 which will look like as follows:

4- Add a contact page to your Middleman site
Now, we have our Middleman site running and welcomes us with "Middleman is Running" message on the homepage.
This homepage is represented by the source/index.html.erb. Middleman uses a file-based routing system. For example, source/contact.html.erb will be mywebsite.com/contact.html/.
Let's create our contact page.
- Create a new file called contact.html.erb under
sourcedirectory. - Change its content with the following code block, the contact form itself will be HTML, which will work fine.
- Don't forget to change the
actionpart of your<form>tag in your contact.html.erb file, update it with the form endpoint URL you copied in step 2.
<h1>Contact Us</h1>
      <div>
        <a target="_blank" href="https://getform.io">
        <img src='https://getform.io/_nuxt/img/095d0b3.svg'>
        </a>
        <br>
        <a target="_blank" href="https://getform.io?ref=gridsome-blog" class="mt-3 d-flex">Getform.io | Get your free endpoint now</a>
        <h2>Getform.io - Middleman Contact Form Example</h2>
            <form accept-charset="UTF-8" action="https://getform.io/f/{YOUR_UNIQUE_FORM_ENDPOINT}" enctype="multipart/form-data" method="POST"  target="_blank">
                <div>
                    <label>Full Name</label>
                    <div>
                        <input style="margin-top: 5px; background-color: #fff; height:35px; width:235px; text-indent: 5px; border-radius:5px;"
                        type="text" name="first_name" placeholder="Enter your name and surname" required="required">
                    </div>
                </div>
                <br>
                <div>
                    <label>Email address</label>
                    <div>
                        <input style="margin-top: 5px;background-color: #fff; height:35px; width:235px; text-indent: 5px; border-radius:5px;"
                        type="email" name="email" placeholder="Enter your email address" required="required">
                    </div>
                </div>
                <br>
                <div>
                    <label for="favourite-platform">Favourite Static Site Generator</label>
                    <div>
                        <select style="margin-top: 5px; background-color: #fff; height:40px; width:245px; text-indent: 5px; border-radius:5px;"
                        class="form-control" id="favourite-platform" name="platform" required="required">
                        <option>Middleman</option>
                        <option>Jekyll</option>
                        <option>Vuepress</option>
                        </select>
                    </div>
                </div>
                <div style="margin-top: 15px;">
                    <label >Upload a file:</label>
                    <input style="margin-left: 5px" type="file" name="file" required="required">
                </div>
                <br>
                <input type="hidden" name="utf8" value="✓">
                <button style="font-size:14px; background-color:#6b7ddf; color:#fff; font-weight:bold; padding:10px 35px; margin: 5px 0 0 0;
                    border: 1px solid; border-radius: 5px;"
                    type="submit">SUBMIT</button>
            </form>
        </div>
Sample form endpoint: [https://getform.io/{YOUR_UNIQUE_FORM_ENDPOINT}](https://getform.io/%7BYOUR_UNIQUE_FORM_ENDPOINT%7D)
- run
bundle exec middleman serverand go tolocalhost:4567/contact.html/. Here is how your contact page looks like:
5- Test your form on your Middleman site by submitting a sample form submission!
Our contact page is ready to receive submissions now. Let's fill out the fields and press submit.

That's it! Your Middleman site is now using Getform for handling form backend and it shows us the submission details as in the image above. File upload previews are another nice thing of Getform and supported for most of the common file types such as png, pdf, jpeg and so on.
After you finish setting things up, you can also set up an email notification from form settings, use the Zapier integration to send your form submission data to 1000s of other applications and keep your form submissions spam protected by using reCaptcha integration. If you are willing to go for more advanced integrations, you can use Getform Submission API to integrate your form to any custom applications.
You can find the source code of this tutorial below. Optionally, you can use the boilerplate code to get started and even deploy this sample to a working website within couple of minutes using Vercel or Netlify.
 getform
/
getform-middleman-example
getform
/
getform-middleman-example
Sample Middleman website creation using Getform and Vercel
Thank you for reading and let me know your thoughts through the comments!

Top comments (0)