Overview of this Hands-on Workshop
The generative AI boom shows no signs of slowing down, but many of you may have already experimented enough with RAG systems. The next trend appears to be "AI agents" that can automatically complete tasks on behalf of humans.
https://xtech.nikkei.com/atcl/nxt/column/18/00001/09497/
AWS cloud's generative AI service "Amazon Bedrock" includes a managed service called "Agents for Amazon Bedrock" that makes it easy to create such agents.
With this service, you can create intelligent agents just by clicking through the AWS Management Console GUI, without having to write extensive Python code.
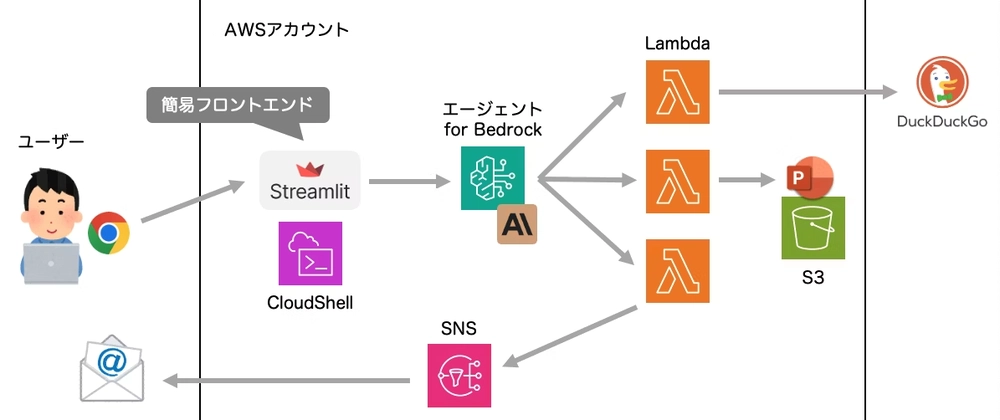
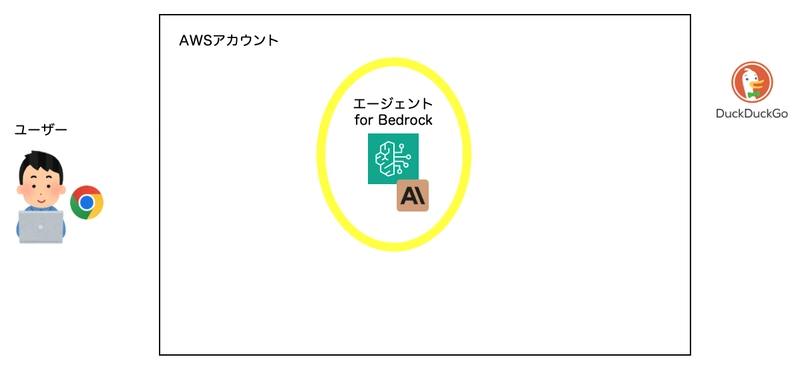
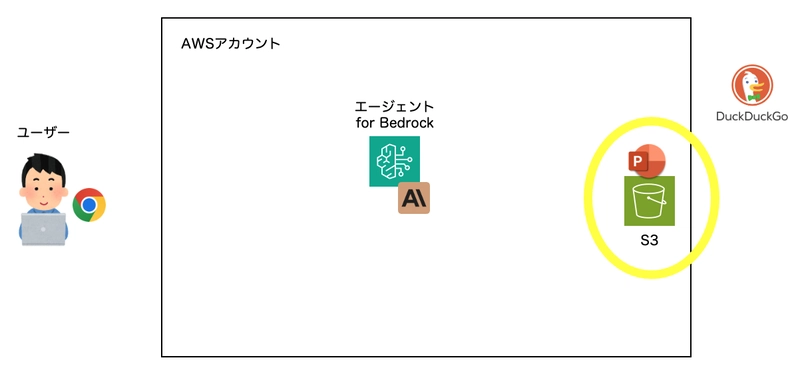
The Application We'll Build
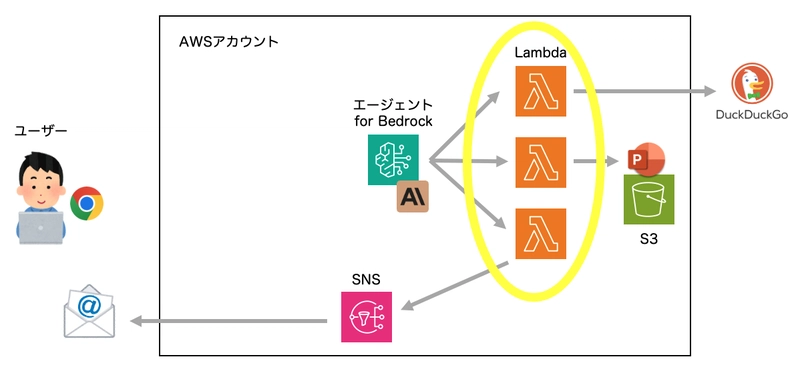
When a user requests "create a document about xxx," the agent will:
- Perform web searches to gather information
- Create a PowerPoint presentation and store it in S3, generating a signed URL
- Send the URL to the user via email
The process happens automatically. If there are any questions, the agent will ask the user for clarification, and the AI will flexibly adjust the next actions based on the results of each step (for example, if email delivery fails, it will display the results on the chat screen).
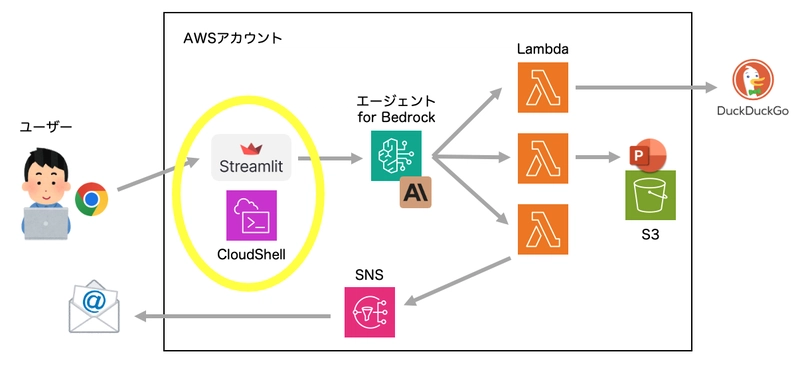
Architecture
We were previously using DuckDuckGo for web searches as it didn't require an API key, but due to recent rate limiting issues, we've updated the instructions to use Tavily instead.
Although not included in this workshop, you can also combine this with the "Knowledge Base" feature to implement RAG for searching internal company documents.
What is Bedrock?
It's an AWS service that allows you to use various AI models as APIs in a serverless manner.
For those interested, I've prepared an overview document:
https://speakerdeck.com/minorun365/awsnosheng-cheng-aisabisu-amazon-bedrockru-men-2025nian-1yue-ban
Hands-on Instructions
You can complete this workshop with just a web browser.
Since everything is built using serverless architecture, the cost should be minimal.
1. Create an AWS Account
Create a new AWS account by following the instructions at:
https://aws.amazon.com/jp/register-flow/
After creating your account, sign in to the AWS Management Console using the URL below:
Once signed in, switch your region to "Oregon" in the top right.
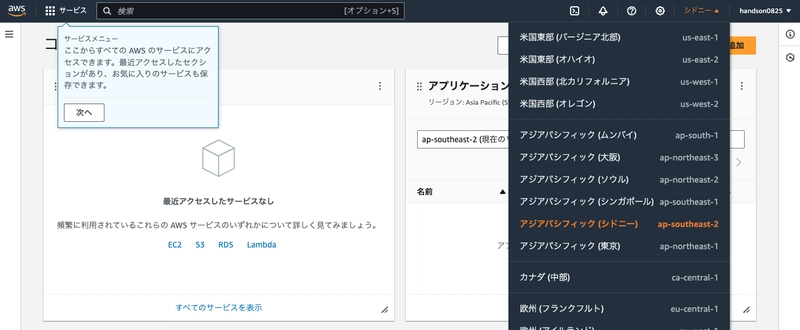
For this workshop, we'll only use the Oregon region (as it has the most lenient model usage quota restrictions for Bedrock).
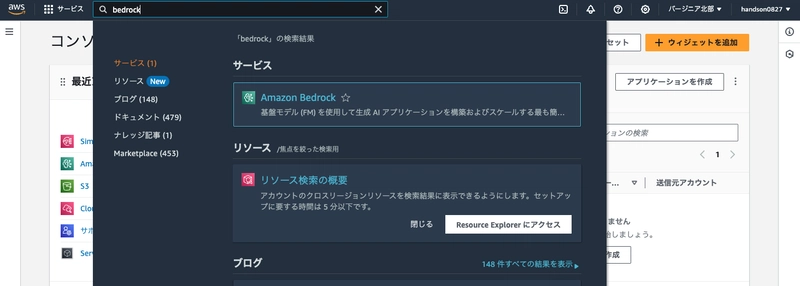
2. Bedrock Configuration
Now let's set up the generative AI service.
Type bedrock in the search box at the top of the Management Console to navigate to the Amazon Bedrock console.
Enable Model Access
From "Model access" in the bottom left, let's enable Anthropic's Claude.
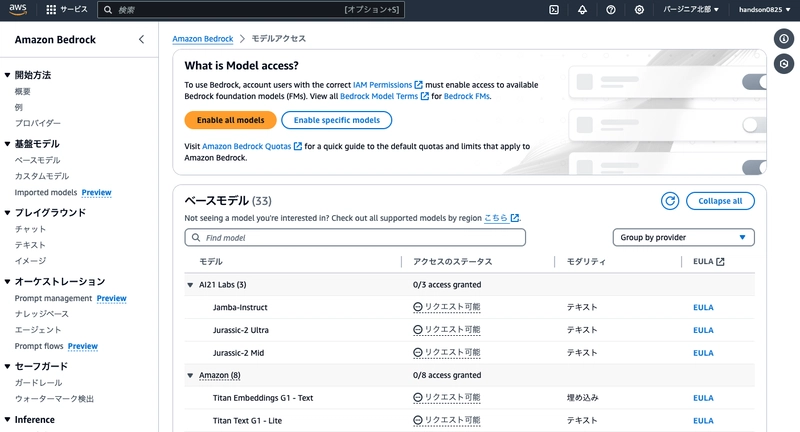
Click "Enable specific models" and check Anthropic > Claude 3.5 Sonnet v2.
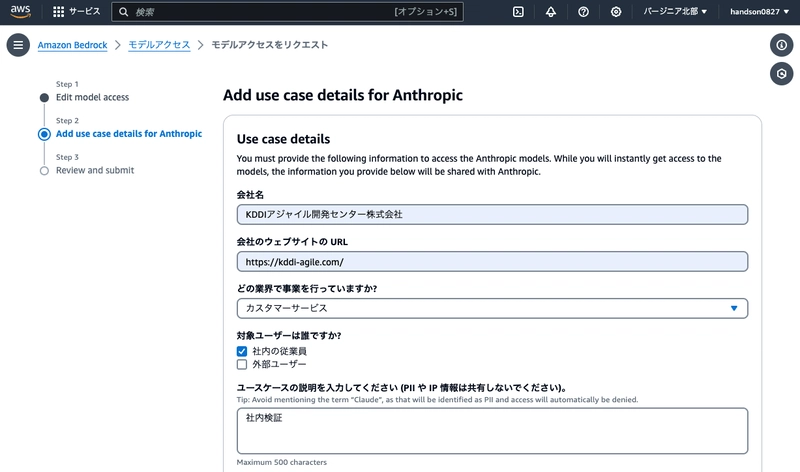
You'll be asked to declare your intended use. Fill in the following basic information:
- Company name: Your company name
- Company website URL: Your company's website
- Industry: Your company's industry
- Target users:
Internal employees - Use case description:
Personal testingor similar
After completion, the model will be enabled in 1-2 minutes. You can proceed to the next step without waiting.
Create an Agent
Next, go to "Agents > Create agent".
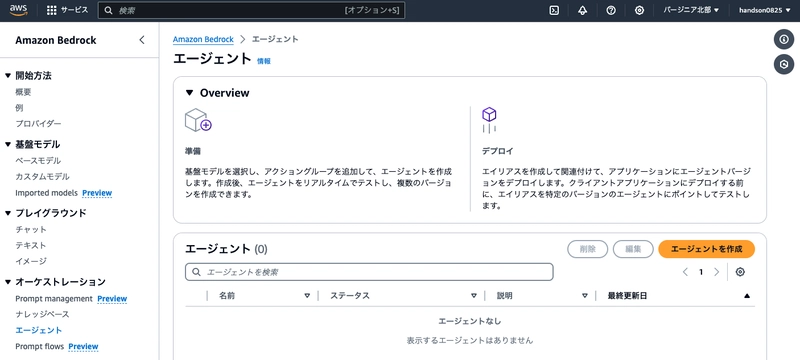
Keep the default agent name and click "Create".
The agent builder screen will open. Configure it as follows:
- Select model: Anthropic > Claude 3.5 Sonnet v2 > US Claude 3.5 Sonnet v2 (select the inference profile, not on-demand)
- Instructions for the agent:
- Based on user requests, formulate queries to perform web searches and create PowerPoint presentations summarizing your research.
- Create at least 6 slides, with each slide having a clear heading and multiple bullet points of content.
- Send the slide URL to the user via email.
- Once all processes are complete, inform the user that the email has been sent.
- Additional settings
- User input: Enabled
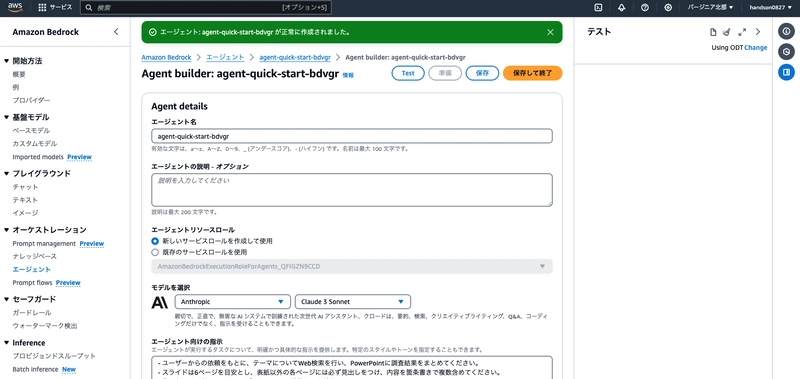
After configuring these settings, click "Save" at the top of the screen.
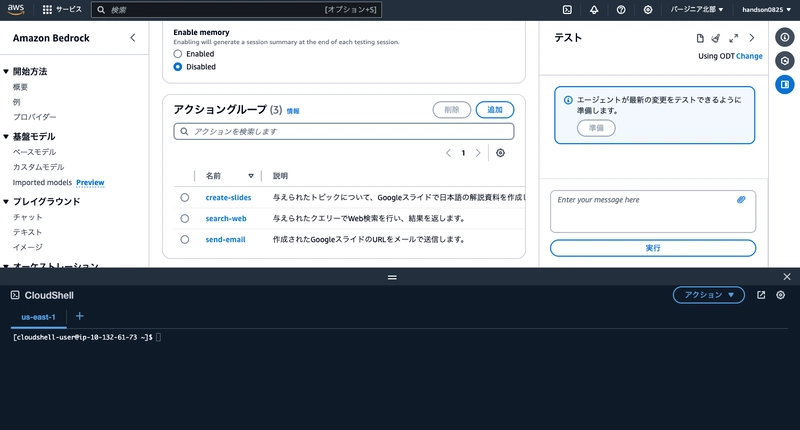
Create Action Groups
In Bedrock agents, tasks that the AI can execute are defined as "action groups." We'll create three action groups: "Web Search," "Slide Creation," and "Email Sending."
Click the "Add" button in the action groups section at the bottom of the agent builder screen.
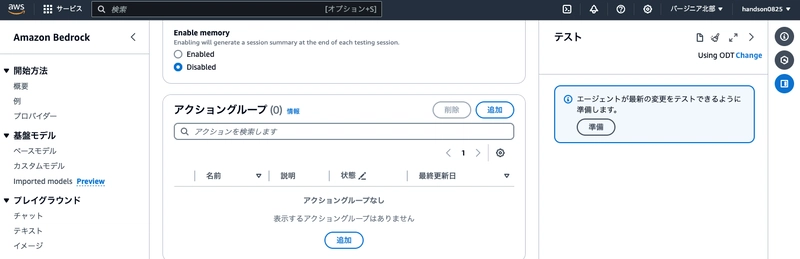
Create the following three action groups:
Action Group (First)
- Action group name: search-web
- Description:
Performs a web search with the given query and returns the results. - Action group function 1
- Name: search-web
- Description:
Performs a web search with the given query and returns the results. - Parameters: As follows
| Name | Description | Type | Required |
|---|---|---|---|
| query | Web search query | string | True |
After configuring these settings, leave the rest at their defaults and click "Create" in the bottom right.
Similarly, click "Add" for action groups to create the next one.
Action Group (Second)
- Action group name: create-pptx
- Description:
Creates a PowerPoint explanatory document in Japanese for the given topic. - Action group function 1
- Name: create-pptx
- Description:
Creates a PowerPoint explanatory document in Japanese for the given topic. - Parameters: As follows
| Name | Description | Type | Required |
|---|---|---|---|
| topic | Main topic of the slides | string | True |
| content | Content of the slides | string | True |
After configuring these settings, leave the rest at their defaults and click "Create" in the bottom right.
Similarly, click "Add" for action groups to create the next one.
Action Group (Third)
- Action group name: send-email
- Description:
Sends the URL of the created PPTX file to the user via email. - Action group function 1
- Name: send-email
- Description:
Sends the URL of the created PPTX file to the user via email. - Parameters: As follows
| Name | Description | Type | Required |
|---|---|---|---|
| url | Signed URL of the PPTX file | string | True |
After configuring these settings, leave the rest at their defaults and click "Create" in the bottom right.
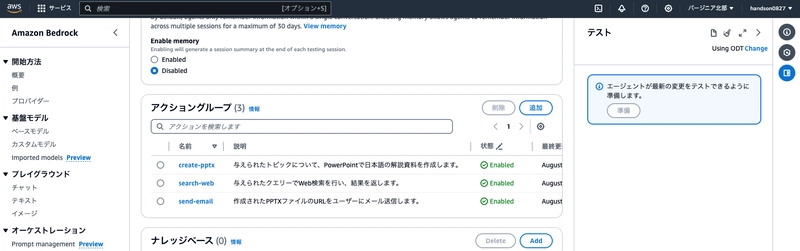
Once you've created all three action groups, they should appear in the agent builder as shown below.
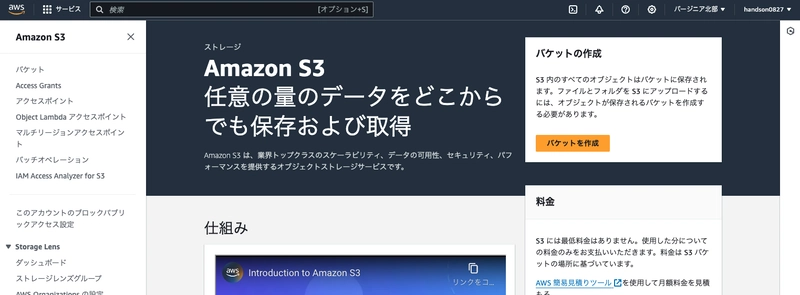
3. Create an S3 Bucket
Let's create a storage location for the PowerPoint documents that the agent will generate.
Navigate to the Amazon S3 console and create a new bucket.
Choose a unique name (such as pptx-yournickname-YYYYMMDD) that won't conflict with other users. All other settings can remain at their defaults.
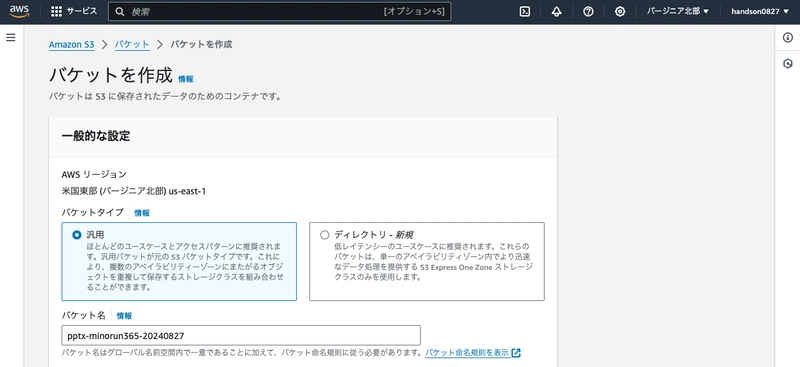
Make a note of the S3 bucket name, as you'll need it later.
4. SNS Configuration
To send emails from Lambda, we need to configure Amazon SNS in advance.
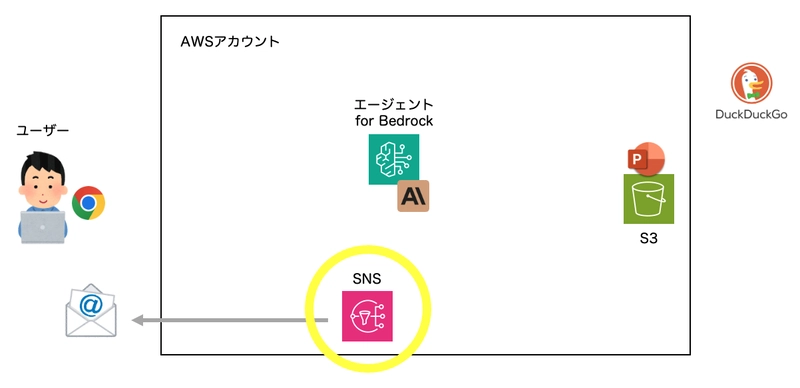
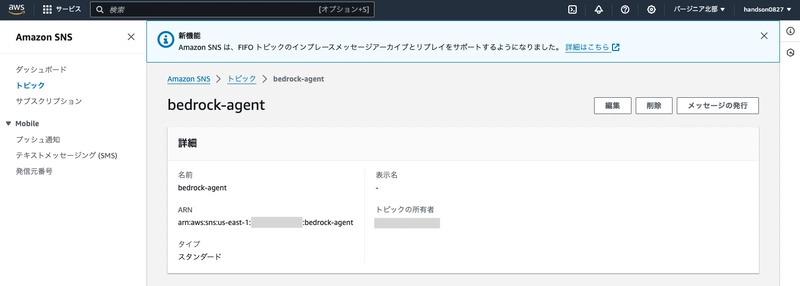
From the SNS console, create a topic named bedrock-agent. You can leave all other settings at their defaults.
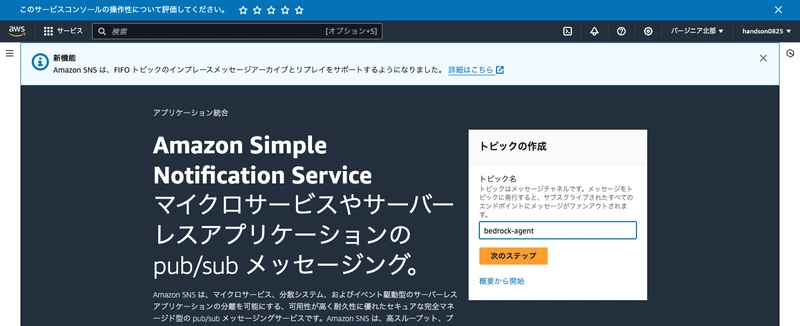
Once the topic is created, copy the "ARN" to a notepad as you'll need it later.
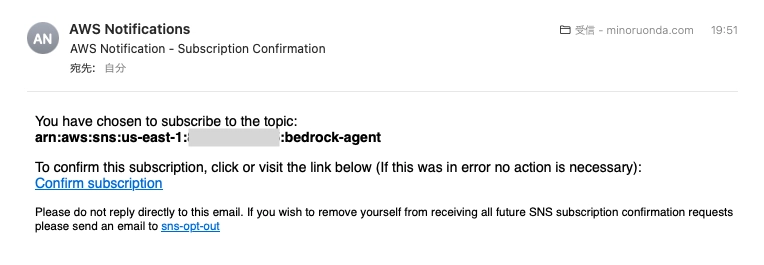
Next, let's create a "subscription" to deliver messages that arrive at this topic.
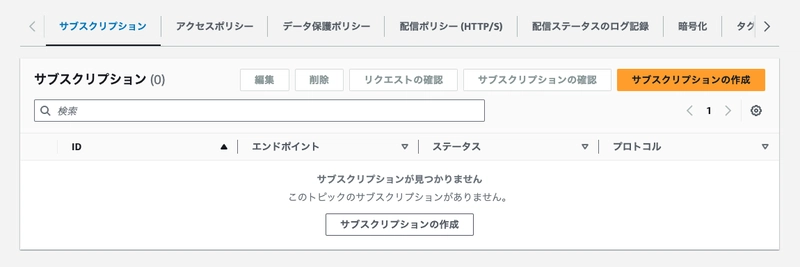
- Protocol: Email
- Endpoint: Your email address
After configuring these settings, a confirmation email will be sent to the address you specified. Click the "Confirm subscription" link to enable notification delivery.
5. Lambda Configuration
Lambda functions were automatically created when we set up the Bedrock agent action groups, but the code is mostly empty, so we need to edit it.
Navigate to the AWS Lambda console, open "Functions," and confirm that three functions have been created in the Northern Virginia region.

Prepare Lambda Layers
Before creating Lambda functions for each action group, let's prepare the external Python libraries needed by Lambda as "layers."
First, launch CloudShell by clicking the [>.] icon in the top right of the management console.
Run the following commands to ZIP the two Python libraries (Tavily and python-pptx):
```bash: CloudShell
Create a directory for the layer
mkdir python
Install the required libraries in the created directory
pip install tavily-python python-pptx -t python --platform manylinux2014_x86_64 --only-binary=:all:
Compress the installed libraries into a ZIP file
zip -r layer.zip python
Click "Actions > Download File" in the top right of CloudShell, enter `layer.zip` as the file path, and download the ZIP file to your local machine.
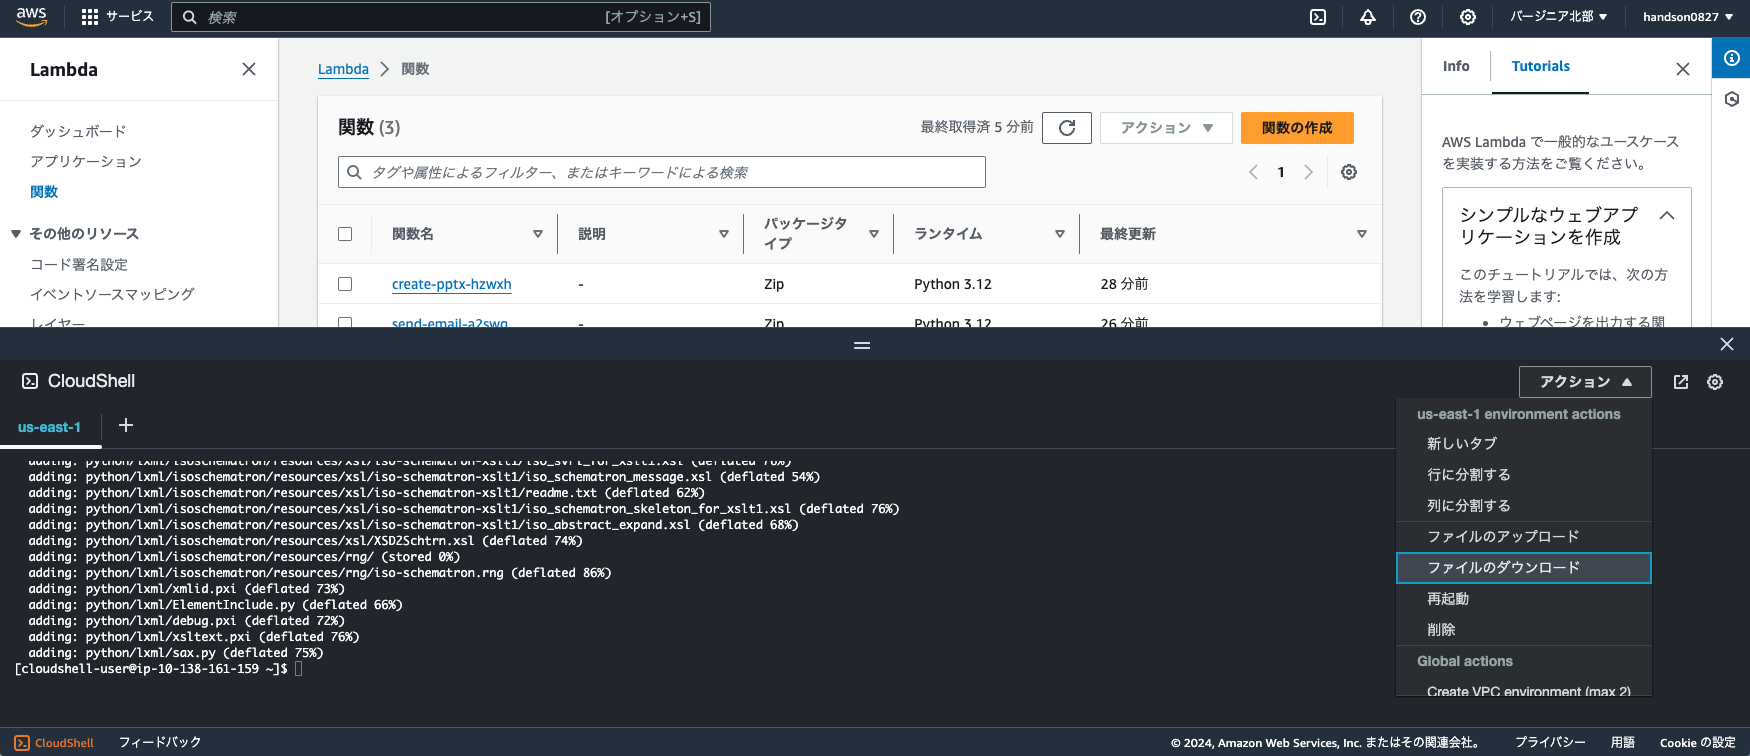
Once the download is complete, you can close the CloudShell window.
### Create a Lambda Layer
First, go to "Layers > Create layer" and create a Lambda layer with the ZIP file we just created:
- Name: `tavily-pptx`
- Upload .zip file: Specify the downloaded ZIP file (approximately 14MB)
- Compatible architectures: x86_64
- Compatible runtimes: Python 3.9
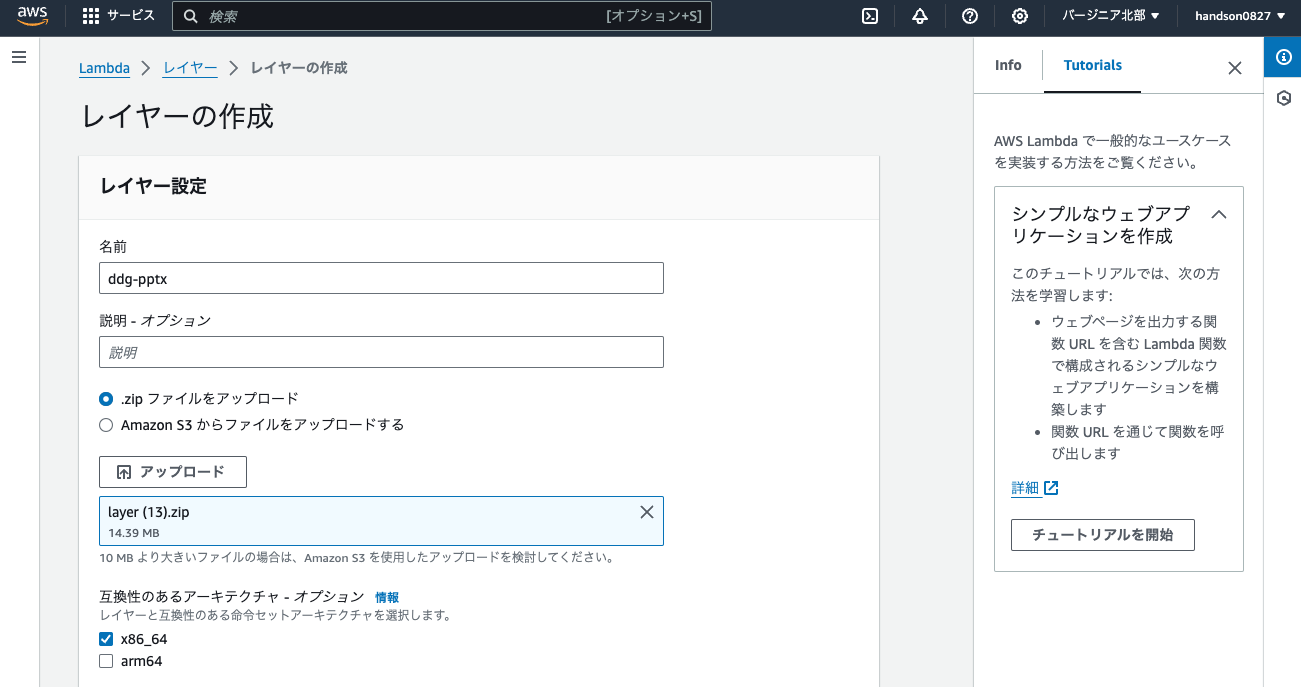
Leave the other settings as they are and click "Create." It will take about 10 seconds.
### Configure Lambda Functions
Next, from the left sidebar's "Functions," we'll configure each of the three functions.
#### search-web Function
- Code source: Overwrite with the following and click "Deploy":
```py: dummy_lambda.py
import os
import json
from tavily import TavilyClient
def lambda_handler(event, context):
# Get API key from environment variables
tavily_api_key = os.environ.get('TAVILY_API_KEY')
# Extract query parameter from event
parameters = event.get('parameters', [])
for param in parameters:
if param.get('name') == 'query':
query = param.get('value')
break
# Initialize Tavily client and execute search
client = TavilyClient(api_key=tavily_api_key)
search_result = client.get_search_context(
query=query,
search_depth="advanced",
max_results=10
)
# Return success response
return {
'messageVersion': event['messageVersion'],
'response': {
'actionGroup': event['actionGroup'],
'function': event['function'],
'functionResponse': {
'responseBody': {
'TEXT': {
'body': json.dumps(search_result, ensure_ascii=False)
}
}
}
}
}
Then scroll down and configure the following settings:
- Runtime settings: Click "Edit"
- Runtime: Python 3.9
- Layers: Click "Add a layer"
- Custom layers: tavily-pptx
- Version: 1
Next, configure the following from the "Configuration" tab:
- General configuration: Click "Edit"
- Timeout: 0 minutes 30 seconds
- Environment variables: Click "Edit"
- Key:
TAVILY_API_KEY - Value: Sign up at the following site and copy your API key
- Key:
Tavily is a web search service specialized for LLMs. Remarkably, you can execute up to 1,000 search API calls per month with the free plan.
For this simple workshop, we're setting the API key as an environment variable, but for production use, please utilize AWS Secrets Manager or similar services for secure operations.
Once completed, find the next function and proceed with the following configuration.
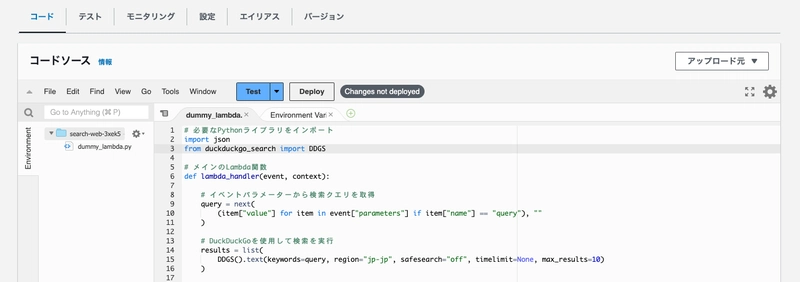
create-pptx Function
- Code source: Overwrite with the following and click "Deploy":
```py: dummy_lambda.py
import os
import json
import boto3
from pptx import Presentation
from datetime import datetime
Get S3 bucket name from environment variables
S3_BUCKET_NAME = os.getenv("S3_BUCKET_NAME")
def lambda_handler(event, context):
# Extract topic and content from event parameters
topic = next((item["value"] for item in event["parameters"] if item["name"] == "topic"), "")
content = next((item["value"] for item in event["parameters"] if item["name"] == "content"), "")

# Remove whitespace and split content by blank lines
content = content.strip()
slides_content = content.split('\n\n')

# Create presentation object
prs = Presentation()

# Create title slide
title_slide_layout = prs.slide_layouts[0]
slide = prs.slides.add_slide(title_slide_layout)
title = slide.shapes.title
subtitle = slide.placeholders[1]
title.text = topic
subtitle.text = f"Created: {datetime.now().strftime('%Y-%m-%d')}"

# Create content slides
for i, slide_content in enumerate(slides_content):
    content_slide_layout = prs.slide_layouts[1]
    slide = prs.slides.add_slide(content_slide_layout)
    title = slide.shapes.title
    content_shape = slide.placeholders[1]

    # Create heading and body
    lines = slide_content.split('\n')
    title.text = lines[0].lstrip('- ')
    content_shape.text = '\n'.join([line.lstrip('- ') for line in lines[1:]])

# Prepare to save file to S3
s3 = boto3.client("s3")
bucket_name = S3_BUCKET_NAME
file_name = f"{topic.replace(' ', '_')}.pptx"
file_path = f"/tmp/{file_name}"

# Upload file to S3 bucket
prs.save(file_path)
s3.upload_file(file_path, bucket_name, file_name)

# Generate signed URL for the file
url = s3.generate_presigned_url(
    'get_object',
    Params={'Bucket': bucket_name, 'Key': file_name},
    ExpiresIn=3600
)

# Return response for the agent
return {
    "messageVersion": "1.0",
    "response": {
        "actionGroup": event["actionGroup"],
        "function": event["function"],
        "functionResponse": {
            "responseBody": {
                "TEXT": {
                    "body": json.dumps(
                        {"signed_url": url}
                    )
                }
            }
        },
    },
}
- Runtime settings: Click "Edit"
- Runtime: Python 3.9
- Layers: Click "Add a layer"
- Custom layers: tavily-pptx
- Version: 1
Next, configure the following from the "Configuration" tab:
- General configuration: Click "Edit"
- Timeout: 0 minutes 30 seconds
- Environment variables: Click "Edit > Add environment variable"
- Key: `S3_BUCKET_NAME`
- Value: The S3 bucket name you created earlier (check in another tab if you didn't make a note of it)
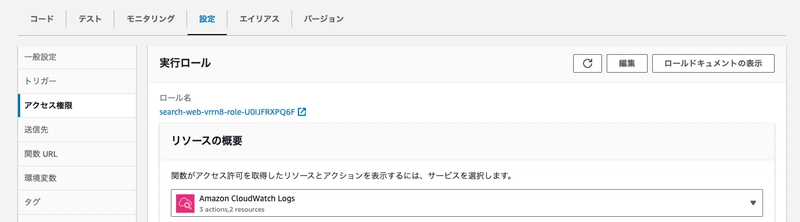
- Permissions: Click the "Role name" under execution role
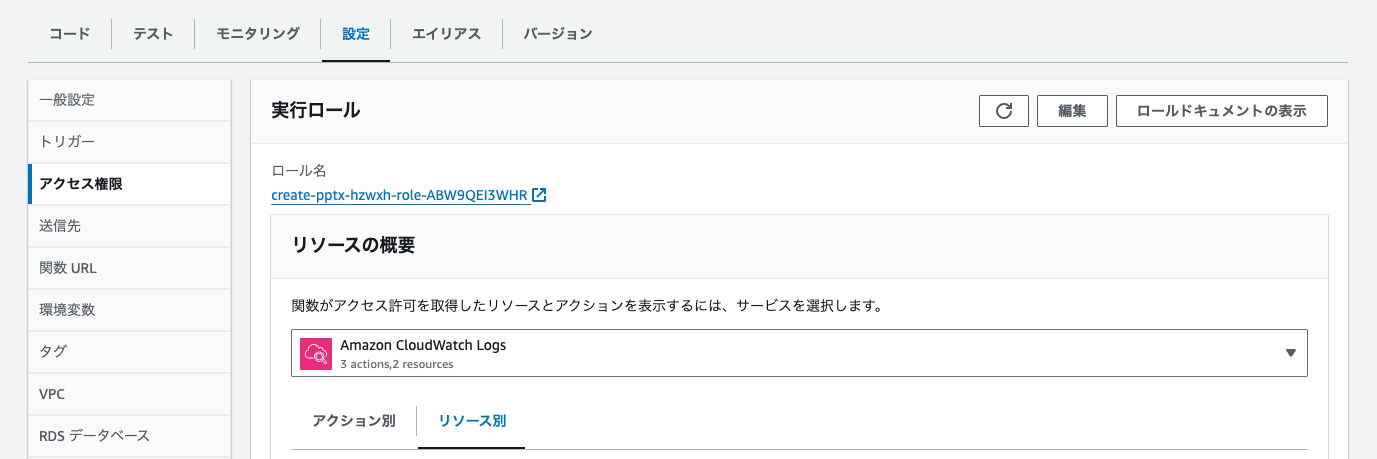
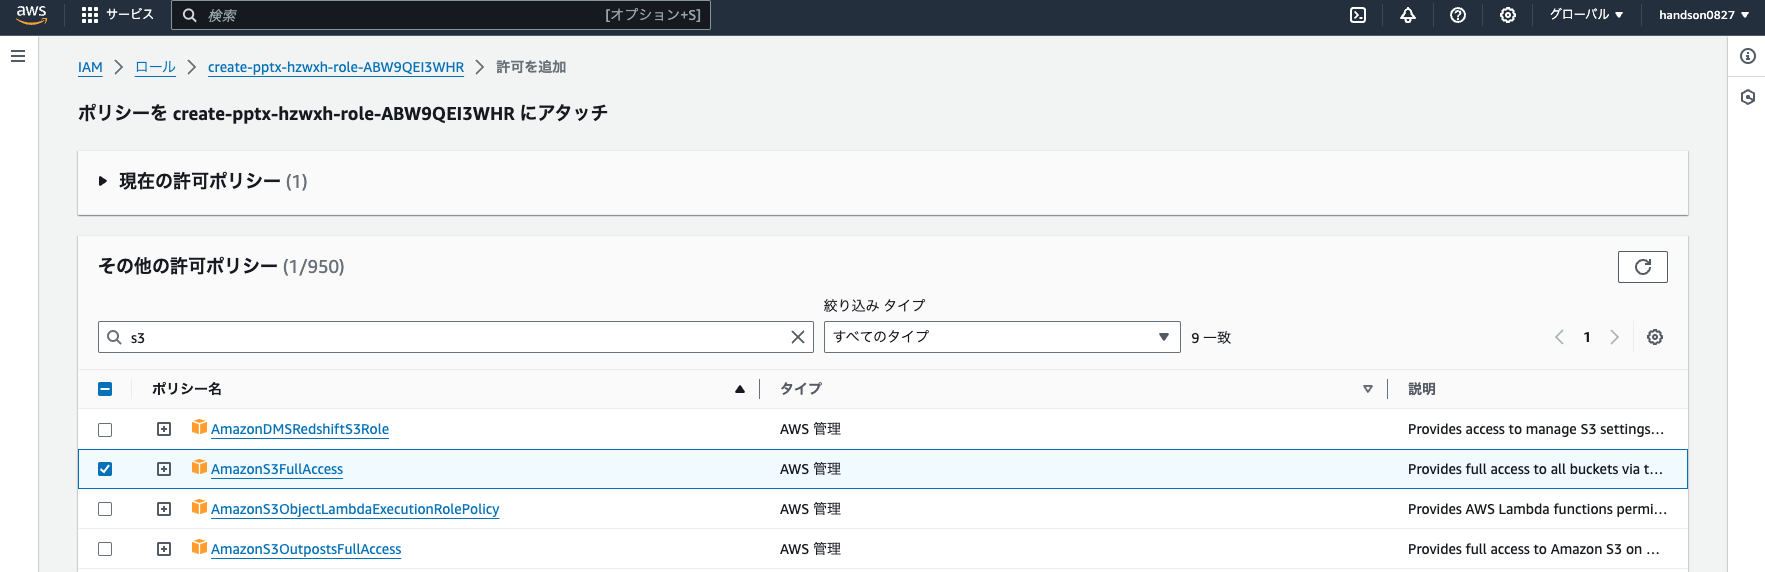
You'll be taken to the IAM role editing screen. Click "Add permissions > Attach policies".
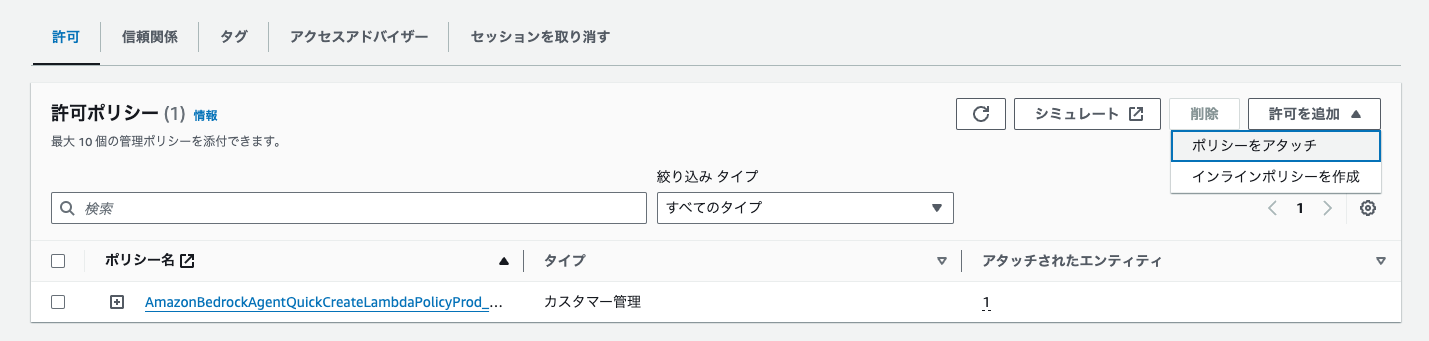
Find and check `AmazonS3FullAccess`, then click "Add permissions".
Once completed, find the next function and proceed with the following configuration.
#### send-email Function
- Code source: Overwrite with the following and click "Deploy":
```py: dummy_lambda.py
import os
import json
import boto3
# Get SNS topic ARN from environment variables
SNS_TOPIC_ARN = os.environ.get("SNS_TOPIC_ARN")
def lambda_handler(event, context):
# Get URL from event parameters
url = event.get("parameters", [{}])[0].get("value")
# Publish SNS message
boto3.client("sns").publish(
TopicArn=SNS_TOPIC_ARN,
Message=f"The Bedrock agent has created a slide deck. The URL is valid for 1 hour:\n{url}",
Subject="Slide Creation Notification"
)
# Return response for the agent
return {
"messageVersion": "1.0",
"response": {
"actionGroup": event.get("actionGroup", "send-email"),
"function": event.get("function", "send-email"),
"functionResponse": {
"responseBody": {
"TEXT": {
"body": json.dumps(
{
"message": "Email sent successfully",
"presentationUrl": url,
}
)
}
}
},
},
}
Note: Runtime and layer settings are not required for this function.
Next, configure the following from the "Configuration" tab:
- Environment variables: Click "Edit"
- Key:
SNS_TOPIC_ARN - Value: The SNS topic ARN you created earlier (check in another tab if you didn't make a note of it)
- Key:
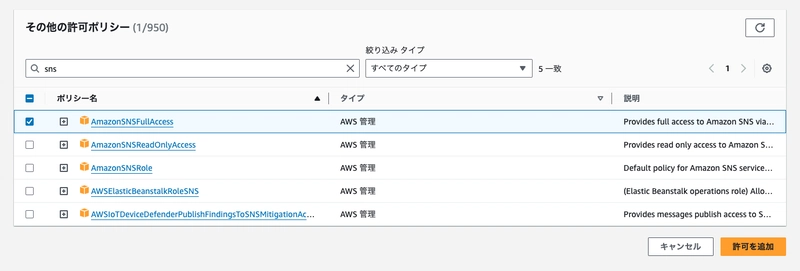
- Permissions: Click the "Role name" under execution role
You'll be taken to the IAM role editing screen. Click "Add permissions > Attach policies".
Check AmazonSNSFullAccess and click "Add permissions".
This completes the configuration of all three functions. To summarize:
| search-web | create-pptx | send-email | |
|---|---|---|---|
| Runtime | Python 3.9 | Python 3.9 | (No change needed) |
| Layer | tavily-pptx | tavily-pptx | (No change needed) |
| Timeout | 30 seconds | 30 seconds | (No change needed) |
| Environment Variables | (No change needed) | S3_BUCKET_NAME | SNS_TOPIC_ARN |
| Permissions | (No change needed) | Added S3 | Added SNS |
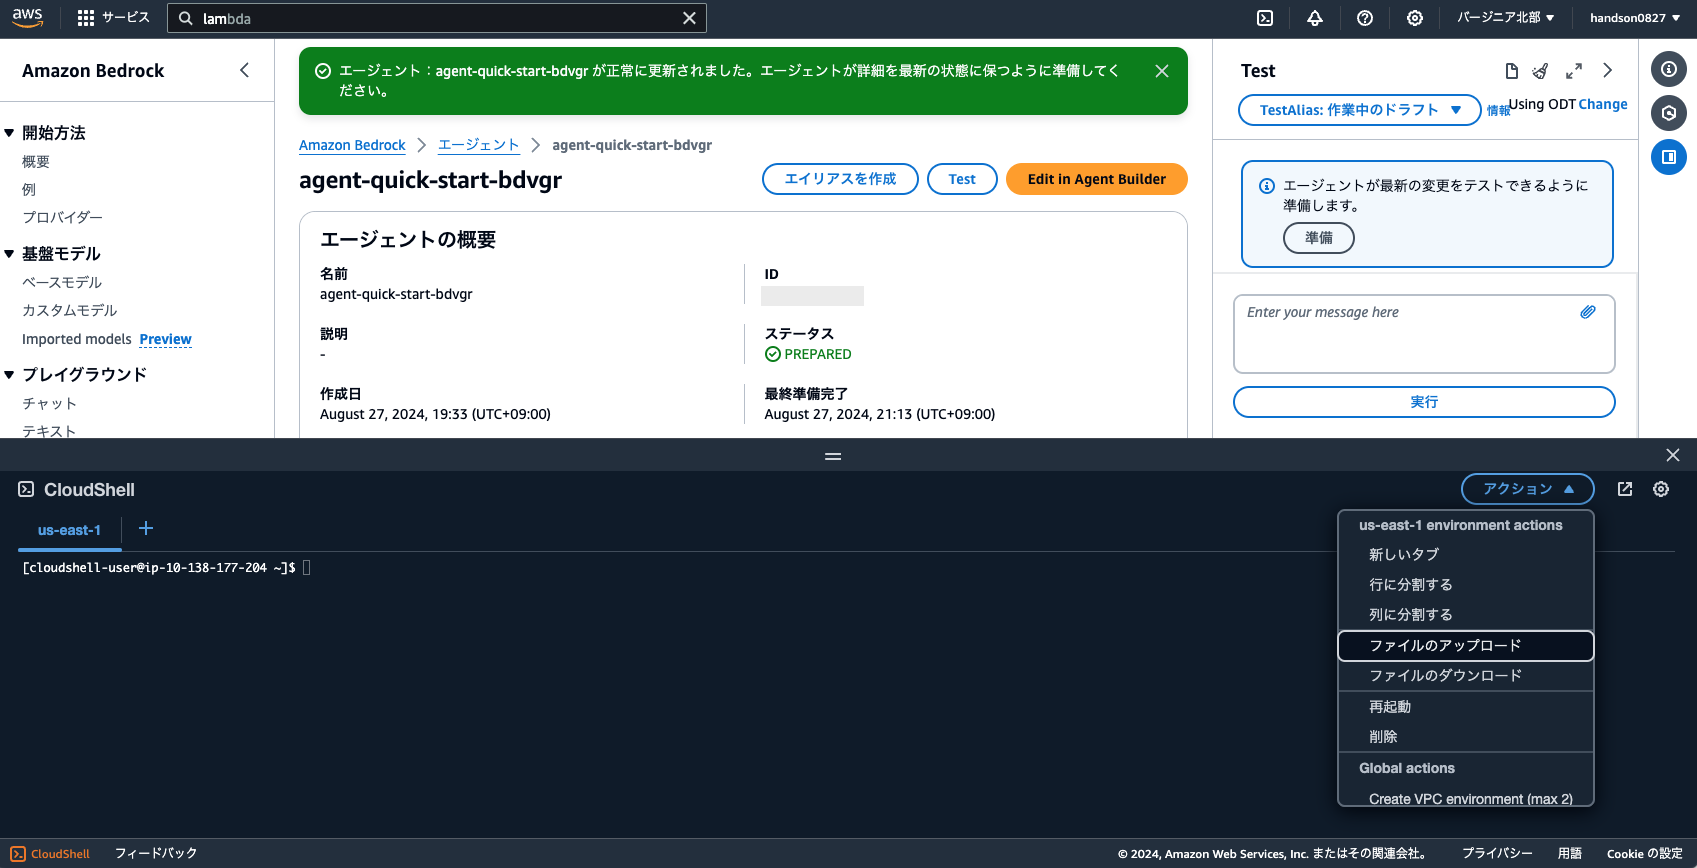
6. Verify Agent Operation
Now that we've configured everything, let's test if the agent works properly before integrating it into the application.

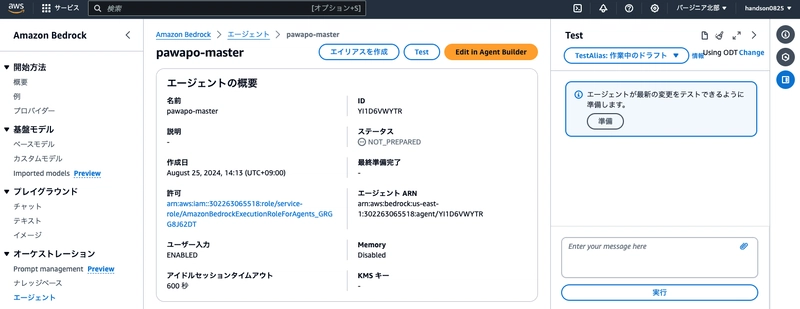
Navigate to the Bedrock console, go to "Agents," and click on the agent name you created earlier.
Click "Prepare" in the test sidebar on the right.
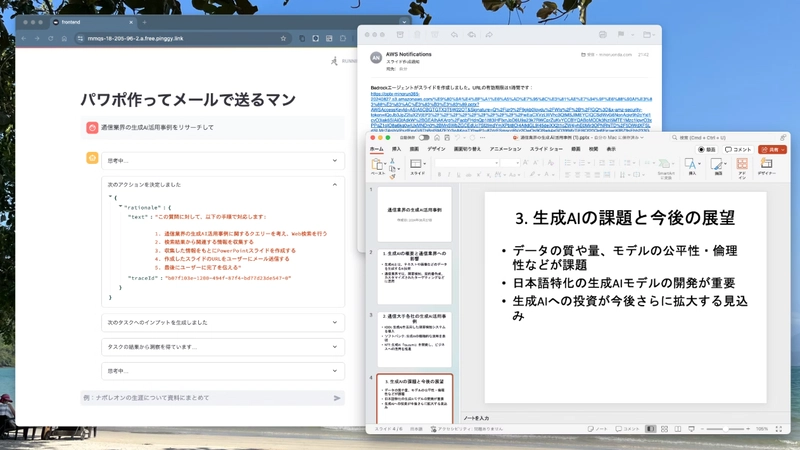
Try sending Research KAG company and create a PowerPoint in the chat box.
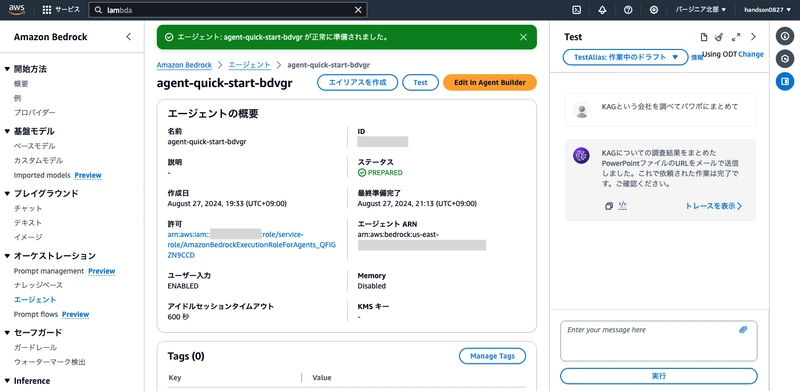
After waiting 30 seconds to 1 minute, you'll get a response from the agent.
You should also receive an email from Amazon SNS.
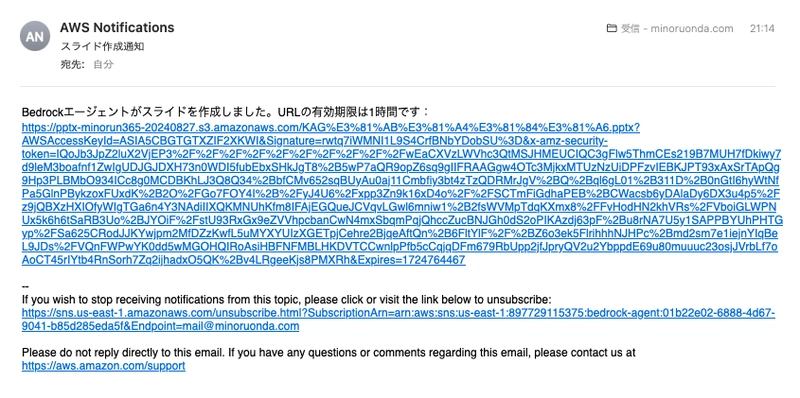
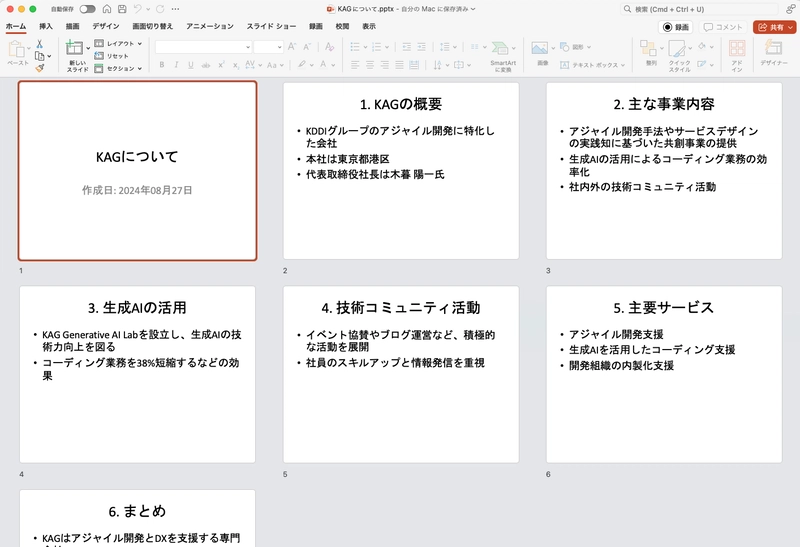
Clicking the URL allows you to download the PowerPoint!
The CEO's name might be slightly off, but since the agent is performing web searches, it's able to gather quite accurate information just from the company acronym, with minimal hallucination.
Once you've confirmed it's working, create an alias by clicking "Aliases > Create" at the bottom of the agent screen. This is like releasing a new version of the agent.
- Alias name: v1
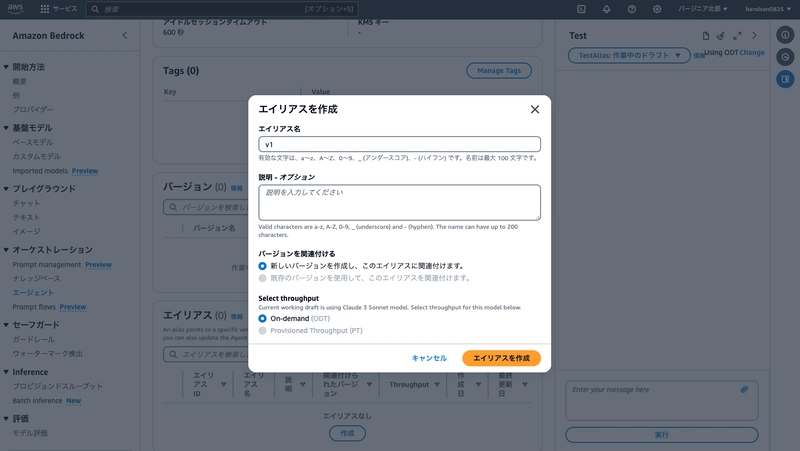
Once the alias is registered, copy both the agent "ID" at the top of the screen and the "Alias ID" at the bottom of the screen to a notepad, as you'll need them later.
If things aren't working properly, try the following to identify the cause:
- Check the agent trace
- Check the log stream via "Monitoring > View CloudWatch logs" in Lambda
Common issues include:
- Is the model properly enabled?
- Are you working in a region other than Northern Virginia?
- Are there any errors in the action group parameters (e.g., typos in variable names)?
- Did you forget to "Deploy" the Lambda function code?
- Is there an issue with the Lambda layer contents?
- Are there any gaps in Lambda runtime settings, layers, environment variables, or IAM roles?
- Did you click the confirmation email from SNS?
- Have you hit the rate limit (Service Quotas) for Claude 3.5 Sonnet v2?
Note that Bedrock is in high demand globally, and newly created AWS accounts have quite low initial quotas. If you hit rate limits, consider switching to a different model like Claude 3 Sonnet, or submit a request to AWS Support to increase your quota (though this can take several days).
https://aws.amazon.com/jp/blogs/news/generative-ai-amazon-bedrock-handling-quota-problems/
7. Frontend Development
Now that the agent is working on its own, let's integrate it into an application.
First, paste the following source code into a notepad on your computer, and replace the XXXXXXXXXX in lines 8-9 with the agent ID and alias ID you created earlier.
Then save it locally as frontend.py.
```py: frontend.py
import json
import uuid
import boto3
import streamlit as st
from botocore.exceptions import ClientError
from botocore.eventstream import EventStreamError
agent_id = "XXXXXXXXXX" # Paste your agent ID here
agent_alias_id = "XXXXXXXXXX" # Paste your alias ID here
def initialize_session():
"""Initialize session settings"""
if "client" not in st.session_state:
st.session_state.client = boto3.client("bedrock-agent-runtime")
if "session_id" not in st.session_state:
    st.session_state.session_id = str(uuid.uuid4())

if "messages" not in st.session_state:
    st.session_state.messages = []

if "last_prompt" not in st.session_state:
    st.session_state.last_prompt = None

return st.session_state.client, st.session_state.session_id, st.session_state.messages
def display_chat_history(messages):
"""Display chat history"""
st.title("PowerPoint Creator and Emailer")
st.text("I'll search the web, create slides, and email them to you!")
for message in messages:
    with st.chat_message(message['role']):
        st.markdown(message['text'])
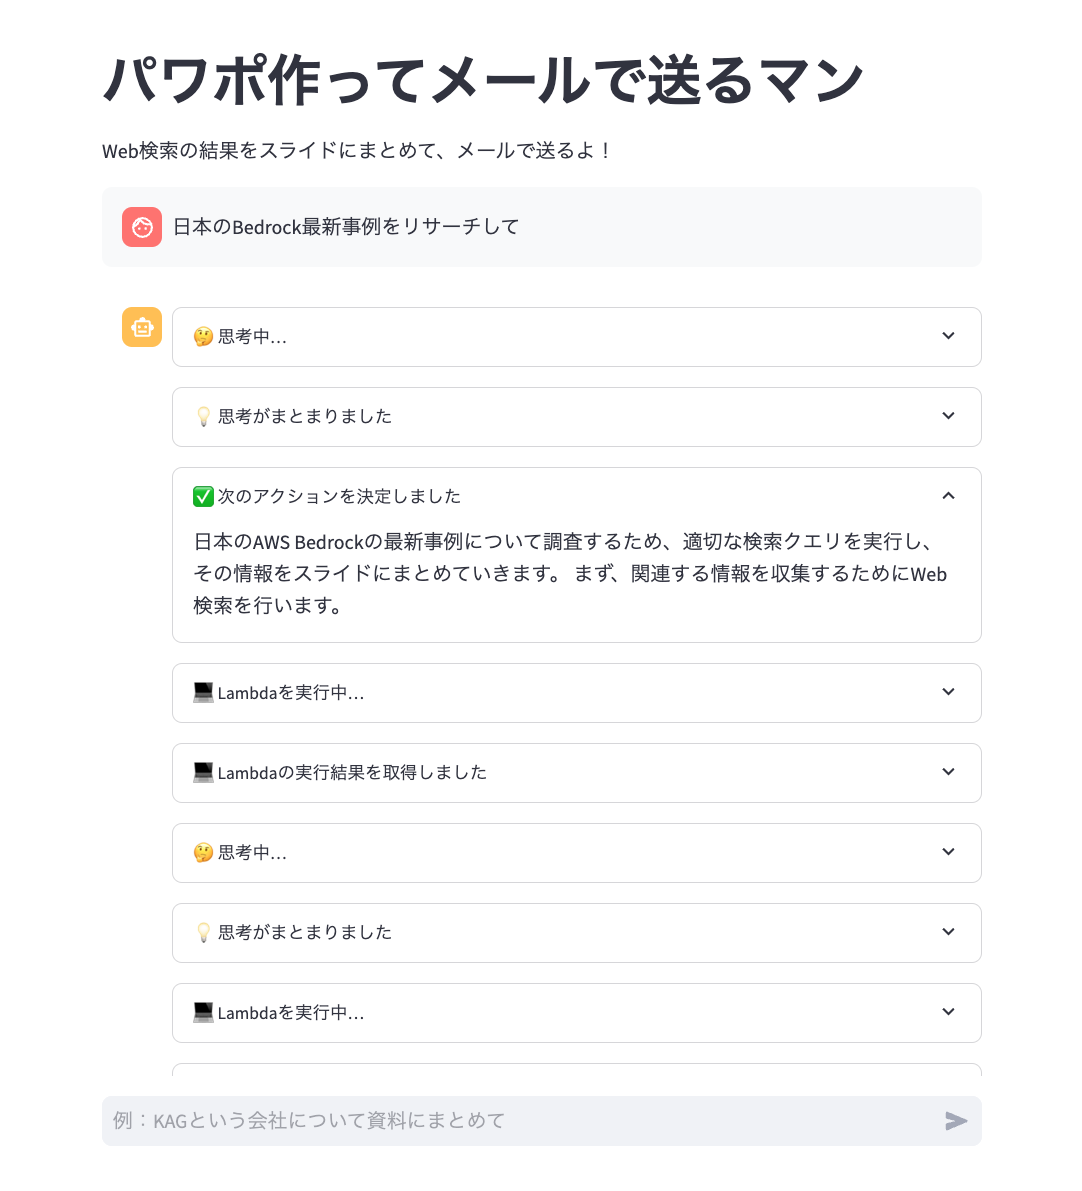
def handle_trace_event(event):
"""Process trace events"""
if "orchestrationTrace" not in event["trace"]["trace"]:
return
trace = event["trace"]["trace"]["orchestrationTrace"]

# Display "Model Input" trace
if "modelInvocationInput" in trace:
    with st.expander("🤔 Thinking...", expanded=False):
        input_trace = trace["modelInvocationInput"]["text"]
        try:
            st.json(json.loads(input_trace))
        except:
            st.write(input_trace)

# Display "Model Output" trace
if "modelInvocationOutput" in trace:
    output_trace = trace["modelInvocationOutput"]["rawResponse"]["content"]
    with st.expander("💡 Thoughts organized", expanded=False):
        try:
            thinking = json.loads(output_trace)["content"][0]["text"]
            if thinking:
                st.write(thinking)
            else:
                st.write(json.loads(output_trace)["content"][0])
        except:
            st.write(output_trace)

# Display "Rationale" trace
if "rationale" in trace:
    with st.expander("✅ Decided on next action", expanded=True):
        st.write(trace["rationale"]["text"])

# Display "Tool Invocation" trace
if "invocationInput" in trace:
    invocation_type = trace["invocationInput"]["invocationType"]

    if invocation_type == "ACTION_GROUP":
        with st.expander("💻 Executing Lambda...", expanded=False):
            st.write(trace['invocationInput']['actionGroupInvocationInput'])

# Display "Observation" trace
if "observation" in trace:
    obs_type = trace["observation"]["type"]

    if obs_type == "ACTION_GROUP":
        with st.expander(f"💻 Retrieved Lambda execution results", expanded=False):
            st.write(trace["observation"]["actionGroupInvocationOutput"]["text"])
def invoke_bedrock_agent(client, session_id, prompt):
"""Invoke Bedrock agent"""
return client.invoke_agent(
agentId=agent_id,
agentAliasId=agent_alias_id,
sessionId=session_id,
enableTrace=True,
inputText=prompt,
)
def handle_agent_response(response, messages):
"""Process agent responses"""
with st.chat_message("assistant"):
for event in response.get("completion"):
if "trace" in event:
handle_trace_event(event)
        if "chunk" in event:
            answer = event["chunk"]["bytes"].decode()
            st.write(answer)
            messages.append({"role": "assistant", "text": answer})
def show_error_popup(exeption):
"""Display error popup"""
if exeption == "throttlingException":
error_message = "【ERROR】Bedrock model load seems high. Please wait about a minute, reload the browser, and try again 🙏 (If issues persist, consider changing models or requesting a service quota increase)"
st.error(error_message)
def main():
"""Main application processing"""
client, session_id, messages = initialize_session()
display_chat_history(messages)
if prompt := st.chat_input("Example: Research the latest Bedrock use cases in Japan"):
    messages.append({"role": "human", "text": prompt})
    with st.chat_message("user"):
        st.markdown(prompt)

    try:
        response = invoke_bedrock_agent(client, session_id, prompt)
        handle_agent_response(response, messages)

    except (EventStreamError, ClientError) as e:
        if "throttlingException" in str(e):
            show_error_popup("throttlingException")
        else:
            raise e
if name == "main":
main()
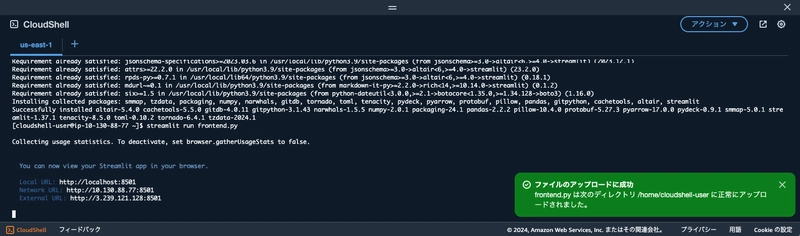
Open CloudShell again and upload this file via "Actions > Upload file" in the top right.
Then, run the following commands:
```bash: CloudShell
# Install Python external libraries
pip install boto3 streamlit
# Launch the Streamlit app
streamlit run frontend.py
If a Streamlit access URL appears, the app has started successfully.
Next, click the "+" at the top of CloudShell to launch a second "us-east-1" terminal and run:
```bash: CloudShell
Connect to Pinggy via SSH to generate a URL accessible from the internet
ssh -p 443 -R0:localhost:8501 a.pinggy.io
When a confirmation message appears, type `yes` and press Enter. This will generate a URL through the Pinggy external service that allows access to this app.
Copy the HTTP**S** URL (the one on the bottom) and access it from a separate browser tab.
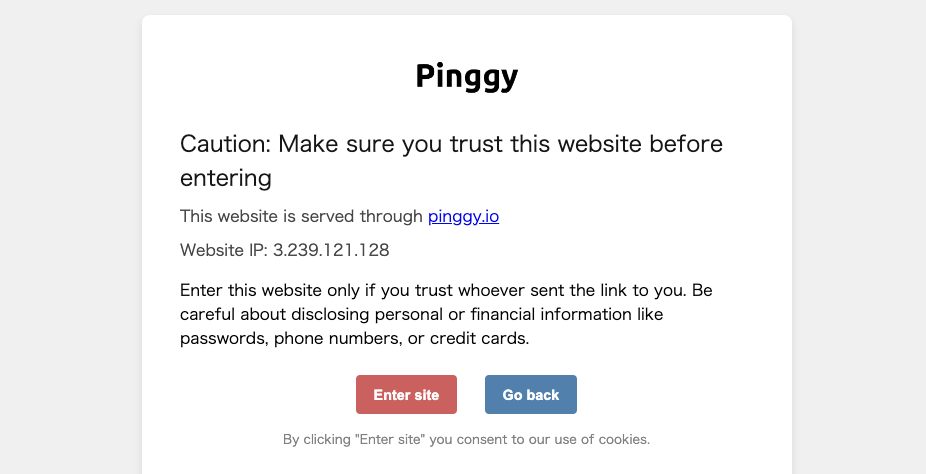
Click "Enter site" to access the Python app you uploaded. The frontend is displayed using the Streamlit framework.
Let's try using this app.
The agent's trace information is output in real-time to the Streamlit frontend.
If you encounter errors, recheck that you correctly copied the agent ID and alias ID into the Python file you uploaded.
To delete an existing file before re-uploading, you can use the following command:
```bash: CloudShell
rm frontend.py
To allow access to the Python app running on CloudShell, we're using an external service called Pinggy to generate a temporary URL accessible from the internet.
Note: For security reasons, be careful not to share this URL with unintended third parties.
You can share the URL you copied with colleagues to let them try the app.
Note that CloudShell automatically stops after 20-30 minutes, requiring you to restart Streamlit and Pinggy. Also, with the free version of Pinggy, URLs are accessible for only 60 minutes.
If you have time, consider experimenting with prompt tuning or Lambda modifications:
- Modify the agent instructions
- Revise the action group descriptions
- Create a knowledge base and add RAG functionality
- Modify Lambda functions to add features like image generation
Cleanup
Since we used a serverless configuration, leaving the environment as is will generate minimal charges, but to prevent security incidents, we recommend closing the AWS account (or, if not closing it, setting up MFA for the root user).
If you close your account, you won't be able to create another AWS account with the same email address, so consider changing to a disposable email address beforehand.

Top comments (0)