
The next thing I'd like to add to our basic engine is some environment. That is, a background. In 2d space backgrounds are pretty easy to understand, it's just an image behind everything else but in 3d it's a bit more complicated. The same principal will apply though, we want an image behind everything however this image needs to change depending on the direction we're looking. In fact to have it completely seamless we essentially need to pretend like we're drawing on the inside of a sphere. Well, almost. In actuality we can simplify to a cube but it's a special cube where the sides match up seamlessly. This is called a "cubemap." Cubemaps can be used for all sorts of things where you need a texture from all angles like with environmental backdrops, skyboxes, and even reflections.
Housekeeping
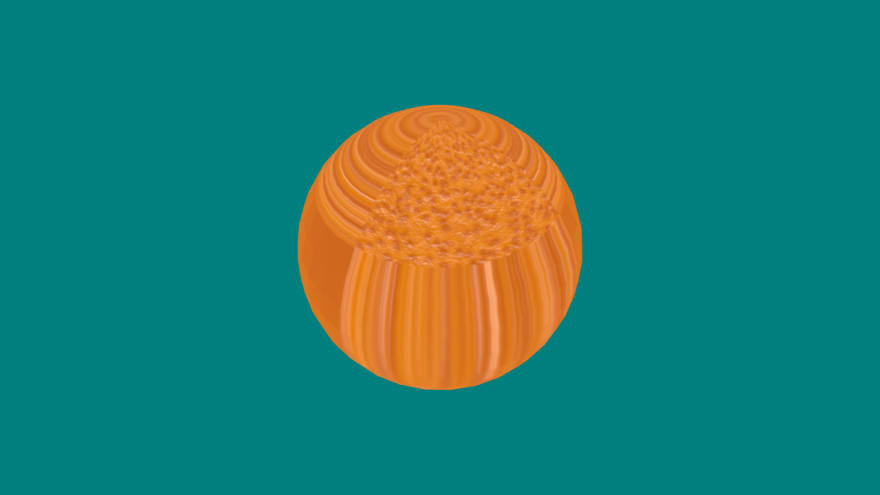
I want to use a more realistic object that looks like it could live out in the real world. Using the geometry we have on hand (spheres and cubes) I thought I'd try a orange. For that I needed to find a seamless orange peel texture. And luckily I found one without watermarks. We can just apply this with our basic textured shader and a UV sphere.

That's not quite the effect we want. The texture details are too large and stretched. What we can do is tweak a few parameters. Firstly, we can change the UV coordinates. I added a new option to the uv sphere to scale the UV coordinates. The implementation isn't really interesting, if the parameter exists then scale by that amount:
if(uvScale){
    uvs = uvs.map(uv => [uv[0] * uvScale[0], uv[1] * uvScale[1]]);
}
This lets use scale the texture up and down. Let's set it to 4.
That's not quite right either. We need to change the texture sampler behavior. I added the ability to pass options into loadTexture, specifically the TEXTURE_WRAP_S and TEXTURE_WRAP_T texture parameters. We had them hardcoded to clamp to edge which means texels after 1.0 are set to the final texel color. What we want is to repeat the texture at UVs past 1.0 which is done with the value REPEAT from the WebGL context.

We can get more realistic with specular lighting and other texture tricks like bump-mapping but that takes more effort (and requires editing textures). This is good enough.
Getting a cube map
The next hard part is getting a cubemap. It is possible to generate one yourself: https://aerotwist.com/tutorials/create-your-own-environment-maps/. Although I'm inside today so let's find one. The one I wanted to use comes as one texture: https://polyhaven.com/a/green_sanctuary . This creates some problems. As far as I can tell we actually need 6 images to form a cubemap in WebGL so we need to slice this up. But it's not even in a useful image format! I found this little app to convert the hdr format to a png so I could use an image editor: https://matheowis.github.io/HDRI-to-CubeMap/.
The resulting map looks like this:

Now we need to slice it up. I created a small app for this: https://codepen.io/ndesmic/pen/Vwyrrxd . This could definitely be more sophisticated by looking at the dimensions of the image similar to how Unity does it: https://docs.unity3d.com/Manual/class-Cubemap.html but it's quick and dirty for now. This gives us 6 images:


Note that a high-resolution cube map is pretty hefty in size, the one I'm using has faces of 2048x2048 and it's about 40Mb of data.
Importing the images as a cubemap texture
Now that we did that round-about step, it's time to actually hook these up to WebGL.
//gl-helpers.js
export function loadCubeMap(context, urls, samplerParams = {}){
    const faceToParam = [
        this.context.TEXTURE_CUBE_MAP_NEGATIVE_X,
        this.context.TEXTURE_CUBE_MAP_POSITIVE_Y,
        this.context.TEXTURE_CUBE_MAP_POSITIVE_Z,
        this.context.TEXTURE_CUBE_MAP_NEGATIVE_Y,
        this.context.TEXTURE_CUBE_MAP_POSITIVE_X,
        this.context.TEXTURE_CUBE_MAP_NEGATIVE_Z
    ];
    return Promise.all(urls.map(url => loadImage(url)))
        .then(imgs => {
            const texture = context.createTexture();
            context.bindTexture(context.TEXTURE_CUBE_MAP, texture);
            imgs.forEach((img, i) => {
                context.texImage2D(faceToParam[i], 0, context.RGBA, context.RGBA, context.UNSIGNED_BYTE, img);
            });
            context.generateMipmap(context.TEXTURE_CUBE_MAP);
            context.texParameteri(context.TEXTURE_CUBE_MAP, context.TEXTURE_MIN_FILTER, context.LINEAR_MIPMAP_LINEAR);
            return texture;
        });
}
We first create a mapping for index to face for convenience. The convention can change but I'm going left to right, top to bottom on the cube map layout. Then we need to fetch all the images. Once we have all of them we create a texture, bind it, and then iterate through each image and assign it to a face and finally set the texture sampler params. This will give us back a reference to the cubemap.
Now in the engine I'm going to create a new entity called an "Environment".
//entity/environment.js
export class Environment {
    #program;
    #cubemap;

    constructor(material) {
        this.#program = material.program;
        this.#cubemap = material.cubemap;
    }

    get program() {
        return this.#program;
    }

    get cubemap() {
        return this.#cubemap;
    }
}
That holds info for an environment.
Next we want to create a screen sized quad which will project the background. To properly interpolate we need to know the camera direction at each of the corners of the screen? So what is the camera direction at those vertices? It's the inverse of the matrix that puts the vertices into clip-space. Essentially we want to convert positions like [-1,1], [1,1] etc to world space positions which is the opposite of what we usually do.
Housekeeping part 2
While trying to reuse some of the code I found that it was a little inconsistent. I changed getProjectionMatrix on the camera to return an array rather than a Float32Array to be consistent with getViewMatrix (and allow our matrix ops to work).
I also modified bindAttributes and autobindUniforms:
- They optionally take the program to be bound to or the current program, which pushes that parameter to the end of the list.
-
bindAttributesnow check if attributes areFloat32Arrays and if not, convert them. -
autobindUniformsnow support 4x4 matrices. This is detected by array length, which can open up debate about the intention betweenvecNs andmatNxMs but since since we don't really use matrices smaller than 3x3 this is probably fine for now.
Anyway back to the main topic, what is the inverse of the matrix that puts world-space points into clip space? First we need to undo projection, then we need to undo the camera transformation. So we take the viewMatrix and the projectionMatrix, multiply them, and take the inverse.
But if we do that we can get some weird results, or at least I did. You need to remove translation from the view matrix by setting the first three positions in the bottom row to be 0. Otherwise you might wind up with some divide by zero stuff that will give you an unusable inverse.
//geo-gl.js - render
if(this.environment){
    this.bindEnvironment();
    this.setupGlobalUniforms();
    this.context.useProgram(this.environment.program);
    bindAttribute(this.context, [
        -1.0, -1.0,
        1.0, -1.0,
        -1.0, 1.0,
        1.0, 1.0
    ], "aVertexPosition", 2);
    this.context.drawArrays(this.context.TRIANGLE_STRIP, 0, 4);
}
// previous drawing code...
And the bindEnvironment method:
bindEnvironment(){
    if(this.environment){
        this.context.useProgram(this.environment.program);
        this.context.activeTexture(this.context.TEXTURE0);
        this.context.bindTexture(this.context.TEXTURE_CUBE_MAP, this.environment.cubemap);
        bindAttribute(this.context, [
            -1.0, -1.0,
            1.0, -1.0,
            -1.0, 1.0,
            1.0, 1.0
        ], "aVertexPosition", 2);
        const viewMatrix = asMatrix(this.cameras.default.getViewMatrix(), 4, 4);
        //remove translation
        viewMatrix[3][0] = 0;
        viewMatrix[3][1] = 0;
        viewMatrix[3][2] = 0;
        const projectionMatrix = asMatrix(this.cameras.default.getProjectionMatrix(), 4, 4);
        const viewProjectMatrix = multiplyMatrix(projectionMatrix, viewMatrix);
        const inverseViewProjectionMatrix = getInverse(viewProjectMatrix);
        autoBindUniform(this.context, "uViewProjectionInverse", inverseViewProjectionMatrix.flat());
    }
}
Once all the uniforms are hooked up we can use them.
//vertex-shader.glsl
precision mediump float;

attribute vec2 aVertexPosition;
varying vec2 vPosition;

void main() {
    vPosition = aVertexPosition;
    gl_Position = vec4(aVertexPosition, 0.0, 1.0);
}
GLSL doesn't give you a built-in value for the screen-space position so you need to supply it yourself.
//fragment-shader.glsl
precision mediump float;

uniform samplerCube uSampler;
uniform mat4 uViewProjectionInverse;

varying vec2 vPosition;

void main() {
    vec4 pos = uViewProjectionInverse * vec4(vPosition, 0.0, 1.0);
    gl_FragColor = textureCube(uSampler, normalize(pos.xyz / pos.w));
}
We take the screen space point and convert it to world space (pos). Since world space is based on the 0 origin of the world it actually represents the direction as well (a key realization), it's just not normalized but that shouldn't matter for the cube map sampler, it just wants a direction. We get the final output:

This looks good! But when we try to rotate something weird happens.
Not good! As it turns out the matrix multiplication was backward!
bindEnvironment(){
    if(this.environment){
        this.context.useProgram(this.environment.program);
        this.context.activeTexture(this.context.TEXTURE0);
        this.context.bindTexture(this.context.TEXTURE_CUBE_MAP, this.environment.cubemap);
        bindAttribute(this.context, [
            -1.0, -1.0,
            1.0, -1.0,
            -1.0, 1.0,
            1.0, 1.0
        ], "aVertexPosition", 2);
        const viewMatrix = asMatrix(this.cameras.default.getViewMatrix(), 4, 4);
        //remove translation
        viewMatrix[3][0] = 0;
        viewMatrix[3][1] = 0;
        viewMatrix[3][2] = 0;
        const projectionMatrix = asMatrix(this.cameras.default.getProjectionMatrix(), 4, 4);
-       const viewProjectMatrix = multiplyMatrix(projectionMatrix, viewMatrix);
+               const viewProjectMatrix = multiplyMatrix(viewMatrix, projectionMatrix);
        const inverseViewProjectionMatrix = getInverse(viewProjectMatrix);
        autoBindUniform(this.context, "uViewProjectionInverse", inverseViewProjectionMatrix.flat());
    }
}
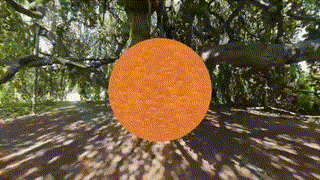
It's always the small things that go unnoticed. Now we get correct behavior:

Optimization
This works but we can optimize a little better. We're drawing the background before anything else and then drawing objects over it. This is a bit expensive since we're doing calculations for pixels we won't see. Instead we can draw the objects first and then draw the background on the remaining pixels. To do this we'll take advantage of the depth test functionality.
I've moved some stuff from bootGpu into the render call to make it more obvious how the drawing flags work:
render() {
    this.context.clear(this.context.COLOR_BUFFER_BIT | this.context.DEPTH_BUFFER_BIT);
    this.context.enable(this.context.CULL_FACE);
    this.context.cullFace(this.context.BACK);
    this.context.enable(this.context.DEPTH_TEST);
    this.context.depthMask(true);
    for (const mesh of Object.values(this.meshes)){
        this.bindMesh(mesh);
        this.setupGlobalUniforms();
        this.context.drawElements(this.context.TRIANGLES, mesh.triangles.length, this.context.UNSIGNED_SHORT, 0);
    }
    this.context.depthMask(false);
    if (this.environment) {
        this.context.useProgram(this.environment.program);
        this.bindEnvironment();
        this.setupGlobalUniforms();
        this.context.drawArrays(this.context.TRIANGLE_STRIP, 0, 4);
    }
}
As you can see we first do our clearing of the draw buffer, including the depth values. We turn on backface culling and we enabled the depth test (this is true by default). We also enable the depthMask which for some reason is not an enable/disable call but a method to itself. This value differs from DEPTH_TEST. DEPTH_TEST says whether or not we use the depth buffer to figure out if pixels are discarded, depthMask says whether we write to the depth buffer. We render objects as normal but before rendering the environment we turn off depth writes so those values do not interfere. One last change we make is to set the depth of the background to something that will not be drawn infront of objects.
//vertex-shader.glsl

gl_Position = vec4(aVertexPosition, 0.999, 1.0);
We use 0.999 so that it's not removed by the far plane. In clip space the planes are between 0 and 1. Doing so lets us draw over the background but without redrawing extra pixels.
One final optimization
We use a quad to draw the background but we could also just draw a single triangle that's sure to contain the whole viewport.
//wc-geo-gl.js - bindEnvironment
// ...binding code
bindAttribute(this.context, [
    -1.0, -1.0,
    3, -1.0,
    -1.0, 3.0
], "aVertexPosition", 2);
Where we bind the triangles attributes let's just set them to -1,-1, 3,-1, and -1, 3 which creates a triangle that holds the entire viewport from -1 to 1 inside of it.
The final output:
Code for this section can be found here: https://github.com/ndesmic/geogl/tree/v8

Top comments (0)