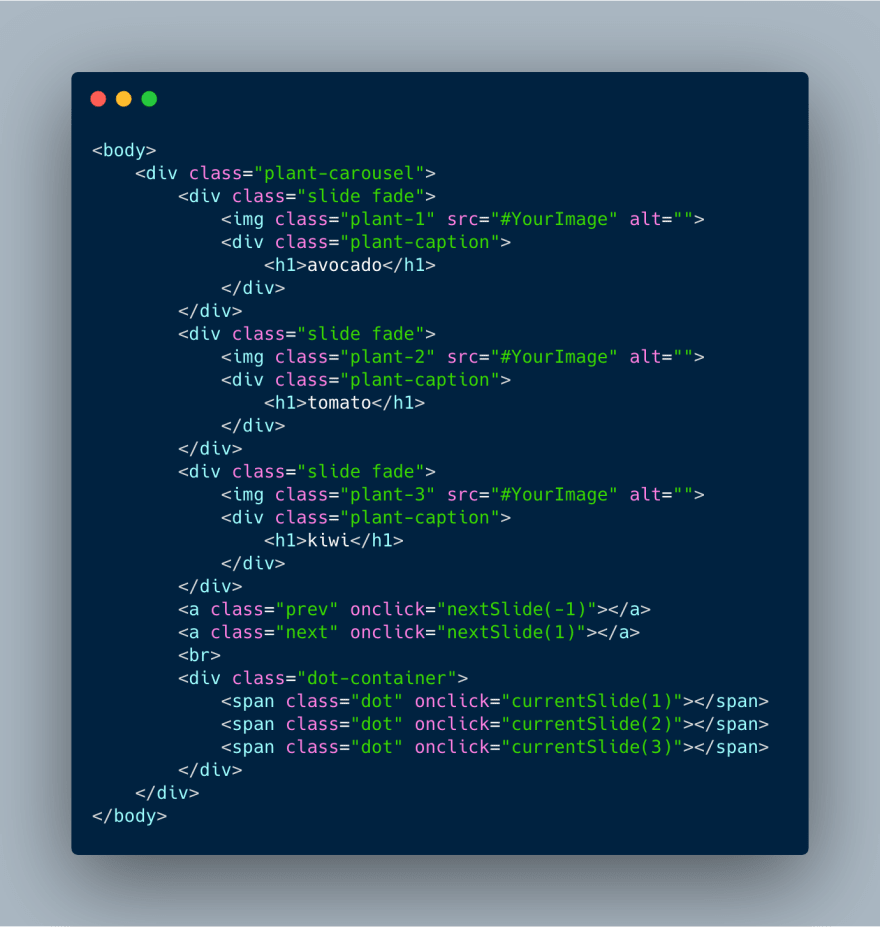
In opposed to building a smooth scroll, single-page site, this week I added separate pages for my blog. This javascript carousel uses simple indexing logic. The images include CSS for overlay text and the HTML is easy to expand on and adapt to your own project. Here's the code I used:
HTML
Before, I used the CSS "background-image" property for all my images until I learned that was poor for SEO. This time, I embedded the images into the HTML instead of adding their URLs in the CSS.
In the "plant-carousel" container, I added another div with utility classes. Utility classes hold properties that may appear in more that one place on a website. (For example, if I wanted all headers to be 20px above paragraph text, I would make a "space" class. In my CSS, I would use the "." selector to style the class like this: .space{ padding-bottom: 20px;})
The utility classes I made add sliding and fading animations. We'll take a look at what those classes do in the CSS and JS files. For added ease in styling the text, I gave the captions their own class. Once I closed the carousel div, I added tags for the next and previous arrows. Below the images, I created a container for indexing. This container holds the individual dots that represent each image's place.
CSS
Since the captions will overlay the images, I added a flex display to the "plant-caption" class. I centered everything and made sure the width was 100% so that it will span the full width of any screen. The "plant-carousel" class is styled in a flex row to keep the arrows and captions horizontally aligned in the container.
The styling for the images and the arrows is pretty standard. I want to highlight the "fade" and "slide" classes before I move onto the moving pieces of Javascript. "slide" has one property with the sole purpose of keeping all the images hidden until they get called to show. I struggled with a cluttered screen until I figured out how this one line could fit into an image slider. I set the display to "none" and BOOM. When the page loads and is re-loaded, the display resets. The images fade onto the screen. It takes 1.5 seconds to bring them from 0.4 opacity to a completely visible 1 opacity property setting.
Javascript
There has to at least be one image in the slider for it to work, so I set a variable to hold the place. Next, I defined what the next slide would be. It sets value of the previous slide to the current slide's indexed value plus the next slide's value. It looks like this when extended:
slideIndex = slideIndex + n (n represents the showing images in the slide's index which is also 1).
"currentSlide" sets whichever slide showing to 1 so that the slider will loop without coming to an end.
The "showSlides" function increases the showing slide along with its corresponding. The slides are set to "active" when the next or previous button is pressed.
TL:DR Check out the CodePen of an image carousel I made using Javascript and flexbox.
Connect with me on Twitter to talk more dev stuff. If you haven't checked out the previous parts of "Creating a Blog", check out part 1 and part 2:

CSS Flexbox Nav Bar - Building a Blog, Part 1
Njeri Cooper ・ May 16 '19 ・ 2 min read

CSS Flexbox Hero Image with Parallax Scroll - Building a Blog, Part 2
Njeri Cooper ・ May 23 '19 ・ 2 min read
Flexbox Javascript Image Carousel codepen.io/njericooper/pe… via @CodePen18:29 PM - 29 May 2019


Latest comments (0)