

Categorizing data based on a feature can be a steep learning curve for beginners. In JavaScript, creating a category typically refers to creating a custom object with specific properties and methods that can be used to perform certain tasks.
Prerequisite:
Solid knowledge of JavaScript, importing objects in a file, mapping, and functions. Basics of React hooks(useState), components, and props.
Set
Set() is a constructor function that creates a new Set object. In JavaScript, a constructor function is a special type of function that is used for creating and initializing objects. It serves as a blueprint or a template for creating multiple objects of the same type. Constructor functions are typically used with the “new” keyword to instantiate new objects.
So to create a set constructor is:
const firstSet = new Set();
Set can help in storing unique values like our category values. Set has some important methods but would like to talk about two. like add() which adds a new element to the Set and has() which returns true if a value exists. For more information, visit MDN.
Setting an image Gallary

We are to build an image gallery like Unsplash. We would be using the set constructor. The first step for this tutorial is to initialize a React project. In this tutorial, We would be using Vite, Check out why. To initialize a React project, you need to open up your terminal and, in your desired folder, run the commands below:
npm create vite@latest
I will name this project pictureApp. Follow the steps and select react. Move to the folder directory using the cd command.
cd pictureApp
Lastly, run this, this will install all the folders and Vite dependencies.
npm install && npm run dev
Inside the src folder, create two files; App.jsx(Vite might have created this, don’t bother) and Categories.jsx.

Setting up the Data for manipulation:
I have created an array of objects, each object contains properties pertaining to a particular image. Create a data.js file in the src folder. Copy this code to the file. All the images are derived from Unsplash.
const pictures = [
  {
    id: 1,
    title: "portrait of a lady",
    category: "portrait",
    image:
      "https://images.unsplash.com/photo-1531746020798-e6953c6e8e04?ixlib=rb-4.0.3&ixid=M3wxMjA3fDB8MHxzZWFyY2h8NHx8cG9ydHJhaXR8ZW58MHx8MHx8fDA%3D&auto=format&fit=crop&w=600&q=60",
  },
  {
    id: 2,
    title: "Lilac-breasted Roller",
    category: "Animals",
    image:
      "https://images.unsplash.com/photo-1535083783855-76ae62b2914e?ixlib=rb-4.0.3&ixid=M3wxMjA3fDB8MHxwaG90by1wYWdlfHx8fGVufDB8fHx8fA%3D%3D&auto=format&fit=crop&w=435&q=80",
  },
  {
    id: 3,
    title: "portrait of a handsome man",
    category: "portrait",
    image:
      "https://images.unsplash.com/photo-1507003211169-0a1dd7228f2d?ixlib=rb-4.0.3&ixid=M3wxMjA3fDB8MHxzZWFyY2h8MTR8fHBvcnRyYWl0fGVufDB8fDB8fHww&auto=format&fit=crop&w=600&q=60",
  },
  {
    id: 4,
    title: "Beautiful Mountain",
    category: "Nature",
    image:
      "https://images.unsplash.com/photo-1682685797439-a05dd915cee9?ixlib=rb-4.0.3&ixid=M3wxMjA3fDF8MHxzZWFyY2h8MXx8bmF0dXJlfGVufDB8fDB8fHww&auto=format&fit=crop&w=600&q=60",
  },
  {
    id: 5,
    title: "Tiger",
    category: "Animals",
    image:
      "https://images.unsplash.com/photo-1591824438708-ce405f36ba3d?ixlib=rb-4.0.3&ixid=M3wxMjA3fDB8MHxwaG90by1wYWdlfHx8fGVufDB8fHx8fA%3D%3D&auto=format&fit=crop&w=387&q=80",
  },
  {
    id: 6,
    title: "An african American",
    category: "portrait",
    image:
      "https://images.unsplash.com/photo-1521119989659-a83eee488004?ixlib=rb-4.0.3&ixid=M3wxMjA3fDB8MHxwaG90by1wYWdlfHx8fGVufDB8fHx8fA%3D%3D&auto=format&fit=crop&w=423&q=80",
  },
  {
    id: 7,
    title: "Sea Waves",
    category: "Nature",
    image:
      "https://images.unsplash.com/photo-1505144808419-1957a94ca61e?ixlib=rb-4.0.3&ixid=M3wxMjA3fDB8MHxzZWFyY2h8MTh8fG5hdHVyZXxlbnwwfHwwfHx8MA%3D%3D&auto=format&fit=crop&w=600&q=60",
  },
  {
    id: 8,
    title: "Cute Cat",
    category: "Animals",
    image:
      "https://images.unsplash.com/photo-1529778873920-4da4926a72c2?ixlib=rb-4.0.3&ixid=M3wxMjA3fDB8MHxzZWFyY2h8Mnx8YW5pbWFsc3xlbnwwfHwwfHx8MA%3D%3D&auto=format&fit=crop&w=600&q=60",
  },
  {
    id: 9,
    title: "portrait of a black lady",
    category: "portrait",
    image:
      "https://images.unsplash.com/photo-1531123897727-8f129e1688ce?ixlib=rb-4.0.3&ixid=M3wxMjA3fDB8MHxzZWFyY2h8MTF8fHBvcnRyYWl0fGVufDB8fDB8fHww&auto=format&fit=crop&w=600&q=60",
  },
];
export default pictures;
Styling the page.
For the styling of the webpage. We create an index.css in the src folder. Paste this CSS code for styling the document.
*,
*::before,
*::after {
  -webkit-box-sizing: border-box;
  box-sizing: border-box;
  margin: 0;
  padding: 0;
  font-weight: 400;
}
:root {
  font-size: 10px;
  --padding: 3rem;
}
::-moz-selection {
  background: rgb(17, 17, 17, 0.99);
  color: rgb(89, 89, 89);
}
::selection {
  background: rgb(17, 17, 17, 0.99);
  color: rgb(89, 89, 89);
}
html {
  font-family: "Wildtype", -apple-system, BlinkMacSystemFont, sans-serif;
}
@supports (font-variation-settings: normal) {
  html {
    font-family: "Wildtype", -apple-system, BlinkMacSystemFont, sans-serif;
  }
}
body {
  background: #1a1a1a;
  color: white;
  margin: 0 auto;
  max-width: 150rem;
  overflow-x: hidden;
}
h1,
h2,
h3,
h4,
p,
a,
span {
  text-rendering: geometricPrecision;
  -webkit-font-smoothing: antialiased;
  -moz-osx-font-smoothing: grayscale;
}
h4 {
  font-size: 20px;
  color: #abbc4e;
  line-height: 1.3;
}

a {
  text-decoration: none;
  color: white;
  -webkit-filter: brightness(0.8);
  filter: brightness(0.8);
  -webkit-transition: 150ms;
  -o-transition: 150ms;
  transition: 150ms;
}
a,
a * {
  border-radius: 0.15rem;
}
a:hover {
  -webkit-filter: brightness(1.09);
  filter: brightness(1.09);
}
.grid {
  display: -ms-grid;
  display: grid;
  -ms-grid-columns: 1fr 1.5rem 1fr 1.5rem 1fr 1.5rem 1fr 1.5rem 1fr 1.5rem 1fr;
  grid-template-columns: repeat(6, 1fr);
  grid-row-gap: 1.5rem;
  grid-column-gap: 1.5rem;
  margin: auto;
}
.project-grid {
  -ms-grid-column: 1;
  grid-column-start: 1;
  -ms-grid-column-span: 7;
  grid-column-end: span 7;
  display: -ms-grid;
  display: grid;
  -ms-grid-columns: 1fr 2rem 1fr 2rem 1fr 2rem 1fr 2rem 1fr 2rem 1fr;
  grid-template-columns: repeat(6, 1fr);
  grid-row-gap: 15rem;
  grid-column-gap: 2rem;
  margin: 6rem auto;
}
.project-grid a {
  -ms-grid-column-span: 2;
  grid-column: span 2;
  color: white;
  min-height: 56.25%;
}
.project-grid a h3 {
  font-size: 2.15rem;
  margin: 1.25rem 0;
}
.project-grid a p {
  font-size: 1.5rem;
  color: lightgrey;
}
.project-grid a img {
  margin-bottom: 0;
  -o-object-fit: cover;
  object-fit: cover;
  width: 100%;
  height: 100%;
}
.btn {
  cursor: pointer;
  color: rgb(0, 0, 0);
  background: #b0afaf;
  border: transparent;
  border-radius: 0.25rem;
  letter-spacing: 1px;
  padding: 25px 10px;
  margin: 0 10px;
  box-shadow: 0 1px 3px 0 rgba(0, 0, 0, 0.1), 0 1px 2px 0 rgba(0, 0, 0, 0.06);
  transition: 0.3s ease-in-out all;
  text-transform: capitalize;
  display: inline-block;
}
.btn:hover {
  background: #585858;
  box-shadow: 0 10px 15px -3px rgba(0, 0, 0, 0.1);
}
main {
  padding: 3rem var(--padding);
}
@media (max-width: 960px) {
  :root {
    font-size: 9px;
  }
  .intro {
    -ms-grid-column: 1;
    grid-column-start: 1;
    -ms-grid-column-span: 7;
    grid-column-end: span 7;
  }
  .project-grid {
    grid-row-gap: 16rem;
  }
  .project-grid a h3 {
    font-size: 2.5rem;
    margin-bottom: 1.15rem;
  }
  .project-grid a {
    -ms-grid-column-span: 3;
    grid-column: span 3;
  }
}
@media (max-width: 700px) {
  :root {
    font-size: 8px;
    --padding: 2rem;
  }
  .project-grid {
    grid-row-gap: 24rem;
  }
  .project-grid a {
    -ms-grid-column-span: 6;
    grid-column: span 6;
  }
  .project-grid a h3 {
    font-size: 3rem;
    margin-top: 2rem;
  }
  .project-grid a p {
    font-size: 1.75rem;
  }
  .project-grid a img {
    width: 100vw;
    margin: auto calc(50% - 50vw);
  }
}
@media (min-width: 4000px) {
  :root {
    font-size: 40px;
  }
}
We would be using this CSS styling across the site.
Setting up the Image Gallary:
Import the data.js in the App.js. In the React component named App, We would be creating an instance of an image and using Map to create instances of every object.
import React from "react";
import data from "./data";
import "./index.css";
function App() {
  return (
    <main className="grid">
      <section className="project-grid">
        {data.map((pic) => {
          return (
            <a href="#" key={pic.id}>
              <img src={pic.image} alt={pic.title} loading="lazy" />
              <h3>{pic.title}</h3>
              <h4>{pic.category}</h4>
            </a>
          );
        })}
      </section>
    </main>
  );
}
export default App;
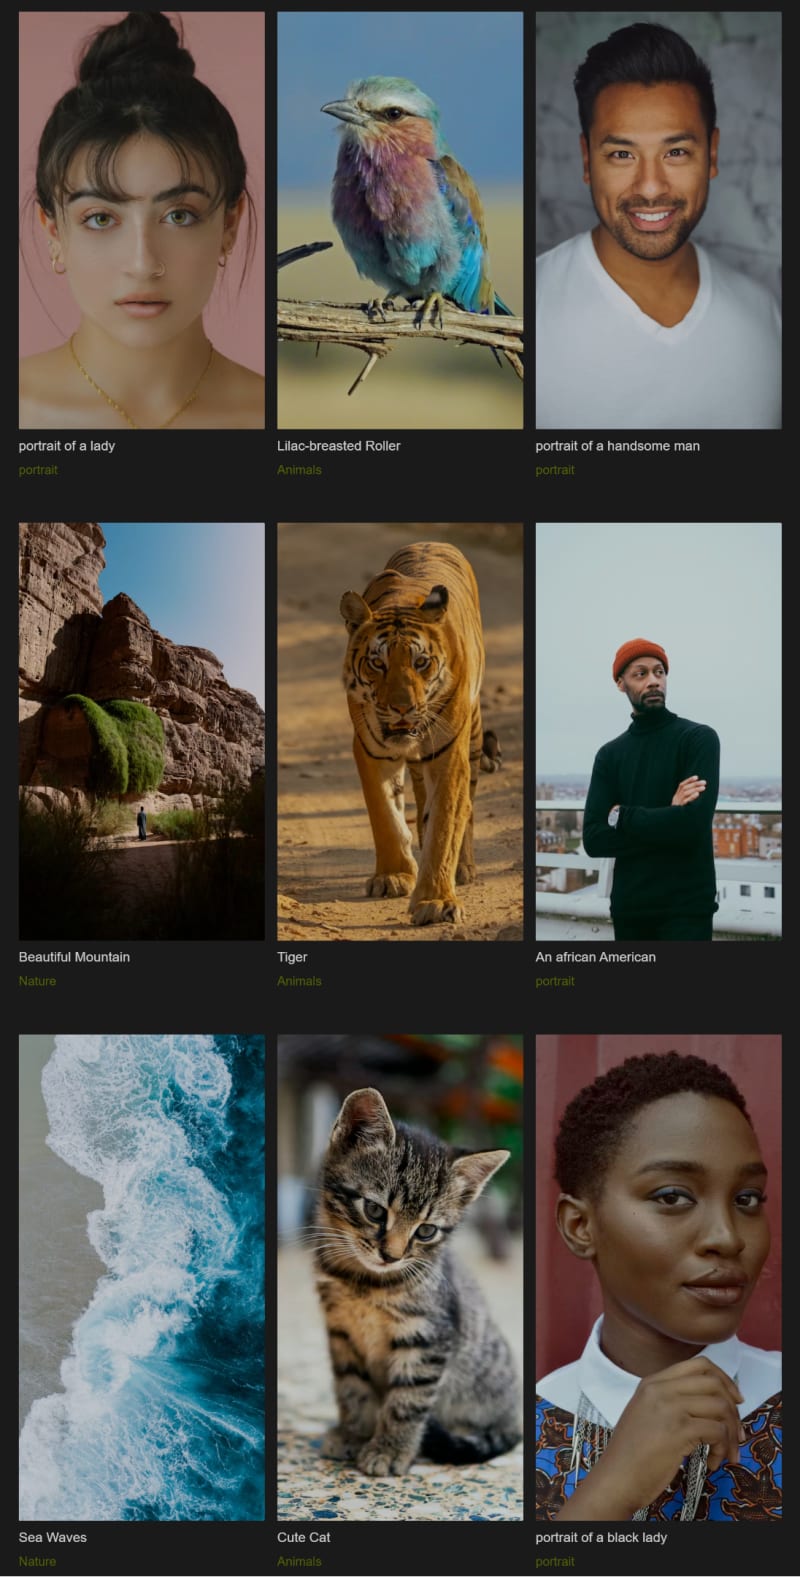
The above code creates an instance of an image, and then maps all the objects in the data array to multiple instances of images. Make sure you imported the index.css for the document styling. You should have a result like this if you follow through.
Setting up the categories using the Set object
Before we set up the filtering button for the categories, we need to set up a state value for the images. This will enable React to re-render the updated or categorized list in the component. To do this, we add this code to the App component.
const [image, setImage] = useState(data);
We need to update the return JSX code to this state(image). We change data used in mapping through the array of objects to image which is the state in the return block.

Due to the fact a Set constructor stores unique values. One of the benefits of the Set() constructor is it ignores any value duplicated.
//This Creates a new set
let myFirstSet = new Set();
// Add values to the set
myFirstSet.add();
myFirstSet.add(2);
myFirstSet.add(3);
// Add a duplicate value (ignored)
myFirstSet.add(1);
// the result is still {1,2,3}
console.log(myFirstSet)
To create a new set, we need to extract the categories of each of the objects. We map through the objects and assign them to ourCategories variable on the App.js.
const ourCategories = data.map((image) => {
  return image.category;
});
console.log(ourCategories)
//["portrait", "Animals","portrait","Nature","Animals","portrait","Nature","Animals","portrait"]
Using the new set, we create an object from the category with no duplicate.
const ourCategories = data.map((image) => {
  return image.category;
});
const objectCategories = new Set(ourCategories); // {'portrait', 'Animals', 'Nature'}
Setting up a Button to Display Items Based on the Category:
Create a useState in the App component and pass the categories.
const [categories, setCategories] = useState(allCategories);
In other not to create a clustered code environment, create a new React file in src folder named Categories.jsx. Categories.jsx would handle the button to filter images. Create a component in Categories.jsx named Categories. We would pass both the function to filter the array with the category name and the state value categories.
Create a function in the app component that accepts a parameter (‘cat’ or any name). Filter through the array using the include method. It returns all the categories with the same name as the one been passed. For the “all” button, we pass a condition that returns all the elements of the array(data) if the category is all.
const filterImage = (cat) => {
    if (cat === "all") {
      setImage(data);
      return;
    }
    const filteredImage = data.filter((item) => item.category === cat);
    setImage(filteredImage);
  };
We need to pass the state(categories) and function(filterImage) to the Categories page as props naming them category and filterImage respectively.

In the Categories.jsx, destructure the props(which are category and filterImage).
Map through each of the category (props) array and create a button inserting the value of the props in.
function Categories({ category, filterImage }) {
  return (
    <>
      {category.map((cat) => {
        return (
          <button
            key={cat}
            className="btn"
            onClick={() => {
              filterImage(cat);
            }}
          >
            {cat}
          </button>
        );
      })}
    </>
  );
}
export default Categories;
This the complete app.jsx code
 import React, { useState } from "react";
import data from "./data";
import "./index.css";
import Categories from "./Categories";
const ourCategories = data.map((image) => {
  return image.category;
});
const objectCategories = new Set(ourCategories);
const allCategories = ["all", ...objectCategories];
function App() {
  const [image, setImage] = useState(data);
  const [categories, setCategories] = useState(allCategories);
  const filterImage = (cat) => {
    if (cat === "all") {
      setImage(data);
      return;
    }
    const filteredImage = data.filter((item) => item.category === cat);
    setImage(filteredImage);
  };
  return (
    <main className="grid">
      <Categories category={categories} filterImage={filterImage} />
      <section className="project-grid">
        {image.map((pic) => {
          return (
            <a href="#" key={pic.id}>
              <img src={pic.image} alt="" loading="lazy" />
              <h3>{pic.title}</h3>
              <h4>{pic.category}</h4>
            </a>
          );
        })}
      </section>
    </main>
  );
}
export default App;
And the Categories.jsx block of code.
import React from "react";

    function Categories({ category, filterImage }) {

      return (

        <>

          {category.map((cat) => {

            return (

              <button

                key={cat}

                className="btn"

                onClick={() => {

                  filterImage(cat);

                }}

              >

                {cat}

              </button>

            );

          })}

        </>

      );

    }

    export default Categories;
You should have a result like this.

Top comments (0)