

Having experienced this in my first week of working at home I knew I needed a solution for letting my wife and kid know when I was going to be in a meeting/pair programming. I could just shout downstairs but where is the fun in that? By automating it, it is also one less thing to have to remember in what is shaping up to be a stressful time for everyone.
I wanted this to be a quick Sunday evening project that only took a couple of hours so needed it to be simple and use the kit I already had. I also wanted it to work without the Raspberry Pi (RPi) being accessible from outside my home network.
I could have completed this project in a much simpler way if I had allowed access to the RPi from the outside world but in a world where IoT devices are the target of cyber attacks I wanted to limit the exposure.
On the hardware side of things, it seemed obvious to use an RPi and Mote LEDs. I have them already and they are simple to work with.
Mote is a collection of components allowing you to easily work with LEDs. The visual side of this project could be anything you have knocking around. I just happened to have these.
I am using an RPi 3 for this but you could any Pi that has is network connected.
All my meetings are in Google Calendar so I just needed a way to trigger an event when my meetings start and finish. If This Than That (IFTTT) is perfect for this. Google Calendar is the THIS of IFTTT and a webhook is the THAT.
I wanted this to be a quick project with as little programming as possible so I needed a way to accept the webhook but also be able to perform actions on a device in my local network. This part took a little longer to figure out, but a combination of Tasker and AutoRemote was able to perfectly meet my needs.
Tasker is an automation app that allows users to perform actions based on an event.
AutoRemote allows devices to communicate with each other without any user interaction.
N.B This article assumes some previous knowledge of Tasker and AutoRemote and so the instructions may be brief
Tasker and AutoRemote are built to work with each other and so we can use AutoRemote as a way of triggering an action in Tasker. AutoRemote is available as a plugin in Tasker.
AutoRemote acts as our "server" for the IFTTT webhook to callout to. When it receives a request, an event is triggered in Tasker which in turn sends a REST request to a local flask app that is running on the RPi. This Flask app controls the Mote LEDs.
Setting up Tasker and AutoRemote
In AutoRemote we need to register IFTTT as a device. Click the phone icon in the tab bar and then click the IFTTT logo and follow the instructions. This will give you a URL that can be added to the IFTTT webhook. It will look something like this:
https://autoremotejoaomgcd.appspot.com/sendmessage?key=[***yourKey***]&sender=[***yourId***]&message=IFTTT_MEETING_BUSY=:=true
Notice message=IFTTT_MEETING_BUSY=:=true this is how we pass properties to AutoRemote. The left side of =:= is how we can filter incoming requests and the right side are any params you want to pass in.
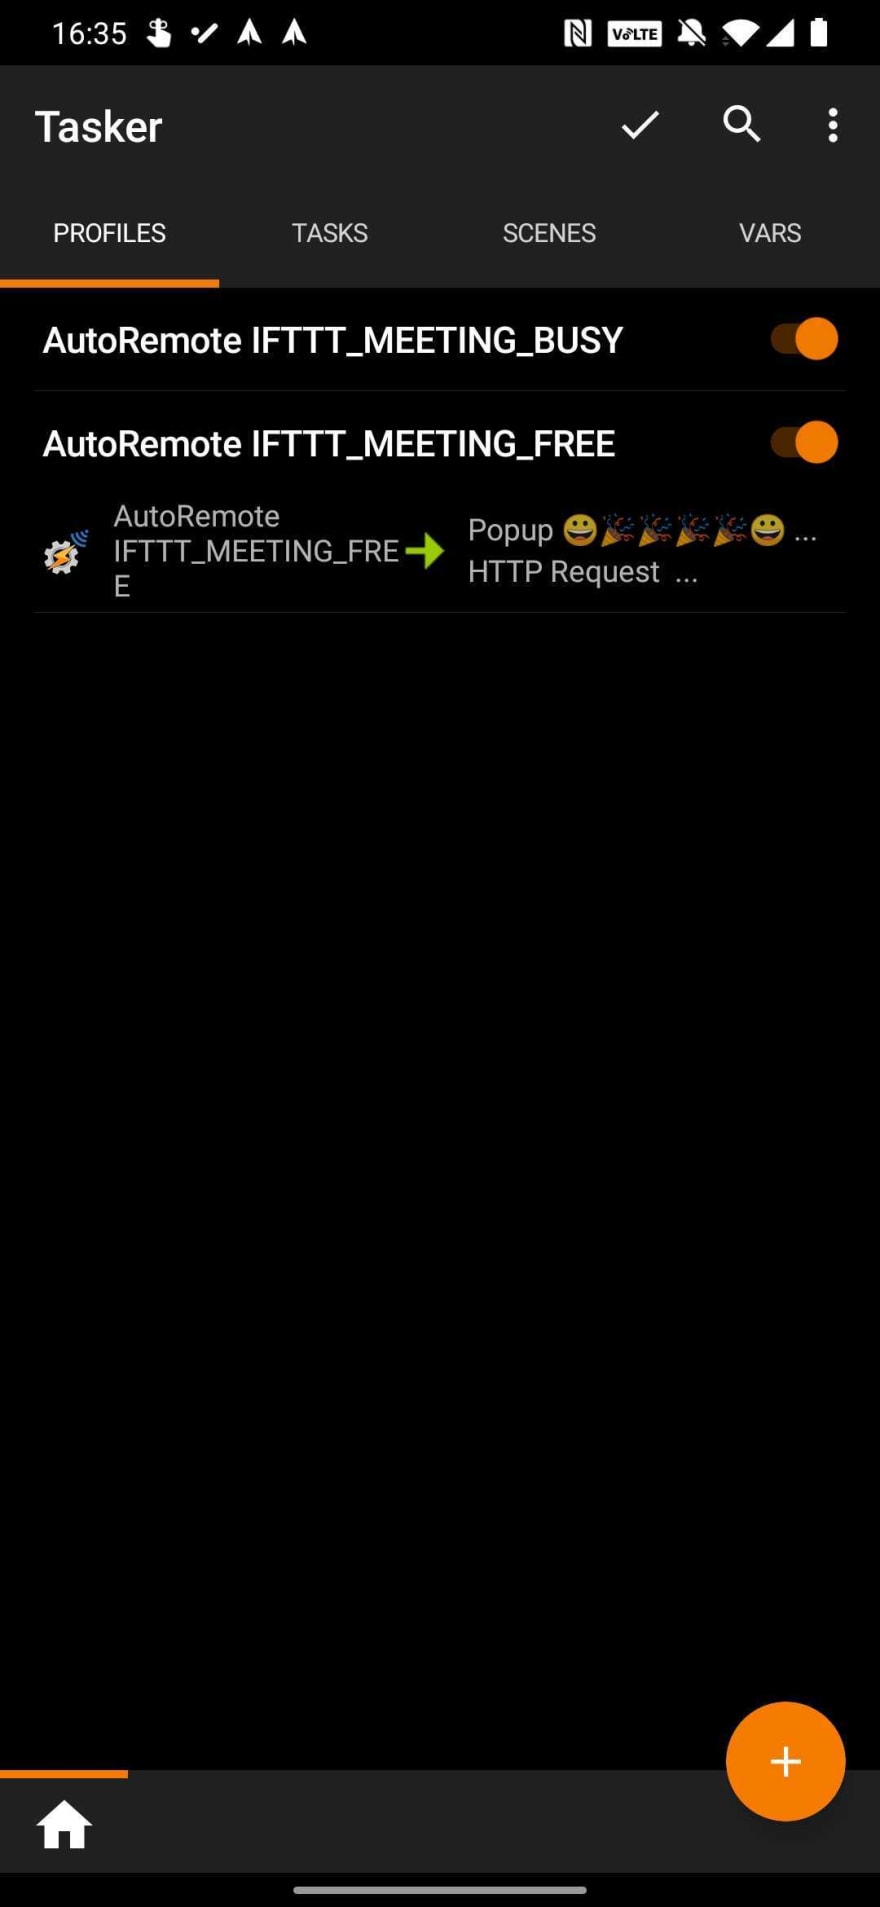
With this set up we now need to trigger events in Tasker. Under the profiles tab create a new one profile selecting event -> plugin -> AutoRemote -> AutoRemote. Edit the configuration and add the name of the event (the left side of the request from IFTTT e.g IFTTT*MEETING_BUSY). Next, click back and add the action. In my case, I wanted to perform an HTTP request* to my RPi but there is a multitude of things that Tasker can do for you.
Once set up your profiles will look like this
The final step is setting up the local server to trigger the Mote lights. I wrote a really simple Flask app that listens to requests and calls the correct Mote methods. It looks something like this:
import motephat
from flask import Flask, jsonify, make_response

app = Flask(__name__)

motephat.set_brightness(0.5)
motephat.configure_channel(1, 16, False)
#motephat.configure_channel(2, 16, False)
#motephat.configure_channel(3, 16, False)
#motephat.configure_channel(4, 16, False)

colour = 'FFFFFF'
status = 0

def mote_on(c):
    for channel in range(1, 5):
            for pixel in range(16):
                motephat.set_pixel(channel, pixel, 255, 0, 0)
    motephat.show()

    return True

def mote_off():
    motephat.clear()
    motephat.show()
    return True

def get_status():
    global status
    for channel in range(4):
        for pixel in range(16):
            if motephat.get_pixel(channel + 1, pixel) != (0, 0, 0):
                status = 1
    return status

@app.route('/')
def hello():
    return 'hello'

@app.route('/mote/api/v1.0/<string:st>', methods=['GET'])
def set_status(st):
    global status, colour
    if st == 'on':
        status = 1
        mote_on(colour)
    elif st == 'off':
        status = 0
        mote_off()
    elif st == 'status':
        status = get_status()
    return jsonify({'status': status, 'colour': colour})

@app.errorhandler(404)
def not_found(error):
    return make_response(jsonify({'error': 'Not found'}), 404)

if __name__ == '__main__':
    mote_off()
    app.run(debug='true', host='0.0.0.0')
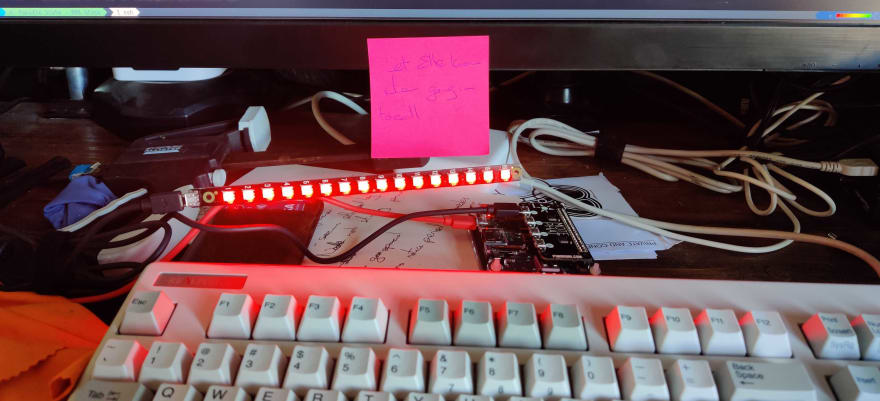
Now when you are about to go into a meeting your lights should look like this
Conclusion
I hope this was of some interest. I really enjoy these little projects that have limited time and scope. Obviously, there are so many ways that this could be done and some many improvements that could be made but this was only meant to be a little bit of fun on a Sunday night.

Oldest comments (0)