
In this section we will build our dashboard that includes a custom calendar component which we will build from scratch!
Dashboard
Let’s first start with adding a Route for Dashboard inside App.js:
import Dashboard from './pages/Dashboard';

...

<Route path="/dashboard">

<Dashboard />

</Route>

....
In the pages folder add a file called Dashboard.jsx
We will use the dashboard template from the Material UI framework which you can find here: https://material-ui.com/getting-started/templates/
First strip down all the items that we do not need.
Then import the withFirebase and withRouter components and export the Dashboard with them.
export default withRouter(withFirebase(Dashboard));
Also import our copyright component and insert it into the correct place.
Remove the sidebar completely for now, as well as the main content.
The styles we will move to our /config folder. Create a new file called theme.dashboard.js inside /config with the following code:
Then import it into Dashboard.jsx
Now you should see an empty dashboard when logging in or signing up:

Let’s add the sidebar component. Create a new folder called Sidebar inside components with an index.jsx file.
Create a function called Sidebar and place in the return the sidebar from the Material UI dashboard template.
The Sidebar will receive props which we will send from the Dashboard.jsx page. Also we will import react router to make our navigation working.
You can see that we are receiving 3 props:
open
handleDrawerClose
signOut()
Inside the Sidebar function you could also destructure these props like this:
const {open, handleDrawerClose, signOut()} = props;
Whatever you prefer. Check your Sidebar code with the following snippet:
Workout direct to the current page, which is the dashboard. Admin directs to the current page/admin.
Now import the Sidebar into Dashboard.jsx and load it on the correct place.
You should see an empty closed Sidebar in the dashboard now.
Let’s send the props to the Sidebar.:
<Sidebar signOut={signOut} open={open} handleDrawerClose={handleDrawerClose} />
And set the functions inside the Dashboard component:
const [open, setOpen] = React.useState(true);
We’ll use a hook to set the open state of our Sidebar, default on true (open).
const handleDrawerOpen = () => setOpen(true);
const handleDrawerClose = () => setOpen(false);
On clicking on the sidebar icon we will open or close it by changing the state.
const signOut = () => {
props.firebase.auth.signOut();
props.history.push("/");
}
The props in signOut are received through our higher order components, we’ll send our user to the homepage after signing out.
Session
Currently everyone can see the dashboard page, this should not be possible. Let’s check if the user is authenticated and only then show the dashboard page.
Add a new folder called Session inside our components folder. In here add three files: context.js, index.js and withAuthentication.js
Inside the context.js we will only set the Context API:
import React from 'react';

const AuthUserContext = React.createContext(null);

export default AuthUserContext;
withAuthentication file needs firebase and also the context API which we just made, so first we will import them.
What we will do here, is create a higher order component that add the state of the authUser to the component. Then we will also add withFirebase so we do not have to call that again.
We’ll use onAuthStateChanged from firebase to check if the state has changed and set our user state accordingly. We will fire this as soon as the component has mounted, and also when the component gets removed the authUser gets removed from the class.
Inside index.js let’s import and export the files above:
import AuthUserContext from './context';

import withAuthentication from './withAuthentication';

export { authUserContext, withAuthentication };
Now import authUserContext and withAuthentication inside Dashboard.jsx:
import { AuthUserContext, withAuthentication } from '../components/Session';
Then check if the authUser variable exists, if so return the complete dashboard component, if not show a message or send the user back to homepage (whichever you prefer, make sure to use the router with redirecting).
<AuthUserContext.Consumer>

{ authUser => authUser ? ( .... ) : ( <p>Not authorized!</p> ) }

</AuthUserContext.Consumer>
Instead of using the withFirebase HOC, we’ll use:
export default withRouter(withAuthentication(Dashboard));
Try to access the dashboard now, you should see the error message. Try logging in and out, if it works, great job!
You can always check the original github repo if something is not working.
Custom Calendar
Next up is our calendar component, which will hold all the workout activities the user tracks.
Start with creating a folder called Calendar inside our components folder with a file Index.jsx.
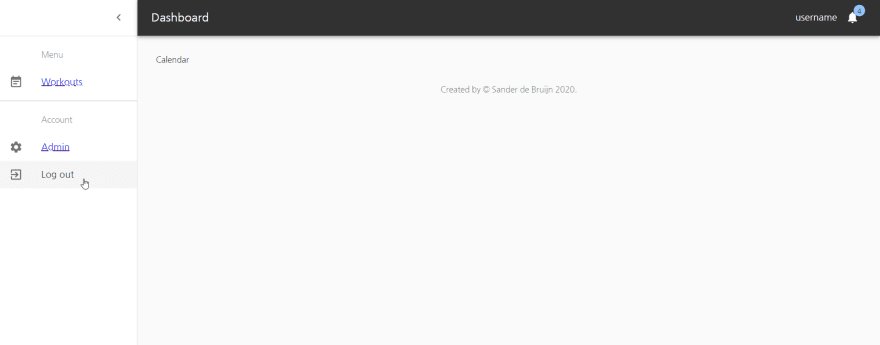
Add the following basic code and import and show it on Dashboard.jsx so that you’ll see Calendar written in the Dashboard. We just add authentication onto the calendar here:
Let’s start by splitting up our Calendar into a header, where the users selects the month, and a body, where they can pick a day.
Create calendar-body.jsx and calendar-head.jsx files inside /Calendar folder. For now add simple functional components inside that return some text. Then import them inside the Calendar index file.
You should see the contents of the body and head files onto the Dashboard.
Next up we will send authUser and firebase as properties to the Calendar component. We do this by changing Dashboard.jsx:
<Calendar firebase={props.firebase} authUser={authUser} />
Now our Calendar component has access to these properties. Add inside the calendar function:
const {firebase, authUser} = props;

console.log(firebase, authUser);
You should see both object now in your console log.
To manage our date and times we will use the moment package, run the command npm install moment and import it into the calendar component. We’ll also import the material UI grid so it gets placed better.
If you want to change the language to your own, you can add import 'moment/locale/en-gb'; but then with your own language.
index.jsx from Calendar now looks like:
Calendar CSS
Create a file called calendar.css inside our /Calendar folder with the following code:
Calendar Head
Let’s start with selecting the correct month.
We’ll be using hooks to manage our state so add useState in the import:
import React, { useState } from 'react';
To decide what we want to use hooks for, we need to think about which variables we would like to have managed inside the state.
This will be:
Date object from moment where we can play with
If the month selection table should be shown or not
The calendar head also needs to retrieve the current month, current year and a list of all months from moment.
We can set the new month by adding a function which receives the month-to-be, creates a copy of the dateObject in our state and assigns it the new month. Then we’ll replace that copy with our current dateObject.
Also we will toggle the month with the ! operator.
And then we will pass all those functionalities to our calendar header.
In calendar-head.jsx we first destructure off our props.
const {allMonths, setMonth, toggleMonthSelect, currentMonth, currentYear, showMonthTable} = props;
Then we’ll create an empty array called months and for every month that we receive from the props allMonths we add a TableCell to the array that contains the month name and a onClick function called setMonth.
Then we’ll create two more empty arrays, one for rows and one for cells. We will loop over our months array and add it to a row until it reaches three, then we create a new row.
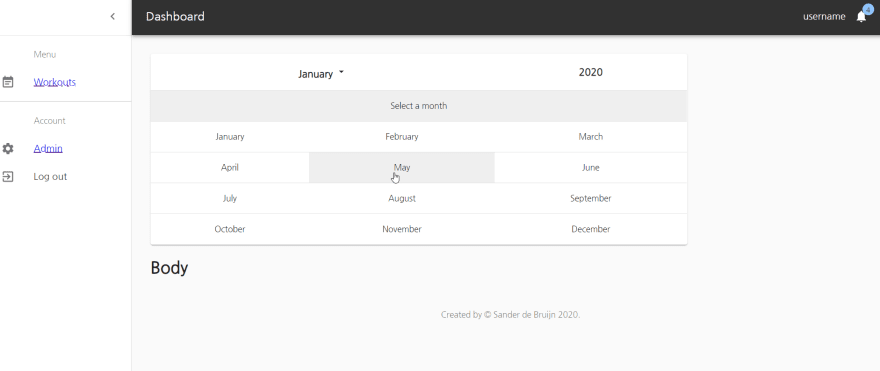
In our return we will add another Table from Material UI containing our monthList with rows if showMonthTable is true. We also import an arrow icon from Material UI and use the currentMonth() and currentYear() getter functions from props to display them.
Now you should be able to select a year from the list and it should update immediately.
Our complete CalendarHead component:
Calendar Body
Next up we will build our calendar body. First let’s decide which hooks and props we need to send to the body.
As state we only need to date that the users select, lets call is selectedDay. This will be an object containing the day and month combination.
const [selectedDay, setSelected] = useState(defaultSelectedDay);

const defaultSelectedDay = {

 day: moment().format("D"),

 month: moment().month()

}
As default we will select the current day and month with moment.
To set a new selectedDay we will add a custom setSelectedDay function that takes in the new day and updated our state hook:
const setSelectedDay = day => {

 setSelected({ day, month: currentMonthNum() });

}
The day stays the same, it is the same as saying day: day. The currentMonthNum() is a getting function that gets the dateObject state hooks month:
const currentMonthNum = () => dateObject.month();
Same goes for the daysInMonth() and currentDay() functions. The actual month we’ll use to indicate the current date.
Now we also need to know the first day of the month, to decide where we need to start counting our days inside our calendar body table.
const firstDayOfMonth = () => moment(dateObject).startOf("month").format("d");
Let’s start working on the calendar-body.jsx file now. Again we’ll use the table components from Material UI.
First destructure off al our props, and then install the package react-id-generator so we can add unique keys when we map over lists (having unique keys is a prerequisite from React).
npm install react-id-generator';

import nextId from "react-id-generator";
Until our month starts, we will add empty cells inside an array called blanks.
Then for each day in the month, we push a filled TableCell containing the day number, the onClick function setSelectedDay with the current day, and a variable className that shows different colours if the day is today or the selected day.
Then we combine the blanks and days arrays together by using the spread operator:
let totalSlots = [...blanks, ...monthDays];
And just like we did in the head, we loop over every cell and push it into a row untill it reaches seven.
In the return we add the Table components from Material UI and loop over the week days and also the rows which contain our day cells.
The complete calendar body then looks like:
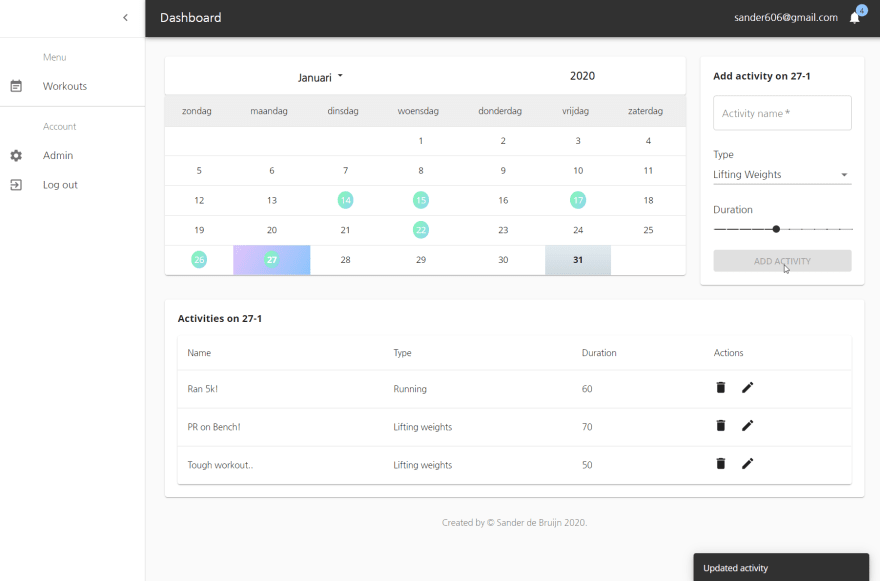
Now you should be able to select a day and the table should highlight today. Great! We have come so far already.

In the next part we will add, update and delete activities which we will store in the Firebase real time database using noSQL.
Checkout the final result: https://master.d2e0orovu8bxyk.amplifyapp.com/**
**Source code: https://github.com/sanderdebr/workout-tracker

Top comments (3)
Thanks for the nice series, @sanderdebr ~
Can you update the code snippet with syntax highlights?
Reference: the Editor Guide.
Thanks for the heads-up @dance2die ! I've updated the article with all github gists and code snippets.
I will upload the last two parts of the series today!
Nicely done with gists~
Gists makes it easy to update code snippets when you post on many media :)