In this article (originally published at sanjaysaini.tech) I will be sharing how we can create ASP.Net Core 3 Web API using Entity Framework Core edition which is basically an open source and cross-platform version of the Entity Framework to be used in the .Net Core application development.
This Web API will perform simple CRUD operations using Entity Framework Core and will use SQL Server Express edition as backend for data storage and retrieval.
Prerequisites
- In order to develop and run .Net Core app, we need .Net Core SDK that includes .Net CLI tools, .Net Core Runtime. So download and install the latest version of .Net Core SDK available from this link.
- We will also need code editor, I will recommend VS Code but if you already have any other code editor that you are using to write C# code then stick with that otherwise download and install VS Code from this link. After installing SDK and VS Code, open the command prompt and run following command to check if SDK installed properly.
$ dotnet –version
You must get the latest version number as a result.
- To test this web API’s CRUD operations, we need to install Postman which a famous API Client tool used in testing web API by sending web requests and inspecting response from the API. So download and install Postman for free from this link.
- And last, we need to have SQL Server installed on the machine. In case you already have Visual Studio 2015 or later installed then SQL Server Express edition will already be installed along with the Visual Studio. Otherwise download and install latest SQL Server Express edition free from this link. After done with the environment setup we are ready to create ASP.Net Core 3 Web API using Entity Framework Core which will provide CRUD operations.
Create a new project
For the purpose of this article I am creating a BookStore Web API that will provide CRUD operation on web requests (Post, Get, Put and Delete) for Book data Model.
So now go to the folder location where you want to create Web API project and open the command window.
Create webapi type project for our CRUD Web API by running following command.
$ dotnet new webapi -o BookStoreApi
It will create BookStoreApi folder with the same name project file in it.
Now we need to work under this folder so move into this folder.
$ cd BookStoreApi
Our Web API will listening at HTTPS so we need to create and trust the development certificate so that web API hosts securely on local development server when we run the project.
So run following command and click on the yes button on the Security Warning dialog window.
dotnet dev-certs https --trust
Add Entity Framework Core Package Reference
First we need to install Entity Framework Core and for that we need to install the package for the EF Core database provider that we want to target. This Web API will use SQL Server so run following command to install the Entity Framework Core.
$ dotnet add package Microsoft.EntityFrameworkCore.SqlServer
You find following entry in the app project file after successful installation.
<ItemGroup>

    <PackageReference Include="Microsoft.EntityFrameworkCore.SqlServer" Version="3.1.0" />

  </ItemGroup>
Check out my article on creating CRUD application using Entity Framework Core 3 as well.
As we are done with our Web API project setup, now open VS code in the project folder to write some code.
Run following command in the command window to open the VS Code.
$ code .
Create the model
Model represents the set of classes that an application uses to manage the data.
Our model will have a POCO class to manage data for our Book Store API.
We should keep all our model classes in the Models folders so let’s create Models folder and create BookItem.cs class in it that will represent Book entities in our model.
    public class BookItem
    {
        public int Id { get; set; }
        public string Title { get; set; }
        public string Author { get; set; }
        public string Publisher { get; set; }
        public string Genre { get; set; }
        public int Price { get; set; }
    }
Also create** BookStoreDbContext.cs** class derived from DbContext that represents session with the database in the Models folder. This class object will be used to perform CRUD operations on the database and its properties will represent table in the database.
using Microsoft.EntityFrameworkCore;

public class BookStoreDbContext: DbContext
{
     public BookStoreDbContext (DbContextOptions< BookStoreDbContext > options) : base(options)
     { }

    public DbSet< BookItem> BookItems { get; set; }

}
Register Database Context
We have to register our BookStoreDbContext with the Dependency Injection container that provides services to API controllers.
And also need to configure the database connection that will be used by the Entity Framework Migrations to sync that database with the data model in the application.
So add following code in the ConfigureServices method of Startup.cs class to pass the database connection while adding the DbContext service to the container.
services.AddDbContext< BookStoreDbContext >(opt => opt
 .UseSqlServer(@"Server=(localdb)\mssqllocaldb;Database=BookStoreApiDb;Trusted_Connection=True;"));
Also add following references in the Startup.cs
using Microsoft.EntityFrameworkCore;
using BookStoreApi.Models;
Entity Framework Migrations
Entity Framework provides a way to create a database from the data model using Migrations. Migrations are used to keen database in sync with the changes in the application’s data model by updating the database schema while preserving existing data in the database.
So in order to create migrations we need to install Entity Framework Core tools that includes dotnet ef tool and the Entity Framework designer.
Run following command in the command window to install the Entity Framework Core tools.
$ dotnet tool install --global dotnet-ef
if you have already installed the Entity Framework Core tools then don’t install it again.
Now run following command to add Entity Framework designer package to the project.
$ dotnet add package Microsoft.EntityFrameworkCore.Design
It will add following entry in the application project file.
<PackageReference Include="Microsoft.EntityFrameworkCore.Design" Version="3.1.0">

<IncludeAssets>runtime; build; native; contentfiles; analyzers; buildtransitive</IncludeAssets>

<PrivateAssets>all</PrivateAssets>

</PackageReference>
Create the database
Since we have installed Entity Framework Core tools, we are ready to create database from our application data model.
First, we need to add migrations that will create the database schema of our model entities.
So run following command to create the first migration.
$ dotnet ef migrations add InitialCreate

It will add Migrations folder in the project with auto-generated files for InitialCreate migration.
Second, we need to apply InitialCreate migration on the database. Since it’s a very first migration and we don’t have existing database so it will create new database for us.
So run following command to apply the migration to the database.
$ dotnet ef database update
A new database BookStoreApiDb is created along with the table BookItems for the Model entity.
Add API Controller
Unlike Visual Studio that has template to generate boiler plate code for Web API controller, VS Code editor doesn’t provide any template.
So we need to install aspnet code generator tool to add API controller in our application.
Run following command in the command window to install the aspnet code generator tool.
$ dotnet tool install --global dotnet-aspnet-codegenerator
Also add code generation design package in the project by running following command.
$ dotnet add package Microsoft.VisualStudio.Web.CodeGeneration.Design
It will add following entry in the application project file.
<PackageReference Include="Microsoft.VisualStudio.Web.CodeGeneration.Design" Version="3.1.0" />
Since we have code generation tool installed, now we can add API controller BookItemsController which will use BookItem Model and BookStoreDbContext database context.
So run following command to generate the API controller.
$ dotnet aspnet-codegenerator controller -name BookItemsController -async -api -m BookItem -dc BookStoreDbContext -outDir Controllers
Above command will create BookItemsController.cs controller class in the Controllers folder with auto generated CRUD operation code (action methods) for following HTTP verbs.
HttpGet – to get the web resources/data
HttpPost – to create web resource/save data
HttpPut – to update web resource/data
HttpDelete – to delete web resource/data
Test CRUD Operations with Postman
After completing the initial development of our web API, we are ready to test it.
So run the following command to start up our BookStore web API.
$ dotnet run
It will host Web API locally and it will be listening at https://localhost:5001 URL. However to request web resource to the API we need to append this URL with the specific action method end point and use it with specific Http verb.
For example to get the web resource we need to use following URL with GET HTTP verb in the Web API Client or web browser.
https://localhost:5001/api/BookItems
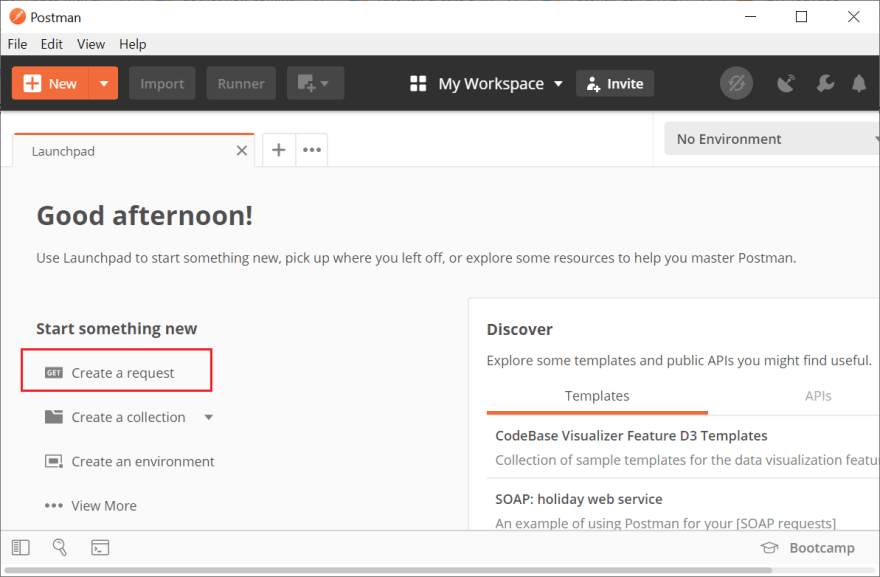
Now open the Postman Web API Client application and click on the Create a request to initiate an API request to our BookStore web API.
Create Web Resource/Data Operation
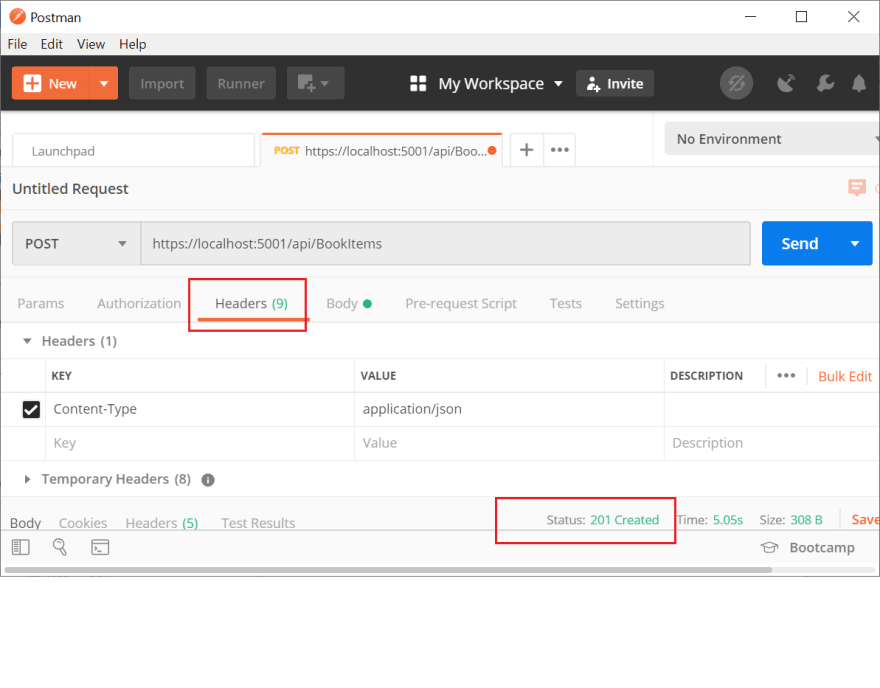
- Select POST HTTP verb from the drop down.
- Enter request URL https://localhost:5001/api/BookItems for post request.
- Select Body tab and then select raw radio button and finally select type JSON from the drop down.
- In the request body enter following JSON object representing our BookItem resource that we want to create.
{
    "Title":"The Art of War",
    "Author":"Sun Tzu",
    "Publisher":"British Museum",
    "Price": 11
}
We are not passing “id” value since it will be auto generated by the Entity Framework.
- Now click on Send button.
Now click on the Header tab and check the status that should be 201 Created which means the post request successfully created the BookItem resource.
Create another BookItem resource the same way using following JSON object in the request body.
{
    "Title":"The Monk Who Sold His Ferrari",
    "Author":"Robin Sharma",
    "Publisher":"Jaico Publishing",
    "Genre":"Fiction",
    "Price": 121
}
Read Web Resource/Data Operation
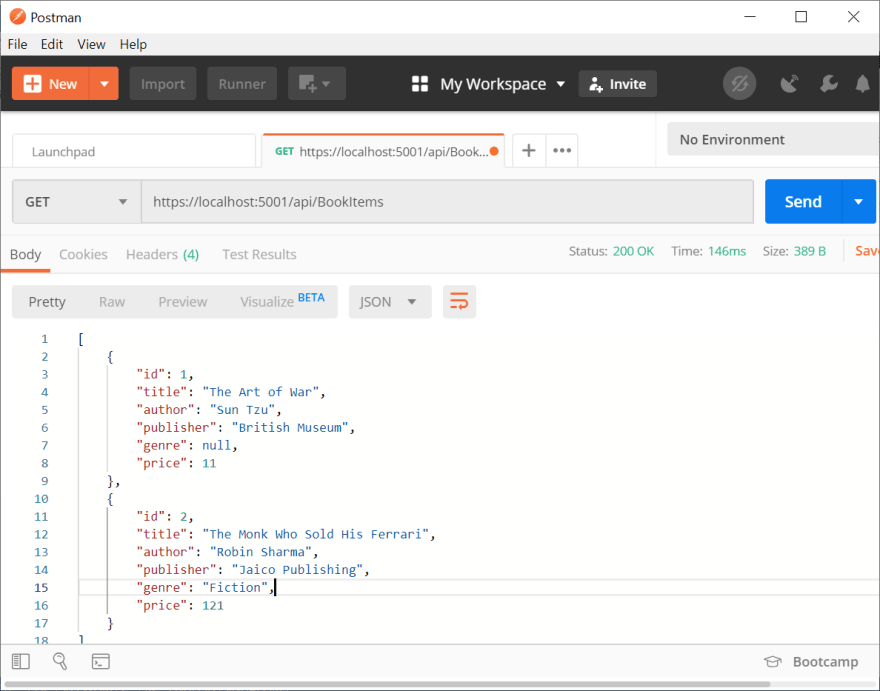
- Select GET HTTP verb from the drop down.
- Enter request URL https://localhost:5001/api/BookItems for get request.
- Click on the Send button.
- Now click on the Header tab and check the response body should be showing the resources we had created.
Update Web Resource/Data Operation
Now we want to update the first BookItem resource that we created because we forgot to pass Genre value when we created it so now we will update it with the Genre value.
- Select PUT HTTP verb from the drop down.
- Enter request URL https://localhost:5001/api/BookItems/1 for put request for first BookItem resource (id=1).
- Select Body tab and then select raw radio button and finally select type JSON from the dropdown.
- In the request body enter following JSON object representing the first BookItem resource that we want to update.
{
    "id": 1,
    "title": "The Art of War",
    "author": "Sun Tzu",
    "publisher": "British Museum",
    "genre": "History",
    "price": 11
}
this time we are passing “id” value in body as well as in the PUT request URL to specify the resource that we want to update.
Now click on Send button.
Now click on the Header tab and check the status that should be 204 No Content which means the put request successfully updated the BookItem resource.
Delete Web Resource/Data Operation
Now we want to delete second BookItem resource that we created earlier.
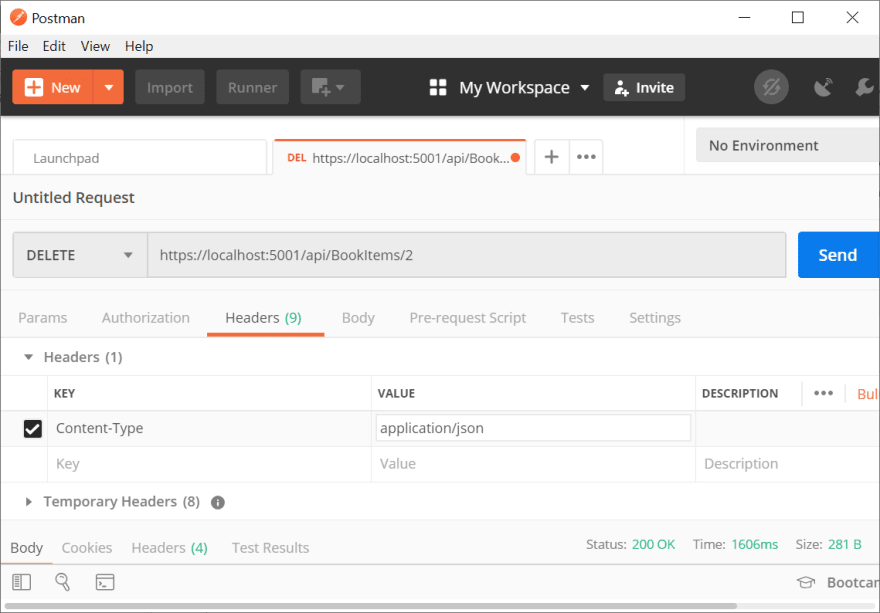
- Select DELETE HTTP verb from the drop down.
- Enter request URL https://localhost:5001/api/BookItems/2 for delete request to delete second BookItem resource (id=2).
- Now click on Send button.
Now click on the Header tab and check the status that should be 200 Ok which means the delete request successfully deleted the BookItem resource.
Hope this article would have given you some idea about how you can create your own ASP.Net Core 3 Web API.
You can get the complete source code of BookStoreApi from my GitHub repository aspnet-core3-webapi.


Latest comments (0)