
We have a Jenkins instance that is running jobs in Docker containers on its host.
Eventually, we’ve faced with an issue when the current AWS Ec2 instance t2.2xlarge (8 CPU, 32 RAM) during peak workload periods was too overloaded — not enough CPU time, not enough memory.
So, the first solution could be to proceed with its vertical scaling for example up to c5.9large, and proceed running builds on the master-host, or by moving some jobs to external workers.
At this time, we have three such workers — Android-builds are running on a PC in our office with Android studio, in the office we also have a bunch of MacMini for iOS builds, plus we have an additional EC2 in AWS for our QA team to run their UI autotests.
Now, let’s add an ability to run jobs on workers in a Kubernetes cluster.
We are using AWS Elastic Kubernetes Service and in this post will check how to use Kubernetes Plugin for Jenkins.
- Jenkins-master: spin up an instance
- Docker install
- Running Jenkins with Docker
- Jenkins Workers in Kubernetes
- Jenkins ServiceAccount
- Jenkins ServiceAccount, and kubeconfig
- Jenkins Kubernetes Credentials
- Jenkins Slaves Pod Template
- Jenkins Job
- Docker in Docker via Docker in Kubernetes
Jenkins-master: spin up an instance
For the testing purpose, let’s create a dedicated AWS ЕС2 with Ubuntu 20.04, add a Docker there and set up a Jenkins master instance.
Docker install
Create an ЕС2, connect with SSH, install Docker:
root@ip-10–0–4–6:/home/ubuntu# apt update && apt -y upgrade
root@ip-10–0–4–6:/home/ubuntu# curl [https://get.docker.com/](https://get.docker.com/) | bash
And Docker Compose.
Find the latest version on Github, at the moment of writing it was 1.28.4, download it:
root@ip-10–0–4–6:/home/ubuntu# curl -L “https://github.com/docker/compose/releases/download/1.28.4/docker-compose-$(uname -s)-$(uname -m)” -o /usr/local/bin/docker-compose]

root@ip-10–0–4–6:/home/ubuntu# chmod +x /usr/local/bin/docker-compose

root@ip-10–0–4–6:/home/ubuntu# docker-compose --version
docker-compose version 1.28.4, build cabd5cfb
Running Jenkins with Docker
Create a directory on the host to store Jenkins’ data:
root@ip-10–0–4–6:/home/ubuntu# mkdir jenkins_home
Write a Docker Compose file:
version: '3.5'

networks:
  jenkins:
    name: jenkins

services:

  jenkins:
    user: root
    image: jenkins/jenkins:2.249.3

    networks:
      - jenkins
    ports:
      - '8080:8080'
      - '50000:50000'
    volumes:
      - /home/ubuntu/jenkins_home/:/var/lib/jenkins
      - /var/run/docker.sock:/var/run/docker.sock
      - /usr/bin/docker:/usr/bin/docker
      - /usr/lib/x86_64-linux-gnu/libltdl.so.7:/usr/lib/x86_64-linux-gnu/libltdl.so.7
    environment:
      - JENKINS_HOME=/var/lib/jenkins
      - JAVA_OPTS=-Duser.timezone=Europe/Kiev
    logging:
      driver: "journald"
Run the instance:
root@ip-10–0–4–6:/home/ubuntu# docker-compose -f jenkins-compose.yaml up
Open its URL in a browser:

Administrator password can be found in the Docker Compose output during startup, or you can get it in a /var/lib/jenkins/secrets/initialAdminPassword file in the container:
root@ip-10–0–4–6:/home/ubuntu# docker exec -ti ubuntu_jenkins_1 cat /var/lib/jenkins/secrets/initialAdminPassword
15d***730
Log in, run the initial installation:


Create a user:

Finish it and go to the Plugins.
Jenkins Workers in Kubernetes
Find the Kubernetes plugin:
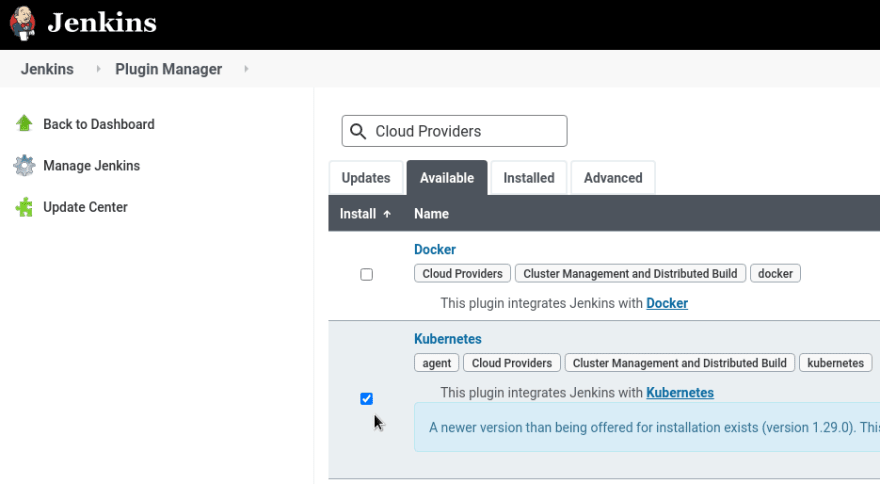
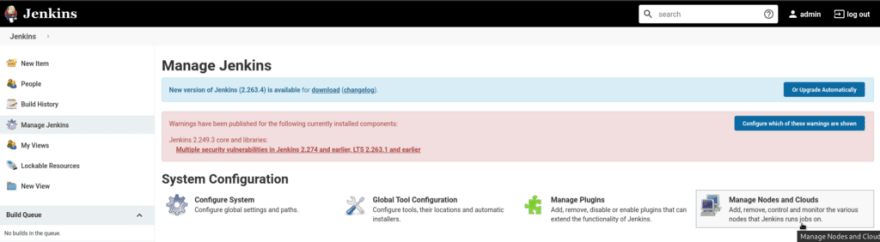
Install it and go to the Manage Nodes and Clouds > Configure Clouds:
Check the Kubernetes:

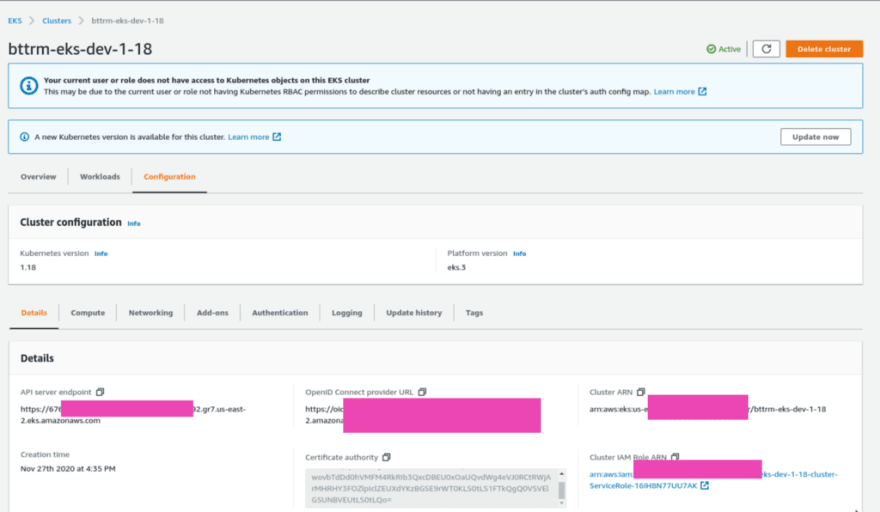
Set the URL of your cluster’s API server and a Namespace:

Jenkins ServiceAccount
In the cluster, create a Namespace and ServiceAccount which will be used by Jenkins for authorization.
On a Production setup, it’s better to configure access via an EC2 Instance Profile with an IAM-role attached.
For now, add a Kubernetes RoleBinding mapped to the default admin role (or create your own — here the admin used just for simplicity as this is a PoC setup) in our dev-1–18-devops-jenkins-slaves-ns namespace:
--------
apiVersion: v1
kind: Namespace
metadata:
  name: dev-1-18-devops-jenkins-slaves-ns
--------
apiVersion: v1
kind: ServiceAccount
metadata:
  name: jenkins-slaves-service-account
  namespace: dev-1-18-devops-jenkins-slaves-ns
--------
apiVersion: rbac.authorization.k8s.io/v1
kind: RoleBinding
metadata:
  name: jenkins-slaves-rolebinding
  namespace: dev-1-18-devops-jenkins-slaves-ns
roleRef:
  apiGroup: rbac.authorization.k8s.io
  kind: ClusterRole
  name: admin
subjects:
- kind: ServiceAccount
  name: jenkins-slaves-service-account
  namespace: dev-1-18-devops-jenkins-slaves-ns
Deploy it:
$ kubectl apply -f jenkins-slaves-sa.yaml
namespace/dev-1–18-devops-jenkins-slaves-ns created
serviceaccount/jenkins-slaves-service-account created
rolebinding.rbac.authorization.k8s.io/jenkins-slaves-rolebinding created
Jenkins ServiceAccount, and kubeconfig
The next thing to do is to generate a kubeconfig, which will use this ServiceAccount.
To do it, we need to get an EKS cluster ARN, its Certificate authority, API server’s address, and a JWT token of the ServiceAccount.
Find a Secret cretaed for your ServiceAccount:
kubectl -n dev-1–18-devops-jenkins-slaves-ns get sa jenkins-slaves-service-account -o jsonpath=’{.secrets[0].name}’
jenkins-slaves-service-account-token-jsbb7
Certificate authority and Cluster ARN can be taken in the AWS Console:
Get the token from the secret, decrypt it with base64:
$ kubectl -n dev-1–18-devops-jenkins-slaves-ns get secret jenkins-slaves-service-account-token-jsbb7 -o jsonpath=’{.data.token}’ | base64 — decode
eyJ…s7w
Write a kubeconfig, for example as a jenkins-dev-1-18-kubeconfig.yaml file:
apiVersion: v1
clusters:
- cluster:
    certificate-authority-data: LS0...LQo=
    server: [https://676\*\*\*892.gr7.us-east-2.eks.amazonaws.com](https://676***892.gr7.us-east-2.eks.amazonaws.com)
  name: arn:aws:eks:us-east-2:534***385:cluster/bttrm-eks-dev-1-18
contexts:
- context:
    cluster: arn:aws:eks:us-east-2:534***385:cluster/bttrm-eks-dev-1-18
    user: jenkins-slaves-service-account
    namespace: dev-1-18-devops-jenkins-slaves-ns
  name: jenkins-slaves-service-account@bttrm-dev-1-18
current-context: jenkins-slaves-service-account@bttrm-dev-1-18
kind: Config
users:
- name: jenkins-slaves-service-account
  user:
    token: ZXl...N3c=
Check if it’s working:
$ kubectl -n dev --kubeconfig ../jenkins-dev-1–18-kubeconfig.yaml auth can-i get pod
yes
Jenkins Kubernetes Credentials
Go back to the Jenkins, add a new Credential:


Check its connection — click on the Test Connection, must see the _Connected to Kubernetes 1.18+ _message:

Save the settings.
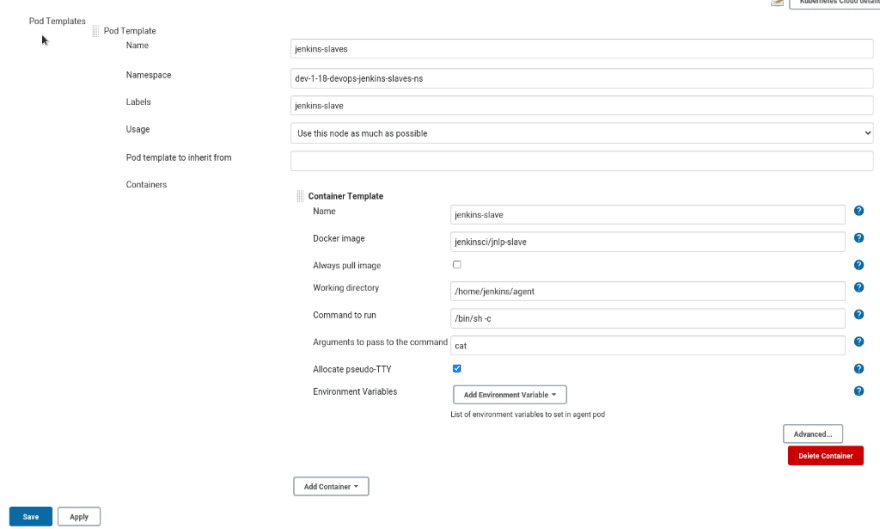
Jenkins Slaves Pod Template
Go to the Pod templates:

Fill the fields of the pod and its default container, set the jenkinsci/jnlp-slave as the Docker image:
Jenkins Job
Create a test job with the Pipeline type:

Write a pipeline’s script:
podTemplate {
    node(POD_LABEL) {
        stage('Run shell') {
            sh 'echo hello world'
        }
    }
}

Run the job and check Jenkins’ logs:
…
jenkins_1 | 2021–02–26 08:36:32.226+0000 [id=277] INFO hudson.slaves.NodeProvisioner#lambda$update$6: k8s-1-b5j7g-glscn-v0tfz provisioning successfully completed. We have now 2 computer(s)
jenkins_1 | 2021–02–26 08:36:32.522+0000 [id=276] INFO o.c.j.p.k.KubernetesLauncher#launch: Created Pod: dev-1–18-devops-jenkins-slaves-ns/k8s-1-b5j7g-glscn-v0tfz
…
And the pod is creating in the Kubernetes cluster:
$ kubectl --kubeconfig ../jenkins-dev-1–18-kubeconfig.yaml get pod
NAME READY STATUS RESTARTS AGE
k8s-1-b5j7g-glscn-v0tfz 0/1 ContainerCreating 0 12s
Job completion:

Docker in Docker via Docker in Kubernetes
Our Jenkins is running as a Docker container, and it’s running its builds in Docker containers inside. It’s a good approach used by me for a long time as it gives us an opportunity not to install libraries on the host system more controlled way to setup build environments, and our developers can configure them as they wish.
So, now we need to realize the same — but in on the Kubernetes salves.
Install the Docker pipeline plugin to the Jenkins:

And create a new pipeline
Here we need another Docker image — docker.dind, and for it, we need another pod's template.
You can create it via Jenkins UI as we did it before, or we can describe it in the pipeline directly by using the podTemplate.
For example, let’s build an NGINX image:
podTemplate(yaml: '''
apiVersion: v1
kind: Pod
spec:
  containers:
  - name: docker
    image: docker:19.03.1-dind
    securityContext:
      privileged: true
    env:
      - name: DOCKER_TLS_CERTDIR
        value: ""
''') {
    node(POD_LABEL) {
        git 'https://github.com/nginxinc/docker-nginx.git'
        container('docker') {
            sh 'docker version && cd stable/alpine/ && docker build -t nginx-example .'
        }
    }
}
And run the job:


Done.
Useful links
Originally published at RTFM: Linux, DevOps и системное администрирование.

Top comments (0)