Introduction: Why Use a CDN?
A Content Delivery Network (CDN) is a distributed network of servers that delivers content to users based on their geographic location. CDNs improve website performance, reduce latency, and ensure better availability by caching content closer to end users. In this blog, we'll create a simple CDN setup using NGINX and Docker, simulating an edge and origin server to demonstrate how content caching works.
Prerequisites:
- Basic knowledge of Docker and NGINX.
- Docker and Docker Compose installed on your local machine.
- Administrative access to edit the
/etc/hostsfile (orC:\Windows\System32\drivers\etc\hostson Windows).
Step 1: Setup Overview
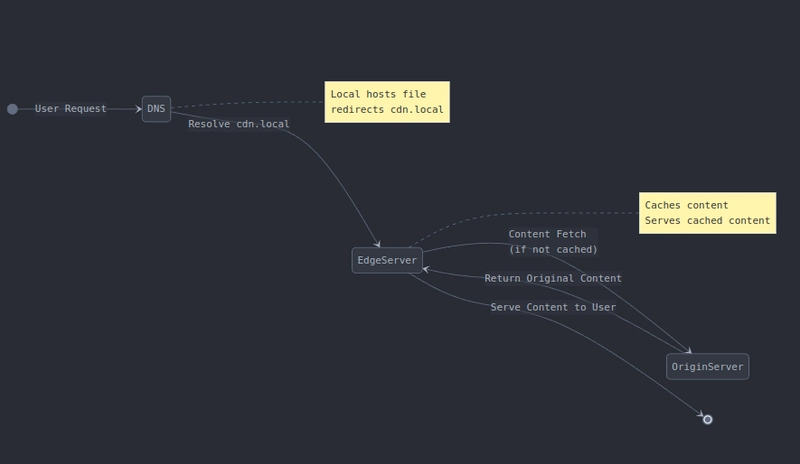
We'll simulate the following:
- Origin Server: Stores the original content.
- Edge Server: Caches content from the origin and serves it to clients.
-
DNS Simulation: Redirect traffic to the edge server using a custom domain (
cdn.local) by configuring your local hosts file.
Both servers will run as Docker containers, with the edge server fetching content from the origin server.
Step 2: Creating the Origin Server
The origin server hosts the original content that the CDN will cache.
1. Create a Dockerfile for the origin server:
# Dockerfile.origin
FROM nginx:latest
COPY ./origin/nginx.conf /etc/nginx/conf.d/default.conf
COPY ./origin-content /usr/share/nginx/html
2. Prepare the NGINX configuration for the origin server:
# origin/nginx.conf
server {
    listen 80;
    server_name localhost;

    location / {
        root /usr/share/nginx/html;
        index index.html;
    }
}
Explanation:
- The
rootdirective specifies the directory containing the website files. - The
indexdirective sets the default file (index.html) to serve.
3. Prepare the content directory:
Create a folder named origin-content and add a simple HTML file (index.html):
<!-- origin-content/index.html -->
<h1>Welcome to the NGINX CDN Origin Server!</h1>
4. Build and run the origin container:
docker build -t origin-server -f Dockerfile.origin .
docker run -d --name origin -p 8080:80 origin-server
You can access the origin content at:
http://localhost:8080
Step 3: Creating the Edge Server
The edge server will cache content from the origin server and serve it to clients.
1. Create an NGINX configuration for the edge server:
# edge/nginx.conf
proxy_cache_path /var/cache/nginx levels=1:2 keys_zone=my_cache:10m max_size=1g inactive=60m use_temp_path=off;

server {
    listen 80;
    server_name cdn.local;

    location / {
        proxy_pass http://origin-server;
        proxy_cache my_cache;
        proxy_cache_valid 200 60m;
        add_header X-Proxy-Cache $upstream_cache_status;
    }
}
Explanation of Key Directives:
-
proxy_cache_path: Defines the cache storage location and size. -
proxy_pass: Forwards requests to the origin server. -
proxy_cache: Activates caching for the definedmy_cachezone. -
X-Proxy-Cache: Adds a custom header to indicate cache status (HIT,MISS, orEXPIRED).
2. Create a Dockerfile for the edge server:
# Dockerfile.edge
FROM nginx:latest
COPY ./edge/nginx.conf /etc/nginx/conf.d/default.conf
3. Build and run the edge container:
docker build -t edge-server -f Dockerfile.edge .
docker run -d --name edge -p 8081:80 --link origin origin-server edge-server
You can access the edge server at:
http://localhost:8081
Step 4: Configuring DNS Simulation with /etc/hosts
To simulate DNS resolution for our custom domain (cdn.local), we’ll modify the /etc/hosts file to map cdn.local to the edge server.
1. Edit the /etc/hosts file:
Open the file with administrative privileges:
- On Linux or macOS:
sudo nano /etc/hosts
-
On Windows:
Open
C:\Windows\System32\drivers\etc\hostswith a text editor as an administrator.
2. Add the following entry:
127.0.0.1 cdn.local
Explanation:
This maps cdn.local to 127.0.0.1, which is your local machine. When you access http://cdn.local, the request will be directed to the edge server running on localhost.
Step 5: Testing the CDN Setup
-
Initial Request (Cache MISS):
When you first access
http://cdn.local:8081, the edge server fetches the content from the origin. You should see the response header:
X-Proxy-Cache: MISS
- Subsequent Requests (Cache HIT): Reload the page, and this time the response will be served from the edge server’s cache:
X-Proxy-Cache: HIT
Conclusion
In this exercise, we created a basic CDN using NGINX and Docker. We set up an origin server hosting the original content and an edge server that caches and serves content. By configuring DNS simulation with the /etc/hosts file, we routed traffic to the edge server using a custom domain (cdn.local). This setup demonstrates how CDNs improve performance by caching content closer to the end user.
Future Enhancements:
- Implement SSL/TLS: Secure your CDN with HTTPS.
- Load Balancing: Add multiple edge servers for redundancy.
- Monitoring and Logging: Use tools like Prometheus and Grafana to monitor CDN performance.

Top comments (0)