
Hello Friends
As you may know, every third week here at Flatiron's bootcamp concludes with a project that utilizes what we learned during the previous two weeks.

These past two weeks we learned about React, and so it was time to build my first project in React!
Compass - My first React application
I decided to build a simple educational platform centered around life purpose. This was inspired by my volunteer work with a non-profit called nXu.
If you'd like to play around with it, feel free to grab it from the following links:
Frontend: https://github.com/shawnhuangfernandes/compass-frontend
Backend: https://github.com/shawnhuangfernandes/compass-backend
User Story
The user should be able to:
- Create an Account, and return to their account at a later time
- Sign in to their account
- Complete 3 types of activities: Readings, Videos and Activities
- Mark their activities as complete and return to them later
Design Strategy
Our instructor laid out a good project management strategy for building a simple full stack application, it went something like this:
- Imagine a user using your app, what does each page look like? Mock it up! I used a neat website called Ninja Mock to create each website view

- Break up each view into their building blocks, these will be your components (Navbar, Card, Descriptions etc)
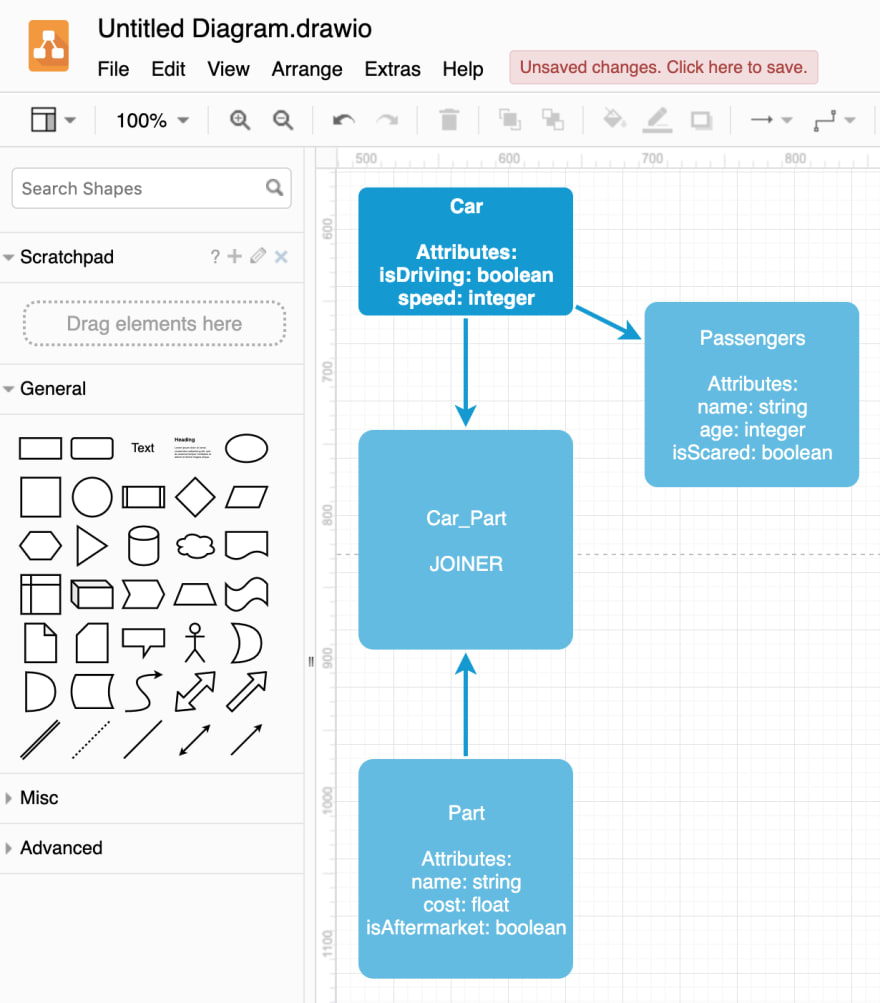
- Figure out what data you'll need to populate the components with their information, and abstract them into models for your backend. I drew representations of my models using Draw.io.
- Use some sort of project management software to divide your project into manageable tasks. I used Trello to do this.

- Build your project view by view, and test before you move on!
Project Kickoff
First thing, I picked a styling library before diving into the coding. One week is not a lot of time to both build site functionality and styling from scratch, so I wanted to lean on some library to provide cookie-cutter components that came pre-styled.
I decided to use Semantic UI for my project's styling.
I then setup my project's backend and frontend folder structure.
Backend
rails new <my-project> --api -T --database=postgresql
Frontend
npm install -g create-react-app
create-react-app my-project-client
Building the Backend
- I created my models (based on my plan) along with their associations and attributes
- I created my routes to access the data from my models
- I created my controllers to handle what to do when a route was 'activated'
- I created seed data (like dummy users with fake names) to test my model functionality using
rails c
and running the rails console suite to run the methods of my models
- I used Postman to test my routes and controllers to make sure that I could get the data properly from my server (aka backend) for my frontend.
Preparing The Frontend Structure
I worked on the frontend view by view. The order I did things in was as follows:
- Create container components for each and every one of my views (e.g LandingContainer, LoginContainer, SignUpContainer, LessonContainer, SettingsContainer etc.)

- In my 'Routing' container (in my case I called it MainContainer), I set up my front-end routes to render each container component appropriately.

Now I could do the hard part: building out each component!
Building Each Component Out
The overall process for building a single component out was:
1) Importing whatever dependencies/components I might need
2) Creating a constructor if needed (React Snippets made this painless)
3) Adding state to the component (For a form, storing a user etc.)
4) Adding event handler methods (for form submissions, button clicks)
5) Adding lifecycle methods (make sure data could be used at the right time)
6) Adding custom methods as needed
7) Add the render method (so that I could take the data from the component and display it)
Here's a sample of what that looked like for one of my components:
import React, { Component } from "react";
import PageTitle from "./PageTitle";
import { Message, Form, TextArea, Button } from "semantic-ui-react";
import { Link } from "react-router-dom";
import VideoPromptContainer from "./VideoPromptContainer";

class PromptContainer extends Component {
  previousLink = `/users/${this.props.match.params.user_id}/prompts`;

  constructor(props) { // constructor
    super(props);
    this.state = { // state
      prompt: {},
      userInput: "",
      isComplete: false
    };
  }

  determineMediaType = () => { // custom method
    switch (this.state.prompt.category) {
      case "Reading":
        return (
          <Message
            color="violet"
            size="massive"
            header={this.state.prompt.header}
            content={this.state.prompt.body}
          />
        );
      case "Video":
        return (
          <div className="prompt-video-container">
            <VideoPromptContainer videoId={this.state.prompt.body} />
          </div>
        );
      case "Activity":
        return (
          <Form size="massive">
            <Form.Field
              onChange={this.handleTextInput}
              control={TextArea}
              label={this.state.prompt.body}
              value={this.state.userInput}
              rows={20}
            />
          </Form>
        );
      default:
      // code block
    }
  };

  handleTextInput = async e => { // event handler method
    await this.setState({
      userInput: e.target.value
    });
  };

  handleCompletionClick = async e => { // event handler method
    await this.setState({
      isComplete: true
    });

    const fetchResponse = await fetch(`http://localhost:3000/responses`, {
      method: "POST",
      headers: {
        "Content-Type": "application/json"
      },
      body: JSON.stringify({
        user_id: this.props.match.params.user_id,
        prompt_id: this.props.match.params.prompt_id,
        body: this.state.userInput,
        complete: this.state.isComplete
      })
    });

    console.log(await fetchResponse.json());
  };

  componentDidMount() { // lifecycle method
    this.fetchPrompt();
  }

  fetchPrompt = async () => { // custom method for http request
    const promptFetched = await fetch(
      `http://localhost:3000/users/${this.props.match.params.user_id}/prompts/${this.props.match.params.prompt_id}`
    );
    const promptObj = await promptFetched.json();

    await this.setState({
      prompt: promptObj,
      isComplete: promptObj.response ? promptObj.response.complete : false,
      userInput: promptObj.response ? promptObj.response.body : ""
    });
  };

  render() { // render method
    return (
      <div className="prompt-container">
        <PageTitle titleText={this.state.prompt.title} />
        <div className="prompt-body-container">{this.determineMediaType()}</div>
        <div className="prompt-button-container">
          <Button
            toggle
            active={this.state.isComplete}
            onClick={this.handleCompletionClick}
            size="massive"
            content={
              this.state.isComplete ? "Click To Update" : "Click To Save"
            }
          />
          <Link to={this.previousLink}>
            <Button
              size="massive"
              basic
              inverted
              color="violet"
              content="Go Back"
            />
          </Link>
        </div>
      </div>
    );
  }
}

export default PromptContainer;
What Did It Look Like
Here are a couple snips of the project itself!
Landing Page

User Dashboard

Prompt Selection

Video Prompt

Takeaways
- Planning is good, but don't expect to stick to your plan
- Styling libraries are convenient, but give yourself at least 1-2 days to work with the library before trying to implement it in your project
- Create a realistic scope, and be prepared to cut features
- Minimal Viable Product is top priority, then make it look polished, then implement stretch goals
This was a good learning project, and can definitely be improved. I am very much looking forward to building better React apps in the future!
Hopefully this was enlightening or interesting for you!
Good luck with your own endeavors,
Shawn

Top comments (0)