
Let us understand one of the popular services of Azure - Appservice with help of dotnetcore application.
Before going deep dive, these are few questions which needs to be answered - what is AppService? How can it be useful? what are the features available to use? Here's an overview of Appservice and its features.
It's a platform as a service (Paas) made available by Azure to make it easier to deploy web applications (backend/frontend) with the help of easy to use UI driven service to host web applications, containerized applications and API applications. Fully managed service with infrastructure maintenance, built-in security, patching and scaling.
Alternative to web servers like IIS, Apache, Nginx to quickly
build, deploy and scale web applications.
Supported Programming Languages are .Net, .Netcore, Node.js, Java, Python and PHP.
Different price plans are available to choose from depending on the application requirements. please find more details on pricing here.
One of the exciting feature of appservice is deployment slots. You can create slots to differentiate dev, qa, staging and prod environments. These slots can also be swapped to make staging to prod and prod to staging easier with a click. This is a useful scenario when a new feature of your application is ready to be deployed to prod, staging slot can be created and validated by your team before swapping it with prod slot.
we will learn how to use appservice by creating a simple frontend application using dotnetcore razor which displays weather information by calling a backend web api service created using dotnetcore webapi, both hosted in appservice.
Hope you already have basic overview on dotnetcore. More details on dotnetcore are available here.
Follow the below dotnet commands to create web application
1.Create a frontend application based on razor.
dotnet new razor -n frontend
2.Create a backend webapi application. dotnet provides us with default WeatherForecast API to get random weather details.
dotnet new webapi -n backend
3.Create solution file and add both frontend and backend applications.
dotnet new sln
dotnet sln add frontend backend
Once both the applications are created, let us proceed further from visual studio. If visual studio 2019 is not installed, follow the instructions provided here. Solution should have both frontend and backend applications as shown below.

Integrate frontend application to use backend service
1.Create a class WeatherForecast.cs to represent WeatherForecast information.
using System;
using System.Collections.Generic;
using System.Linq;
using System.Threading.Tasks;

namespace frontend
{
    public class WeatherForecast
    {
        public DateTime Date { get; set; }

        public int TemperatureC { get; set; }

        public int TemperatureF => 32 + (int)(TemperatureC / 0.5556);

        public string Summary { get; set; }
    }
}
2.Add WeatherClient.cs class to frontend application which includes code to call backend application and return back weather details.
using System;
using System.Collections.Generic;
using System.Linq;
using System.Net.Http;
using System.Text.Json;
using System.Threading.Tasks;

namespace frontend
{
    public class WeatherClient
    {
        private readonly JsonSerializerOptions options = new JsonSerializerOptions()
        {
            PropertyNameCaseInsensitive = true,
            PropertyNamingPolicy = JsonNamingPolicy.CamelCase
        };

        private readonly HttpClient httpClient;

        public WeatherClient(HttpClient httpClient)
        {
            this.httpClient = httpClient;
        }

        public async Task<WeatherForecast[]> GetWeathersAsync()
        {
            var responseMessage = await this.httpClient.GetAsync("/weatherforecast");
            var stream = await responseMessage.Content.ReadAsStreamAsync();
            return await JsonSerializer.DeserializeAsync<WeatherForecast[]>(stream, options);
        }
    }
}
3.Configure backend client in startup class.
....
 // This method gets called by the runtime. Use this method to add services to the container.
        public void ConfigureServices(IServiceCollection services)
        {
            services.AddRazorPages();

            services.AddHttpClient<WeatherClient>(httpClient =>
            {
              //include the backend application url once it is deployed to appservice
                httpClient.BaseAddress = new Uri("url of backedn application");
            });
        }
....
4.Add Forecasts property to index.cshtml.cs file. This property is used to fill in the ui.
....
public WeatherForecast[] Forecasts { get; set; }
....
Change OnGet Method in index.cshtml.cs file to call backend service and store the result in Forecasts property.
....
 public async Task OnGet([FromServices]WeatherClient weatherClient)
 {
     Forecasts = await weatherClient.GetWeathersAsync();
 }
....
5.Modify Index.cshtml razor page to render Forecast property information.
@page
@model IndexModel
@{
    ViewData["Title"] = "Home page";
}

<div class="text-center">
    <h1 class="display-4">Welcome</h1>
    <p>Learn about <a href="https://docs.microsoft.com/aspnet/core">building Web apps with ASP.NET Core</a>.</p>
</div>

Weather Forecast:

<table class="table">
    <thead>
        <tr>
            <th>Date</th>
            <th>Temp. (c)</th>
            <th>Temp. (f)</th>
            <th>Summary</th>
        </tr>
    </thead>
    <tbody>
        @foreach(var forecast in @Model.Forecasts)
        {
            <tr>
                <td>
                    @forecast.Date.ToShortDateString()
                </td>
                <td>
                    @forecast.TemperatureC
                </td>
                <td>
                    @forecast.TemperatureF
                </td>
                <td>
                    @forecast.Summary
                </td>
            </tr>
        }
    </tbody>
</table>
To test backend application, run the application with IISExpress in Visual Studio and navigate to /WeatherForecast in browser.

To test frontend application, run the application with IISExpress in Visual Studio, application will redirect to browser with localhost url.

Deploy applications to AppService
Create frontend and backend web apps
Navigate to Azure Portal
- Create webapp for backend application from Azure portal and provide below information
- ResourceGroup: Select existing one or create a new one with unique name across your azure account.
- Name: Provide globally unique name for azure web app in azure.
- Runtime Stack: Select .Net Core 3.1.
- Region: Select any of the regions from dropdown.
- Windows Plan: Select existing appservice or create a new plan.
- Sku and Size: Select Free F1 plan to avoid incurring costs.
Click on Review+create and create.

- Create webapp for frontend application from Azure portal and provide below information
- ResourceGroup: Select existing one or create a new one with unique name across your azure account.
- Name: Provide globally unique name for azure web app in azure.
- Runtime Stack: Select .Net Core 3.1.
- Region: Select any of the regions from dropdown.
- Windows Plan: Select existing appservice or create a new plan.
- Sku and Size: Select Free F1 plan to avoid incurring costs.
Click on Review+create and create.

Publish backend application to azure appservice webapp created above
1.To deploy application to appservice, visual studio provides option to publish. Right click on backend application and select publish.
2.If you dont see any options, click on start.

3.Select Azure Target.

4.Select Azure App Service (Windows) option in next tab.

5.Sign in to microsoft azure account to see the list of resources created. Select backendwebapp created.
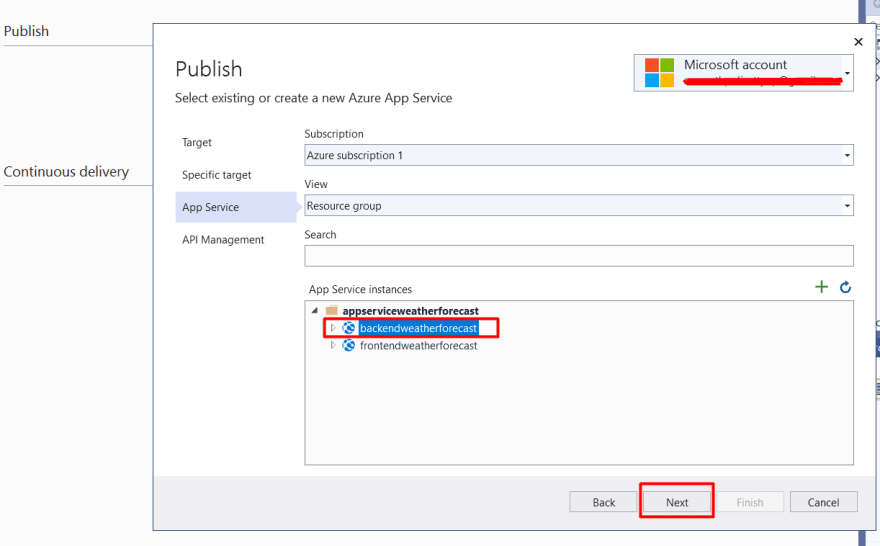
6.skip API Management setup and click on Finish

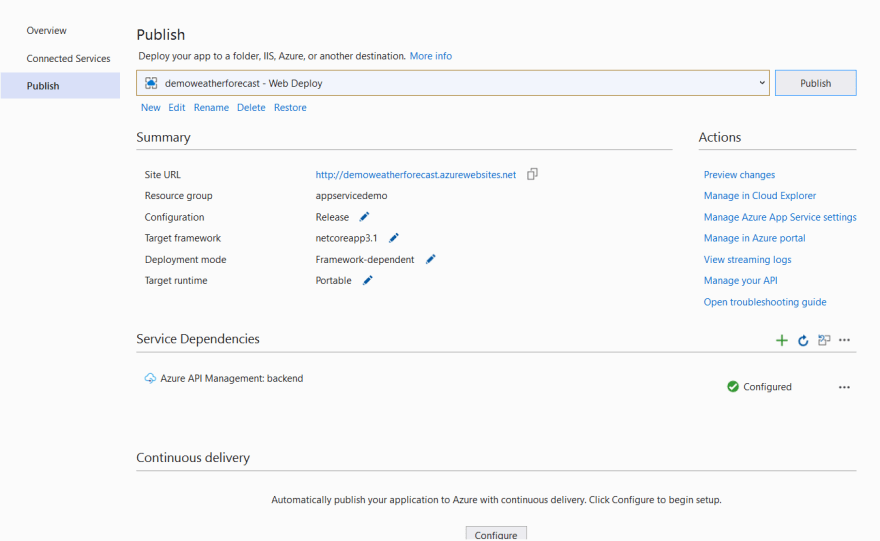
7.Finally select publish option to deploy the backend web app to azure app service.

8.Ensure publish output is successful.

9.Navigate to the Url mentioned in output by appending /WeatherForeCast at the end of Url to see the output from backend webapp.

Publish frontend application to azure appservice webapp created above
1.Follow the same steps for frontend application and publish the app to frontend webapp created above.

Publish Window.
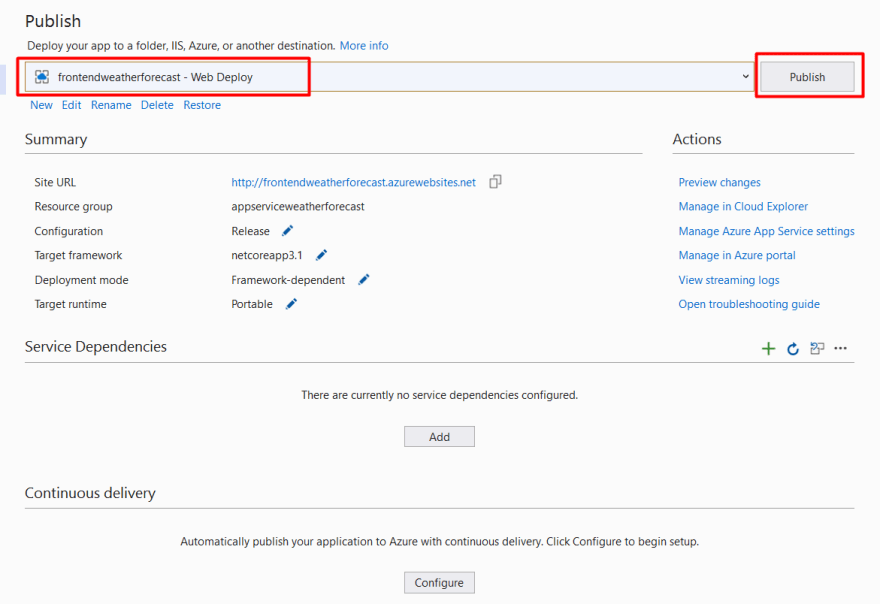
Output Window.

2.Navigate to the url mentioned in output window above
 .
.
Azure Appservice provides in-browser editor to edit the applications files deployed. Navigate to development section under the backend webapp created in azure. Click on Go, you will be navigated to in-browser editor.

Appservice Editor.

To know more about deployment slots, container deployment, scaling appservice, head over to microsoft learn.

Oldest comments (1)
Hello sumanth. Thank you for the blog. I want to add a database to this application. Can you guide me?