
Documentation is the unsung hero of software development, ensuring that developers, users, and stakeholders can navigate, use, and maintain software with ease and precision. Among the various styles of documentation, I've developed a particular fondness for YARD(Yay! A Ruby Documentation Tool)-style documentation when working in Ruby. It's not just Ruby though, JavaScript has JSdoc, and Python boasts Google style or NumPy style; each having the clarity and structure of YARD documentation.
I've been using YARD documentation for the past 3-4 months, and I've found it to be incredibly intuitive and easy to understand. This experience has only deepened my appreciation for well-crafted documentation, making it a joy to both write and read.
What is yard-style documentation?
According to yardoc.org
YARD is the only Ruby documentation tool that supports storing metadata alongside your documentation.
YARD documentation is robust and provides a well-structured format for writing documentation. It supports extensions for unique Ruby constructs, such as unique class-level definitions, and enables users to provide consistent, easily navigable documentation that can be exported to various formats. Let's dive into installing and getting Yarddoc in action without further delay.
Let's first install the yard.
gem install yard
If you want to add it to your Gemfile then just,
Gemfile

gem 'yard'

# Or if you want to encapsulate it just inside development env

group :development do
  gem 'yard'
end
let's implement YARD-style documentation in your code.
Suppose you have a method that takes an array of numbers as a parameter and returns a single accumulated integer value.
# Sums up all elements in the provided array after converting them to integers.
#
# @param numbers [Array<String, Integer>] an array of numbers or numeric strings. Defaults to an empty array.
# @return [Integer] the sum of the converted integers in the array.
#
# @example Summing an array of numeric strings
#   add(numbers: ["1", "2", "3"]) # => 6
#
# @example Summing an array of integers
#   add(numbers: [1, 2, 3]) # => 6
#
# @example Handling non-numeric values
#   add(numbers: ["a", "1", "2"]) # => 3
#
# @example Default empty array
#   add(numbers: []) # => 0
def add(numbers: [])
  numbers.map(&:to_i).inject(0) { |sum, x| sum + x }
end
This might seem overwhelming, 3 lines of code just turned into multiple lines of code but it is fairly straightforward. Let me break it down.
YARD uses special @tags to highlight metadata in documentation, with common ones being @param, @return, and @example. Personally, I avoid adding multiple examples to prevent cluttering the codebase. Instead, I provide clear definitions for the parameters and return types, trusting that readers can understand the method based on the concise, well-written documentation.
Sometimes, a method can have multiple return types. For instance, if you remove the inject(0) in the above code and simply use inject it will return nil for an empty array. This introduces two possible return types: a numeric value when the array has elements or nil when the array is empty. It’s important to reflect such scenarios in the documentation for clarity. Let me provide an example.
# Sums up all elements in the provided array after converting them to integers.
#
# @param numbers [Array<String, Integer>] an array of numbers or numeric strings. Defaults to an empty array.
# @return [Integer, nil] the sum of the converted integers in the array, or `nil` if the array is empty.
#
# @example Summing an array of integers
#   add(numbers: [1, 2, 3]) # => 6
#
# @example Default empty array
#   add(numbers: []) # => nil
def add(numbers: [])
  numbers.map(&:to_i).inject { |sum, x| sum + x }
end
The @return tag can specify multiple possible data types, such as Integer or nil in this case. I’ve also updated the example for the default empty array scenario to reflect these changes. Similarly, you can define multiple data types for parameters as well. This approach works seamlessly even for vector values.
How to document error handling?
Let’s take the above example for the reference
def add(numbers: [])
  numbers.map(&:to_i).inject { |sum, x| sum + x }
end
Let’s add a few exceptions handling for the above example:
def add(numbers: [])
  numbers.map(&:to_i).inject(0, :+)
rescue StandardError => e
  raise TypeError, "Failed to convert elements to integers: #{e.message}"
end
Now how would you document the above method using yard-style doc?

# Sums up all elements in the provided array after converting them to integers.
#
# @param numbers [Array<String, Integer>] an array of numbers or numeric strings. Defaults to an empty array.
# @return [Integer] the sum of the converted integers in the array, or `nil` if the array is empty.
#
# @raise [TypeError] If any element cannot be converted to an integer or if unexpected errors occur during processing.
# @example Summing an array of integers
#   add(numbers: [1, 2, 3]) # => 6
#
# @example Default empty array
#   add(numbers: []) # => 0
def add(numbers: [])
  numbers.map(&:to_i).inject(0, :+)
rescue StandardError => e
  raise TypeError, "Failed to convert elements to integers: #{e.message}"
end
You can see I have written yard-tag @raise after @param and @return that documents the exceptions raised from the given methods — You can document multiple exceptions using multiple @raise tags if your method raises different types of errors.
Now another great benefit is that you can document dynamic or custom Ruby constructs, for example: in readme.md for yard. You can see an example:
class List
 # Sets the publisher name for the list.
 cattr_accessor :publisher
end
Now how do you document the above line of code?
# A list of items with a configurable publisher.
class List
  # The publisher name for the list.
  #
  # @!attribute [rw] publisher
  #   @return [String] the publisher name for this list.
  cattr_accessor :publisher
end
In the code, we start by defining the class, List, and its attribute publisher using cattr_accessor. The first part is simply the method definition, but the key here is the use of @!attribute instead of @param. This special tag tells YARD that we're dealing with a dynamically defined attribute. This [rw] indicates that the attribute is both readable and writable, meaning it can be accessed and modified. Finally, we specify the @return type, which describes the type of value this attribute will hold.
For example:
List.publisher = "Medium"
List.publisher #=> "Medium"
This demonstrates how publisher acts as a class-level getter and setter. There are other dynamic ways to document cattr_accessor in YARD, but that’s a topic for another article.
Now, since you have written all of these documents, what’s the use of it if you cannot have interactive documents right? So, don’t worry Yard provides a functionality to generate static HTML with support for a live server.
Since you have already installed a yard; it bundles with everything mentioned above. Let's see with an example.
This would be the final code that we want to visualize with proper documentation.
# array_adder.rb

# A utility class for array operations.
class ArrayAdder
    # Sums up all elements in the provided array after converting them to integers.
    #
    # This method converts each element of the given array into an integer
    # and returns their sum. If any element cannot be converted, a TypeError is raised.
    #
    # @param numbers [Array<String, Integer>] an array of numbers or numeric strings. Defaults to an empty array.
    # @return [Integer] the sum of the converted integers in the array. Returns 0 if the array is empty.
    #
    # @raise [TypeError] If any element cannot be converted to an integer or if an unexpected error occurs.
    #
    # @example Summing an array of integers
    #   ArrayAdder.add(numbers: [1, 2, 3]) # => 6
    #
    # @example Including numeric strings
    #   ArrayAdder.add(numbers: ["1", "2", "3"]) # => 6
    #
    # @example Default empty array
    #   ArrayAdder.add(numbers: []) # => 0
    #
    # @example Invalid elements
    #   ArrayAdder.add(numbers: ["a", 2]) # => Raises TypeError: Failed to convert elements to integers
    def self.add(numbers: [])
        numbers.map(&:to_i).inject(0, :+)
    rescue StandardError => e
        raise TypeError, "Failed to convert elements to integers: #{e.message}"
    end
end
Generating documentation is pretty straightforward. Type below code in your terminal
yard doc your/path/to/file.rb
for the above example is
yard doc array_adder.rb
Files:           1
Modules:         0 (    0 undocumented)
Classes:         1 (    0 undocumented)
Constants:       0 (    0 undocumented)
Attributes:      0 (    0 undocumented)
Methods:         1 (    0 undocumented)
 100.00% documented
You’ll notice something like the above in your terminal after executing the command with a ‘doc’ folder appearing in your project directory. Next, start the server within your project directory to view the documentation.
yard server
You will see something like below:
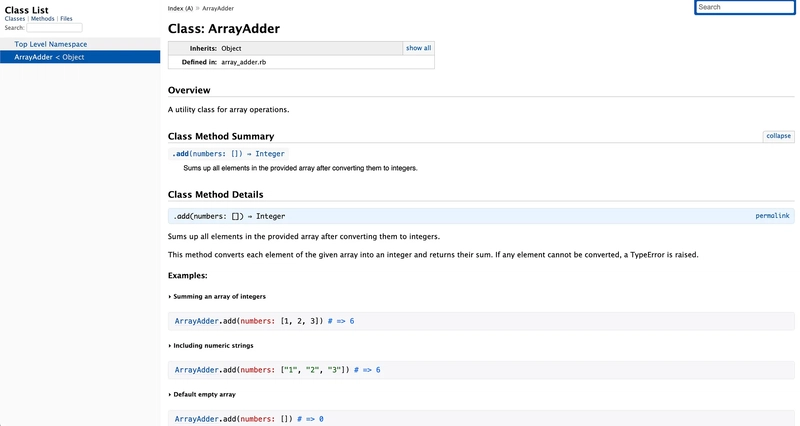
A proper interactive yard documentation — NOICE.
In summary, documentation can change how you and others work with your code. It lets you create easy-to-understand guides and examples for each piece of code, making everything clearer for everyone involved. Yard is a tool to create systematic documentation but there are tons of other tools or methods, You can pick any one of them as per your liking.
To finish off, motivate yourself and your team to see documentation as a key part of coding. Remember, documentation isn’t just about explaining what your code does; it’s about making it accessible and maintainable for others (and your future self). Happy coding, and may your documentation be as clear as your intentions!
References and Further Reading:
Official YARD Documentation: yardoc.org: The primary source for all things YARD, including installation, usage, and contributing guidelines.
YARD GitHub Repository: github.com/lsegal/yard: For those interested in the codebase, bug reports, or contributing to YARD.
YARD Tags Reference: rubydoc.info/gems/yard/file/docs/Tags.md: Detailed documentation on YARD tags for advanced documentation practices.

Top comments (0)