
In this short article, I will show you how you can add a full-featured admin panel to your koa application.
This is a 7 minutes’ long article which can save you weeks of work.
After following this tutorial you will have an app with authentication, beautiful interface and the entire CRUD for your data. Further, you can adjust it to your specific needs.
The stack
Obviously we will use koa with some of its modules. But as an admin panel interface, we will use AdminBro, which got official koa support last week.
So this is HOT news. ^^^
Installation
If you start from scratch, first initialize the repo and install koa:
mkdir koa-admin
cd koa-admin
yarn init
yarn add koa
Now install the following dependencies necessary to set up the admin panel:
yarn add admin-bro @admin-bro/koa @koa/router koa2-formidable
Admin Setup - basics
Now we have to launch the admin interface. Create an index.js file and insert the following content:
// index.js
const AdminBro = require('admin-bro')
const { buildRouter } = require('@admin-bro/koa')

const Koa = require('koa')
const app = new Koa()

const adminBro = new AdminBro({
  databases: [],
  rootPath: '/admin',
})

const router = buildRouter(adminBro, app)

app
  .use(router.routes())
  .use(router.allowedMethods())

app.listen(3000)
What we did:
- create a regular
koaapplication - initialize AdminBro with some default settings
- attach admin by using the
buildRoutermethod
Now, let’s run the app with node command. (you can also use nodemon)
node index.js
And visit the http://localhost:3000/admin page. You should see something like this:

Ok, it’s pretty and it works, but it doesn’t do much. Let’s change that.
Fill it with your data
This is a part not exactly related to koa itself. AdminBro gives you the ability to manage data of all kinds. It supports the following adapters:
- @admin-bro/sequelize
- @admin-bro/typeorm
- @admin-bro/mongoose
- @admin-bro/firebase (beta)
In this article, I will show you the simplest example of showing data from MongoDB with a mongoose adapter but first, make sure you have MongoDB running locally.
Now install mongoose dependencies:
yarn add @admin-bro/mongoose mongoose
And change our index.js file.
- Require new dependencies and register the mongoose adapter with AdminBro, so it knows how to handle passed models.
- Create a new mongoose model: User with an
emailandencryptedPassword. - We have to
awaitfor mongo toconnectmethod first. This is why we will need to wrap an entire setup with anasyncfunction. - Inside the setup, we pass User to
resourcesarray in AdminBro.
This is an updated index.js file
const AdminBro = require('admin-bro')
const mongoose = require('mongoose')
const AdminBroMongoose = require('@admin-bro/mongoose')
const { buildRouter } = require('@admin-bro/koa')

const Koa = require('koa')
const app = new Koa()
AdminBro.registerAdapter(AdminBroMongoose)

const User = mongoose.model('User', {
  email: { type: String, required: true },
  encryptedPassword: { type: String, required: true },
});

const run = async () => {
  const mongoose = require('mongoose')
  await mongoose.connect('mongodb://localhost:27017/test', {
    useNewUrlParser: true,
    useUnifiedTopology: true,
  });

  const adminBro = new AdminBro({
    resources: [User],
    rootPath: '/admin',
  })

  const router = buildRouter(adminBro, app)

  app
    .use(router.routes())
    .use(router.allowedMethods())

  app.listen(3000)
}

run()
And this is what creating new users looks like:
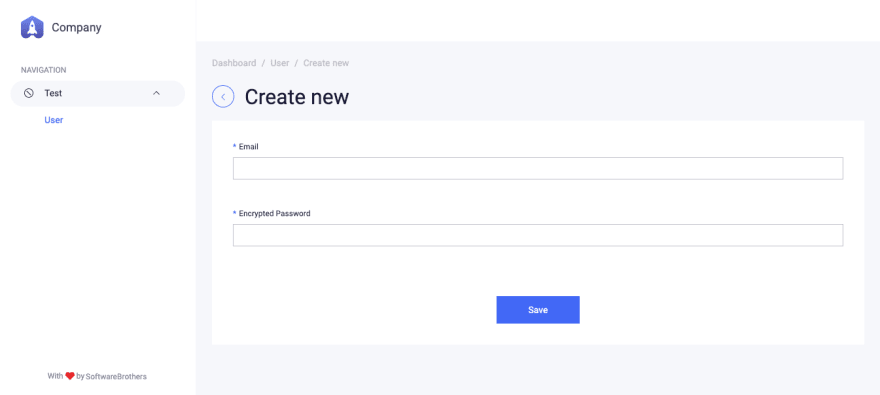
For the User model, AdminBro has generated an entire CRUD with validations.
Password hashing
The problem is with the password field which should be hashed whenever the user passes something. Fortunately, AdminBro comes with installable chunks of code which are called AdminBro Features. And guess what - there is a feature to the password hashing.
Install the feature first with argon2 which will be used to encrypt the password.
yarn add @admin-bro/passwords argon2
And pass the feature to AdminBro options like this
const passwordFeature = require(‘@admin-bro/passwords’)
const argon2 = require(‘argon2’)
// …

const adminBro = new AdminBro({
    resources: [{
      resource: User,
      options: {
        properties: { encryptedPassword: { isVisible: false } },
      },
      features: [passwordFeature({
        properties: { encryptedPassword: 'encryptedPassword' },
        hash: argon2.hash,
      })]
    }],
    rootPath: '/admin',
  })
And this is basically it. Now you can create users and their passwords will be hashed automatically. Cool - right?
Before you move forward - create, at least, one user with known email and password. Let me suggest: admin@example.com:password
Authentication
Since we have users in the database, with proper password hashing, let’s add an authentication mechanism.
In order to do that we will have to change buildRouter to buildAuthenticatedRouter and define the async authenticate method.
Before we do this we also have to set koa app.keys because authentication is using cookies.
app.keys = ['super-secret1', 'super-secret2']
most probably in the real world example you would like to take them from
process.env
Next, change the buildRouter to buildAuthenticated router:
const router = buildAuthenticatedRouter(adminBro, app, {
    authenticate: async (email, password) => {
      const user = email && await User.findOne({ email })
      if (password && user && await argon2.verify(user.encryptedPassword, password)){
        return user.toJSON()
      }
      return null
    },
  })
So we first look for an existing user and then we check her password with argon2. If everything is correct, we return the user object, which goes to the session. It can be then used inside the AdminBro.
And this is what we see after running the app again:

Fill it with the email and password you've just created (PS: I suggested admin@example.com:password :)) - and you are in.
Summary, what’s next
Uff, we did it. We launched the entire application, authentication, password hashing and user management (CRUD) in a couple of minutes. Everything thanks to the amazing koa framework and a superb admin-bro admin panel.
From here you can do lots of things:
- Modify the look and feel of the UI
- Add new resources
- Define actions (like approve, disapprove users etc)
- Add role-based access control
- And many, many more
To check out all the available options - see adminbro.com documentation page - it is huge.
AdminBro is updated very often by developers from SoftwareBrothers, so make sure to star the repo to motivate them :). Do the same thing with koa.
I hope you liked this brief tutorial. Next time I would like to describe some more advanced AdminBro topics.
If you want you can download one file with the server code - you can do this here.

Top comments (1)
Glad you like it