
This is the first part of a post series about running Spark on Kubernetes. You can read more about the advantages of using this approach in this Spot.io post here
By the end of this post, you will have a local environment ready to use minikube to run spark.
Create local environment
Except for autoscaling, which I will simulate using AWS EKS, Cluster Autoscaler, and Karpenter, we will use this local environment to work with spark throughout this series. The post on scalability will be published soon.
You must install minikube to use it locally. The procedures are very simple, and the official documentation is available here.
Tip: I strongly advise installing this plugin if you use ohmyzsh because provides you an alternative to aliasing popular kubectl commands.
Let’s create a multinode cluster with 2 nodes after installing minikube
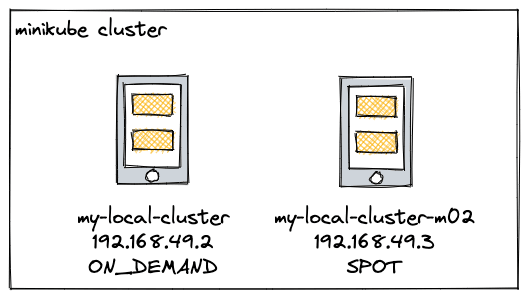
minikube start --nodes 2 -p my-local-cluster
Perhaps you’re wondering why there are two local nodes, and the answer is that Kubernetes lets us specify which node on which we can install our applications.
In this post, we will simulate a small production environment, and in the next post, the spark driver will run on ON_DEMAND nodes and the executors on SPOT nodes. As a result, we can reduce cloud costs.
You can see if everything worked out by looking at this output at the console.

Imagine the following hypothetical scenario: my-local-cluster is an ON_DEMAND instance and my-local-cluster-m02 is a SPOT instance
Create the processing namespace from which our spark job will run.
$ k create namespace processing
Installing Spark
The SparkOperator must be installed before we can use Spark on Kubernetes. Google created this operator, which is available on Github. In a nutshell, the operator is in charge of monitoring the cluster for specific events related to the spark job, as known as kind: SparkApplication
The simplest way to install is to follow the documentation using Helm but we can customize some interesting features by downloading the SparkOperator helm
$ helm repo add spark-operator https://googlecloudplatform.github.io/spark-on-k8s-operator
$ helm pull spark-operator/spark-operator
You will get this result

Let's open the values.yaml file and make some changes.
...
sparkJobNamespace: "processing"
...
webhook:
  enable: true
  ...
  namespaceSelector: kubernetes.io/metadata.name=processing
...
nodeSelector:
    kubernetes.io/hostname=my-local-cluster
sparkJobNamescape specifies which namespace SparkOperator will use to receive spark job events.
Because we will control instance types for spark drivers and executos in the following post, webhook is set to true. Don’t be concerned right now.
The nodeSelector parameter specifies which node instance the SparkOperator pod will be installed on. We need to ensure that we do not lose the spark-operator pod, so we use an ON_DEMAND instance in our hypothetical example.
Run to install
$ helm install <chart-name> <chart-folder> -n <namespace>
$ helm install spark-operator spark-operator -n spark-operator --create-namespace
We now have SparkOperator installed and running

The final step is to set up a spark job to run.
An example of a spark job defined using a YAML file is provided below. As you can see, we’re defining the processing namespace in which all of our spark jobs will run, and the SparkOperator will receive events from that.
In addition, kind: SparkApplication is specified
apiVersion: "sparkoperator.k8s.io/v1beta2"
kind: SparkApplication
metadata:
  name: my-job-with-operator
  namespace: processing
spec:
  type: Scala
  mode: cluster
  image: "tiagotxm/spark3.1:latest"
  imagePullPolicy: Always
  mainClass: org.apache.spark.examples.SparkPi
  mainApplicationFile: "local:///opt/spark/examples/jars/spark-examples_2.12-3.1.1.jar"
  sparkVersion: "3.1.1"
  restartPolicy:
    type: Never
  volumes:
    - name: "test-volume"
      hostPath:
        path: "/tmp"
        type: Directory
  driver:
    cores: 1
    coreLimit: "1200m"
    memory: "512m"
    labels:
      version: 3.1.1
    serviceAccount: spark-operator-spark
    volumeMounts:
      - name: "test-volume"
        mountPath: "/tmp"
  executor:
    cores: 3
    instances: 3
    memory: "512m"
    labels:
      version: 3.1.1
    volumeMounts:
      - name: "test-volume"
        mountPath: "/tmp"
We’ll use a spark image and run a simple spark job defined at mainApplicationFile, which is contained within the image.
Let's get started on our simple task.
$ k apply -f hello-spark-operator.yaml
We can monitor the job’s start and all spark-related events, such as the creation of a prod driver and an executor.
$ kgpw -n processing

Also, double-check the final status
$ k get sparkapplications -n processing
```
##Conclusion
We created a local environment in this post to run spark jobs with two namespaces. The SparkOperator has been installed in the **spark-operator namespace**, and it now handles spark events from the **processing namespace**

I hope this post was useful and you can find a complete example in my git [repository](https://github.com/tiagotxm/data-engineer-projects/blob/main/jobs/getting-started-spark-operator/hello-spark-operator.yaml).
Thank you for your time!
You can also read on [medium] (https://tiagotxm.medium.com/spark-k8s-getting-started-part-1-44200fb53606) if you prefer
Join me: https://www.linkedin.com/in/tiagotxm/

Top comments (0)