
This article was first published on our open-source platform, SimpleAsWater.com. If you are interested in IPFS, Libp2p, Ethereum, Zero-knowledge Proofs, DeFi, CryptoEconomics, IPLD, Multiformats, and other Web 3.0 projects, concepts and interactive tutorials, then be sure to check out SimpleAsWater.
In this first post of the hands-on series, we will understand the basic concepts of IPLD followed by coding in Golang to persist key-value entries.
- Understanding IPLD
- Install Golang
- Use
go-ipfs-apito write & fetch data via IPLD. - Use IPLD explorer to explore the data that we wrote using the command line.
If you get stuck in any part or have any queries/doubts, then feel free to reach us out on our discord channel.
Here is a preview of the final implementation.
You can check out the complete code for the tutorial here.
Understanding IPLD
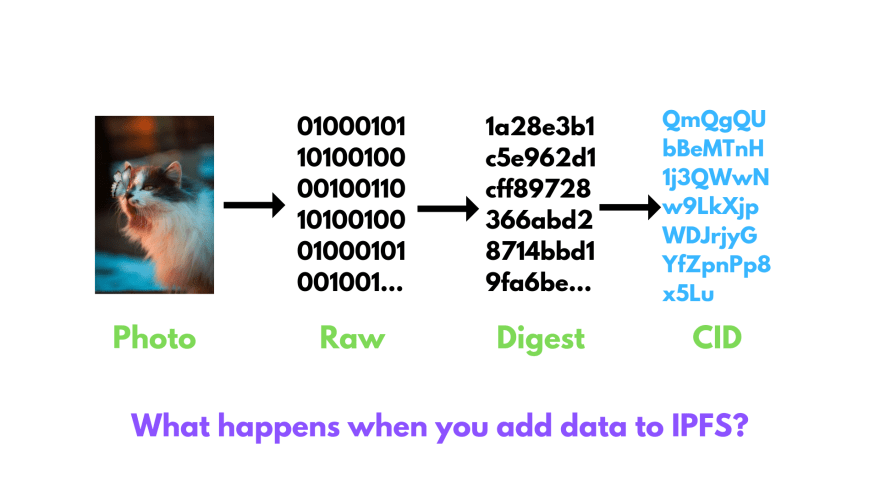
When you add the photo to IPFS, this is what happens:
When we add something to IPFS, we get something like this:
$ ipfs add cat.png
added QmQgQUbBeMTnH1j3QWwNw9LkXjpWDJrjyGYfZpnPp8x5Lu cat.png
 717.23 KiB / 717.23 KiB [=============================================] 100.00%
You can see the final hash here:
QmQgQUbBeMTnH1j3QWwNw9LkXjpWDJrjyGYfZpnPp8x5Lu
But we don’t see anything related to the 2 steps(Raw and Digest). This all happens under the hood.
When we added the image, we converted the image into the Raw data which the computer can understand. Now, to make it content-addressable we have to come up with a method by which we can convert this image data to a label that uniquely identifies it’s content.
This is where hash functions come into play.

Hash functions take the data(any data from texts, photos, whole bible, etc.) as input and give us an output(Digest) which is unique with respect to its output. If we change even a pixel in this image then the output will be different. This shows its tamper-proof property, hence making IPFS a Self-certifying File System. So if you transfer this image to anybody, he/she can check that if the photo received has been tampered with or not.
Also, you cannot tell what was the input(in this case, a cat photo), but just seeing its output(the Digest). So, this also ensures a great amount of security.
Now we pass the Raw image data into SHA256 hash function and get the unique Digest. Now, we need to convert this Digest into a CID(Content Identifier). This CID is what IPFS will search for when we try to get back the image. For doing this, IPFS uses something called Multihash.
To understand the significance of Multihash, consider this situation.
You stored this image on the internet and you have its CID, which you can give to anybody who wants to get this image. Now, what if you discover in future that SHA256 is broken(this would mean that this process is NO more tamper-proof and secure) and you want to use SHA3(to ensure tamper-proofing and security) instead? This would mean changing the whole process of converting your photo to CID, and the previous CIDs will be useless…
This above problem may seem a small issue in this context, but you should know that these hash functions secure TRILLIONS of dollars. All the Banks, National security agencies, etc. use these hash functions to operate securely. Even the green lock that you see beside the address of every site on the browser will not work without it.
In order to solve this problem, IPFS uses Multihash. Multihash allows us to define hashes that are self-defining. So, we can have multiple versions of CIDs, according to the hash function used. We will talk more about it below.
Well, now we have added our photo to IPFS, but this was not the whole story. What is actually happening is something like this:
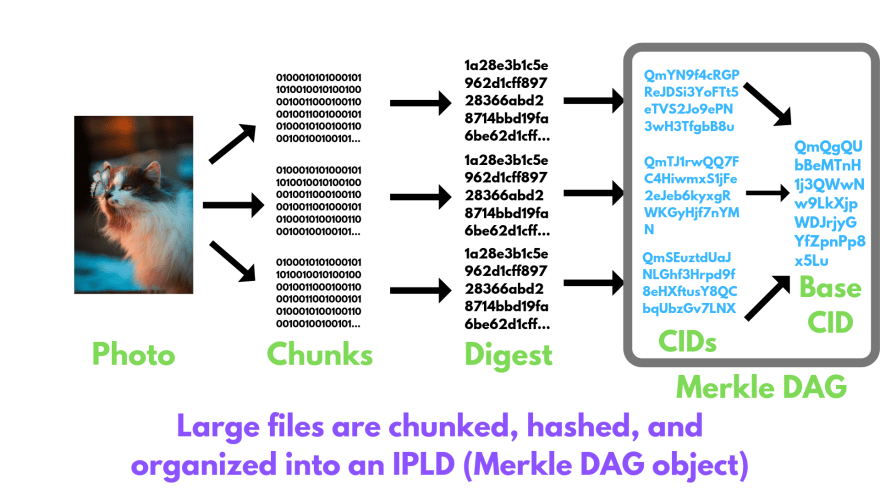
If the files are bigger than 256 kB, then they are broken down into smaller parts, so that all the parts are equal or smaller than 256 kb. We can see the chunks of our photo using this command:
$ ipfs object get QmQgQUbBeMTnH1j3QWwNw9LkXjpWDJrjyGYfZpnPp8x5Lu
This gives us 3 chunks, each of which is smaller than 256kb. Each of these chunks is first converted into a digest and then into CIDs.
{
    "Links": [
        {
            "Name": "",
            "Hash": "QmYN9f4cRGPReJDSi3YoFTt5eTVS2Jo9ePN3wH3TfgbB8u",
            "Size": 262158
        },
        {
            "Name": "",
            "Hash": "QmTJ1rwQQ7FC4HiwmxS1jFe2eJeb6kyxgRWKGyHjf7nYMN",
            "Size": 262158
        },
        {
            "Name": "",
            "Hash": "QmSEuztdUaJNLGhf3Hrpd9f8eHXftusY8QCbqUbzGv7LNX",
            "Size": 210174
        }
    ],
    "Data": "\u0008\u0002\u0018��, ��\u0010 ��\u0010 ��\u000c"
}
IPFS uses IPLD (IPLD uses Merkle DAG, or directed acyclic graph) for managing all the chunks and linking it to the base CID.
IPLD (objects) consist of 2 components:
-
Data— a blob of unstructured binary data of size < 256 kB. -
Links— array of Link structures. These are links to other IPFS objects.
Every IPLD Link(in our case the 15 links that we got above) has 3 parts:
-
Name— name of the Link -
Hash— the hash of the linked IPFS object -
Size— the cumulative size of linked IPFS object, including following its links
IPLD is built on the ideas of Linked Data, which is actually something that folks in the decentralized web community have been talking about for quite some time. It’s something Tim Berners-Lee has been working on for ages, and his new company, Solid, is building a business around it.
Using IPLD has also other benefits. To see this, let’s create a folder named photos and add 2 photos into it (the cat pic and a copy of the same pic).

As you can see both the photos have the same hash(which proves that I haven’t changed anything in the copy of the image). This adds De-duplication property to IPFS. So even if your friend adds the same cat photo to IPFS, he will not duplicate the image. This saves a lot of storage space.
Here is a talk by Juan Benet explaining the significance and features of IPLD that we just discussed.
Now, as we have understood what is IPLD, how it works and its significance, let’s get our hands dirty!
Playing With IPLD
In IPFS, IPLD helps to structure and link all the data chunks/objects. So, as we saw above, IPLD was responsible for organizing all the data chunks that constituted the image of the kitty🐱.
In this part, we will use go-ipfs-api to write and fetch data via IPLD. Let's get started!
Install Golang
We recommend you to install the latest version of Golang from the official website](https://golang.org/doc/install). There are instructions available for installing Golang on Windows, Linux, FreeBSD & MacOS.
Writing to IPFS via IPLD
The purpose of the code is to get access to some of the deeper abstractions of IPFS that can allow developers to store information apart from files. This was possible by operating directly on the Merkle DAGs. Although versions of similar implementations are available in Javascript, we wanted to implement something in Golang.
Coding the IPLD operations block-by-block
The code primarily depends upon the go package called go-ipfs-api. It is maintained by IPFS and offers wrappers to many core HTTP APIs.
Our code is a single file that defines every key-value through a simple mapping:
// Mapping-based structure to record key-value information
keyValueMap := make(map[string]interface{})
Followed by the definition of key-value structure, we read the user inputs. Once we read the user inputs of key and value, we set them in the mapping using the following code:
scanner := bufio.NewScanner(os.Stdin)

fmt.Println("Enter value for the key field: ")
scanner.Scan()
inputKey := scanner.Text()

fmt.Println("Enter value for value field: ")
scanner.Scan()
inputValue := scanner.Text()

// Setting the key and values in the mapping
m[inputKey] = inputValue
The mapping set with user inputs will now be converted into a JSON object and printed on the console with the following code:
// Converting into JSON object
entryJSON, err := json.Marshal(m)
if err != nil {
    fmt.Println(err)
}

// Display the marshaled JSON object before sending it to IPFS
jsonStr := string(entryJSON)
fmt.Println("The JSON object of your key-value entry is:")
fmt.Println(jsonStr)
Once the JSON object is created and marshaled, we now add this to the DAG by calling the DagPut() function:
// Dag PUT operation which will return the CID for futher access or pinning etc.
cid, err := sh.DagPut(entryJSON, "json", "cbor")
if err != nil {
    fmt.Fprintf(os.Stderr, "error: %s", err)
    os.Exit(1)
}
fmt.Println("------\nOUTPUT\n------")
fmt.Printf("WRITE: Successfully added %sHere's the IPLD Explorer link: https://explore.ipld.io/#/explore/%s \n", string(cid+"\n"), string(cid+"\n"))
Once the JSON object is written, the DagPut() returns the CID.
We can now access the IPLD entry by passing along the returned CID to the GetDag() function. Once we receive the entry, we also print it on the console using the following code:
// Fetch the details by reading the DAG for key "inputKey"
fmt.Printf("READ: Value for key \"%s\" is: ", inputKey)
res, err := GetDag(cid, inputKey)
if err != nil {
    fmt.Println(err)
}
fmt.Println(res)
The full implementation can be found here.
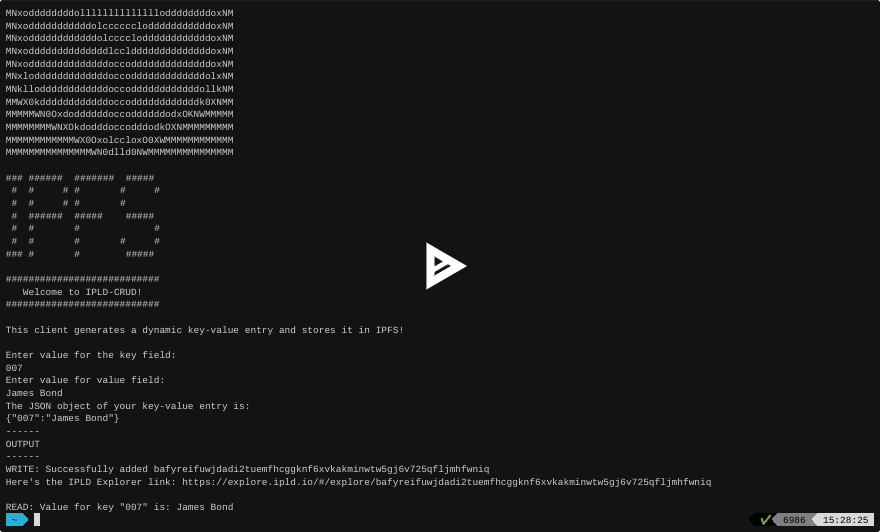
Here is how our code looks in action😎
Conclusion
In summary, we have covered the basic concepts of hashing, IPFS and how IPLD is used. Further, we have also provided a hands-on code demonstration in Golang to effectively building a key-value based data interface using the go-ipfs-api package.
If you get stuck in any part or have any queries/doubts, then feel free to reach us out on our discord channel.
In PART 2 of the series, we will be introducing how to extend this code for enacting the storage of docstore entries.
Hands-on IPLD Tutorial in Golang: PART 2
About the authors
Ganesh Prasad Kumble

Ganesh is an expert in emerging technologies and business strategy. He has co-founded, bootstrapped, mentored several start-ups and initiatives across SaaS, eCommerce, IoT, Blockchain & AI.
He is a contributor to several open-source projects including Ethereum and IPFS. He is also a moderator at the Ethereum Research forum.
He is currently leading Platform Innovation efforts at Aicumen Technologies Inc. & KIP Foundation, building a general purpose business protocol featuring identity management, third party services, distributed compute and immutable storage.
Ganesh is the author of the Hands-On Artificial Intelligence for Blockchain book.
You can know more about him here.
Vaibhav Saini
Vaibhav is the Co-founder of TowardsBlockchain, SimpleAsWater & Dappkit. You can know more about him here.

Top comments (0)