
Part 4: Creating and Using Tokens
The purpose of building this blog is to write down the detailed operation history and my memo for learning the dApps.
If you are also interested and want to get hands dirty, just follow these steps below and have fun!~
Previous Blog
Tutorial: Ethereum BlockChain Development (1)
Tutorial: Ethereum BlockChain Development (2)
Tutorial: Ethereum BlockChain Development (3)
Intro & Review
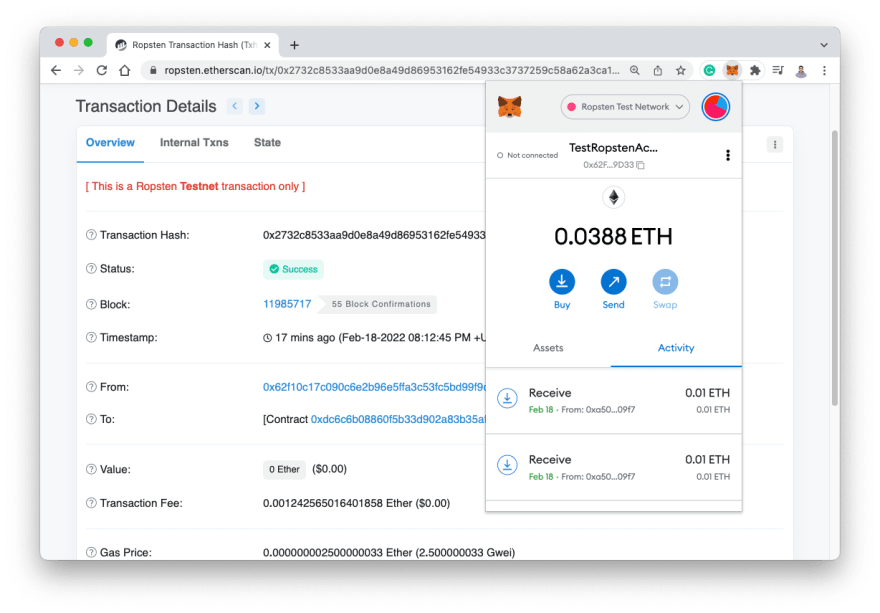
Previously we have deployed contract on a real test network - Ropsten Testnet, and we have spent some fake test ETH on deploying contract.
In this blog let's look at more of a real world use case. When people have created smart contracts, they have some types of tokens that associated with them. Let's take a look at how to create some tokens and we will do that in a couple of different ways.
We will create our tokens from scratch, and alternatively we will use ERC20 standard to create a token, which is being used in the real cryptocurrency world(will do it in next blog).
Getting started
We should first go to our code, create a new file named Token.sol in the directory: /contracts/:

Next update Token.sol with the following code:
//SPDX-License-Identifier: MIT

pragma solidity ^0.8.0;

import "hardhat/console.sol";

contract Token {
  string public name = "Yongchang He Token";
  string public symbol = "YHT";
  uint public totalSupply = 1000000;
  mapping(address => uint) balances;

  constructor() {
    balances[msg.sender] = totalSupply;
  }

  function transfer(address to, uint amount) external {
    require(balances[msg.sender] >= amount, "Not enough tokens");
    balances[msg.sender] -= amount;
    balances[to] += amount;
  }

  function balanceOf(address account) external view returns (uint) {
    return balances[account];
  }
}
This new contract Token.sol will create a new token called Yongchang He Token and set the supply to 1000000. The function transfer will transfer tokens to another address, and balanceOf will return the latest token balance.
Now let's go to CLI and compile our updated contract:
npx hardhat compile
If run successfully, we should get message as following:

Next let's update the deploy script at scripts/deploy.js to include the following new Token contract:
const hre = require("hardhat");

async function main() {

  const Greeter = await hre.ethers.getContractFactory("Greeter");
  const greeter = await Greeter.deploy("Hello, Hardhat!");
  await greeter.deployed();
  console.log("Greeter deployed to:", greeter.address);

  const Token = await hre.ethers.getContractFactory("Token");
  const token = await Token.deploy();
  await token.deployed();
  console.log("Token deployed to:", token.address);
}

main().catch((error) => {
  console.error(error);
  process.exitCode = 1;
});
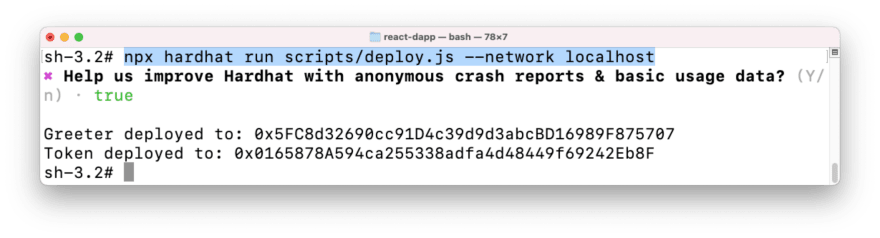
Now let's deploy this new contract to localhost:
npx hardhat run scripts/deploy.js --network localhost
We should get the following message:
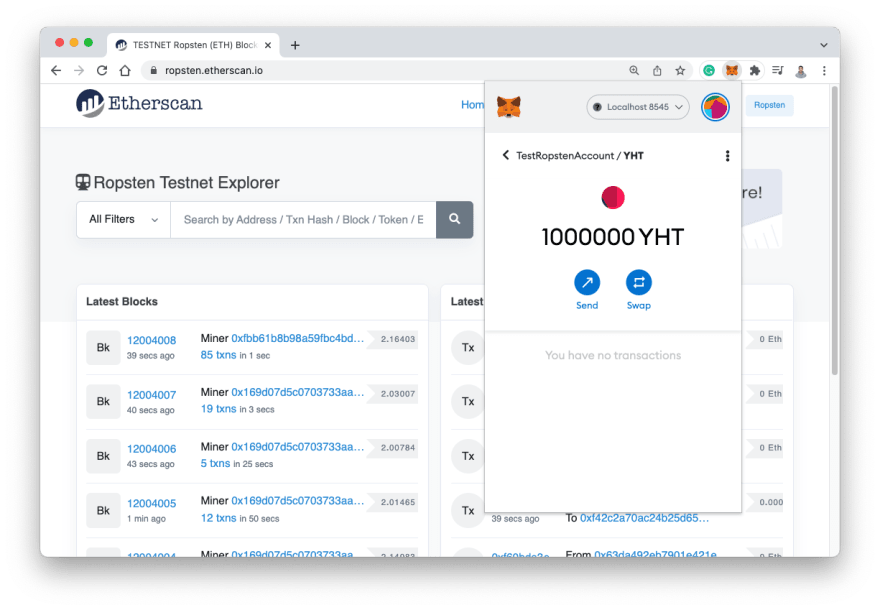
Let's see if we can review the Token in MetaMask. We can go back to localhost and choose the test account, and then click on "Import tokens":


We should copy and paste the Token Contract Address (produced in CLI window), Token Symbol and fill the decimal text with "0", and Click on Add custom Token and Import Token:


We should see the Tokens that we current have:
Let's also update the client code at src/App.js:
import { useState } from 'react';
import { ethers } from 'ethers';
import './App.css';
import Greeter from './artifacts/contracts/Greeter.sol/Greeter.json'
import Token from './artifacts/contracts/Token.sol/Token.json'

// Store the contract Address into variable
const greeterAddress = "0x5fbdb2315678afecb367f032d93f642f64180aa3";
const tokenAddress = "0x0165878A594ca255338adfa4d48449f69242Eb8F";

function App() {
  const [greeting, setGreetingValue] = useState('')
  const [userAccount, setUserAccount] = useState('')
  const [amount, setAmount] = useState(0)


  async function requestAccount(){
    // Aims to connect to the Metamask wallet of the user and create a transaction
    // Request users' account information from MetaMask wallet
    // This will prompt the user to connect to one of their MetaMask account
    // if they have already connected and return array of their accounts
    await window.ethereum.request({ method: 'eth_requestAccounts' });
  }

  async function getBalance() {
    if (typeof window.ethereum !== 'undefined') {
      const [account] = await window.ethereum.request({ method: 'eth_requestAccounts' })
      const provider = new ethers.providers.Web3Provider(window.ethereum);
      const contract = new ethers.Contract(tokenAddress, Token.abi, provider)
      const balance = await contract.balanceOf(account);
      console.log("Balance: ", balance.toString());
    }
  }

  async function sendCoins() {
    if (typeof window.ethereum !== 'undefined') {
      await requestAccount()
      const provider = new ethers.providers.Web3Provider(window.ethereum);
      const signer = provider.getSigner();
      const contract = new ethers.Contract(tokenAddress, Token.abi, signer);
      const transation = await contract.transfer(userAccount, amount);
      await transation.wait();
      console.log(`${amount} Coins successfully sent to ${userAccount}`);
    }
  }

  async function fetchGreeting(){
    // When Ethereum window is exist
    // Waiting for the MetaMash extension to be connected
    // If MetaMask is not installed on that user's broswer,
    //window.ethereum will be rejected
    if (typeof window.ethereum !== 'undefined'){
        // Create a new provider using Ethers
        // In our case we use Web3Provider
        const provider = new ethers.providers.Web3Provider(window.ethereum)
        // When We have the provider instance, we can now create contract instance
        // We should pass in greetAddress, Greeter.abi and provider
        const contract = new ethers.Contract(greeterAddress, Greeter.abi, provider)
        try{
          // Read value from BlockChain, and assign it to variable data
          const data = await contract.greet()
          // Show data to console
          console.log('data: ', data)
        }catch (err) {
          console.log("Error: ", err)
        }
    }
  }

  async function setGreeting(){
    // To check if users have typed in a greeting
    // If no greeting function stop without writing empty string
    if (!greeting) return
    // When Ethereum window is exist
    if (typeof window.ethereum !== 'undefined'){
      // Wait for the user to go ahead and enable the account to be used
      await requestAccount()
      // Create another new provider using Ethers
      // In our case we use Web3Provider
      const provider = new ethers.providers.Web3Provider(window.ethereum);
      // Await to sign a transaction using a signer
      const signer = provider.getSigner();
      // Create contract instance and pass in contract address, abi and signer
      const contract = new ethers.Contract(greeterAddress, Greeter.abi, signer);
      // Passing in greeting variable
      const transaction = await contract.setGreeting(greeting);
      setGreetingValue('')
      // Waiting the transaction to be confirmed on the BlockChain
      await transaction.wait()
      // Refresh value
      fetchGreeting()
    }
  }

  return (
    <div className="App">
      <header className="App-header">
        <button onClick={fetchGreeting}>Fetch Greeting</button>
        <button onClick={setGreeting}>Set Greeting</button>
        <input onChange={e => setGreetingValue(e.target.value)} placeholder="Set greeting" />

        <br />
        <button onClick={getBalance}>Get Balance</button>
        <button onClick={sendCoins}>Send Coins</button>
        <input onChange={e => setUserAccount(e.target.value)} placeholder="Account ID" />
        <input onChange={e => setAmount(e.target.value)} placeholder="Amount" />
      </header>
    </div>
  );
}

export default App;

// limb proof waste call shrug street poet bike sleep bunker expire panic
Let's test it out by running the following the command:
npm start
Now we can open our test React App which is running locally.
We can click "Get Balance", and we will get a balance of 1000000:

Next we can pick one of our account as a recipient, and click the account name area to copy and paste the account ID and input the amount of coins that we want to send, and then we click "Send Coins":


After that we should see the following result that 150000 YHT has been sent successfully to the recipient account:

After we click Confirm, we should see the pop-up message in the Console:

And if we click on "Get Balance", we will also get the balance in our console:

Pretty Cool!
Reference:
https://www.youtube.com/watch?v=a0osIaAOFSE&t=2239s
https://dribbble.com/shots/14225432-Coder

Top comments (0)