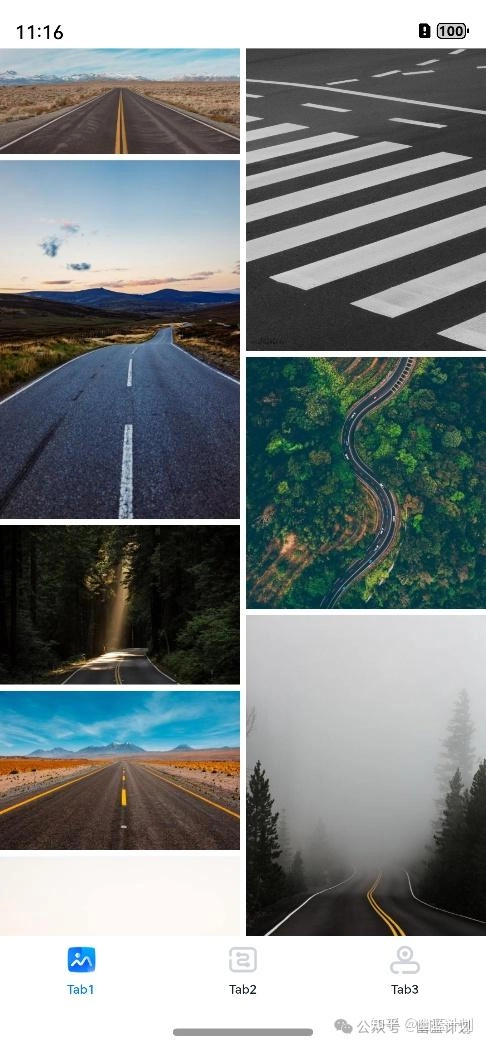
今天和大家分享一下瀑布流的实战案例,和官方文档略有不同,本文数据直接从api接口获取,更接近实战。需要注意的是,要实现瀑布流,接口最好将图片尺寸一起返回。网络请求使用幽蓝君封装的网络库
本文效果图:
首先要实现IDataSource接口的对象,用于瀑布流组件加载数据:
export class WaterFlowDataSource implements IDataSource {


  private dataArray: Object[] = []

  private listeners: DataChangeListener[] = []


  constructor() {

    let url = "http://youlanjihua.com/AIImage/wallpaper.php?classId=2"

    HttpManager.getInstance().request({

      method: RequestMethod.GET,

      url: url

    }).then((result:object)=>{

      let str = JSON.stringify(result)

      let strArr:Object[] =  JSON.parse(str)

      for (let i = 0; i < strArr.length; i++) {

        this.dataArray.push(strArr[i])

      }

      this.notifyDataReload()

    })


  }


  // 获取索引对应的数据

  public getData(index: number): Object {

    return this.dataArray[index]

  }


  // 通知控制器数据重新加载

  notifyDataReload(): void {

    this.listeners.forEach(listener => {

      listener.onDataReloaded()

    })

  }


  // 通知控制器数据增加

  notifyDataAdd(index: number): void {

    this.listeners.forEach(listener => {

      listener.onDataAdded(index)

    })

  }


  // 通知控制器数据变化

  notifyDataChange(index: number): void {

    this.listeners.forEach(listener => {

      listener.onDataChanged(index)


    })

  }


  // 通知控制器数据删除

  notifyDataDelete(index: number): void {

    this.listeners.forEach(listener => {

      listener.onDataDeleted(index)

    })

  }


  // 通知控制器数据位置变化

  notifyDataMove(from: number, to: number): void {


    this.listeners.forEach(listener => {

      listener.onDataMoved(from, to)

    })

  }


  // 获取数据总数

  public totalCount(): number {

    return this.dataArray.length

  }


  // 注册改变数据的控制器

  registerDataChangeListener(listener: DataChangeListener): void {

    if (this.listeners.indexOf(listener) < 0) {

      this.listeners.push(listener)

    }

  }


  // 注销改变数据的控制器

  unregisterDataChangeListener(listener: DataChangeListener): void {

    const pos = this.listeners.indexOf(listener)

    if (pos >= 0) {

      this.listeners.splice(pos, 1)

    }

  }


  // 增加数据

  public Add1stItem(): void {

    this.dataArray.splice(0, 0, this.dataArray.length)

    this.notifyDataAdd(0)

  }


  // 在数据尾部增加一个元素

  public AddLastItem(): void {

    this.dataArray.splice(this.dataArray.length, 0, this.dataArray.length)

    this.notifyDataAdd(this.dataArray.length-1)

  }


  // 在指定索引位置增加一个元素

  public AddItem(index: number): void {

    this.dataArray.splice(index, 0, this.dataArray.length)

    this.notifyDataAdd(index)

  }


  // 删除第一个元素

  public Delete1stItem(): void {

    this.dataArray.splice(0, 1)

    this.notifyDataDelete(0)

  }


  // 删除第二个元素

  public Delete2ndItem(): void {

    this.dataArray.splice(1, 1)

    this.notifyDataDelete(1)

  }


  // 删除最后一个元素

  public DeleteLastItem(): void {

    this.dataArray.splice(-1, 1)

    this.notifyDataDelete(this.dataArray.length)

  }


  // 重新加载数据

  public Reload(): void {

    this.dataArray.splice(1, 1)

    this.dataArray.splice(3, 2)

    this.notifyDataReload()

  }

}
然后使用WaterFlow组件展示数据:
import { HttpManager } from '../../library/httpTool/HttpManager';

import { RequestMethod } from '../../library/httpTool/RequestOptions';

import display from '@ohos.display';


@Entry

@Component

export  struct Home {

  @State dataSource: WaterFlowDataSource = new WaterFlowDataSource()

  @State item_width:number = (px2vp(display.getDefaultDisplaySync().width) - 5)/2


  build() {

      Column({ space: 2 }) {

        WaterFlow() {

          LazyForEach(this.dataSource, (item: object,index:number) => {

            FlowItem() {

              Column() {

                Image("http://youlanjihua.com/AIImage/wallpaper/compressSize/l_" + item['cover'])

                  .objectFit(ImageFit.Fill)

                  .width('100%')

                  .layoutWeight(1)

              }

            }

            .width('100%')

            .height(this.item_width * item['height']/item['width'])

            .backgroundColor('#ececec')

          }, (item: string) => item)

        }

        .columnsTemplate("1fr 1fr")

        .columnsGap(5)

        .rowsGap(5)

        .backgroundColor(Color.White)

        .width('100%')

        .height('100%')

      }

  }

}


Top comments (0)