If you like this post, please check out my Courses and Online Bootcamps at JavaScript for WordPress.
In the last part of this series we looked at how to include React in a WordPress Theme. In this tutorial we are going to look at how to build on that and setup the WordPress GraphQL plugin and Apollo for making requests for data with our JavaScript.
Apollo & WPGraphQL vs. REST API & WP Fetch API
WordPress ships with a REST API. This is great and super easy to use with the Fetch API or other AJAX libraries. I have a nice tutorial and video on how to work with these two if you're interested. However, working with REST APIs is falling out of popularity largely because of common necessity for making multiple API calls to get the data you need.
The WP GraphQL plugin does not ship with WordPress Core, but does add a GraphQL endpoint to WordPress. GraphQL is the preferred method for getting data mostly due to its ease of use and ability to get with one query what would take multiple queries with a REST API.
Apollo is the go to library for making GraphQL requests so we will bundle that with our theme code.
Getting GraphQL Setup in WordPress
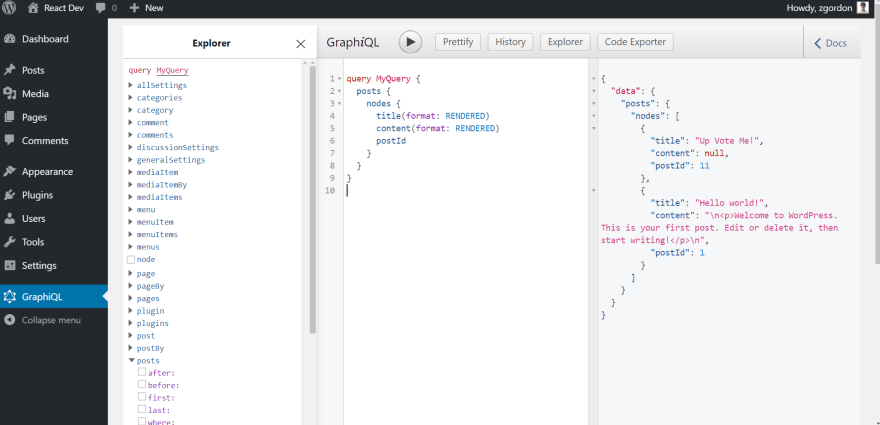
To get setup with GraphQL in WordPress we have to first install the WP GraphQL and WP GraphiQL plugins. The first one will enable the GraphQL server and the second one will give us an interface for making queries and looking through what data is available.
This what GraphiQL looks like when it is up and running (with a post request). If this is your first time using WP GraphQL, it is quite exciting to see everything that is available and be able to easily query it all via the Explorer.
Setting Up Apollo in Our Theme
You can see the example theme we are using here. We are going to pickup where we left off with the last tutorial.
The first thing we have to do is install Apollo and the related packages. Run this in the root of your theme:
npm install apollo-boost @apollo/react-hooks graphql
Now we are going to setup some new files that let us query some recent posts and display them on the page.
We are going to add in a components folder with a posts folder and an index.js file inside that.
/build
/src
-- /components
   -- /posts
      -- index.js
   -- index.js
functions.php
package.json
page-react.php
style.css
webpack.config.js
Inside the main /src/index.js file we are going to setup the Apollo client like this:
const { render } = wp.element;
import { ApolloProvider } from "@apollo/react-hooks";

const client = new ApolloClient({
  uri: "http://react-dev.local/graphql"
});

const App = () => {
  return (
    <ApolloProvider client={client}>
      <div>
        <h1>My First Apollo Theme!</h1>
      </div>
    </ApolloProvider>
  );
};
render(<App />, document.getElementById(`react-app`));
This sets up our Apollo client to ping the GraphQL endpoint on our WordPress site. You can change that URL to match the URL of your site.
Then we wrap our code inside the Apollo Provider, which will allow this client to be available to any components we include inside of it.
Now we can turn to looking at a how to create a Posts component that queries and displays posts.
Creating a List of WordPress Posts with Apollo
Now open the /src/components/posts/index.js file. The first thing we're going to do is import the necessary libraries for using React hooks and making GraphQL queries:
import { useQuery } from "@apollo/react-hooks";
import { gql } from "apollo-boost";
Then below that we can write out the query we will use to get our posts:
const POSTS_QUERY = gql`
  {
    posts {
      nodes {
        postId
        title(format: RENDERED)
      }
    }
  }
`;
This is a pretty straightforward query to get our post titles and IDs.
Next we can write our actual Posts component that will make the query, display a loading message, an error message if there is one, and then finally display our posts.
const Posts = () => {
  const { loading, error, data } = useQuery(POSTS_QUERY);

  if (loading) return <p>Loading Posts...</p>;
  if (error) return <p>Something wrong happened!</p>;

  const posts = data.posts.nodes;
  return posts.map(({ postId, title }) => <h3 key={postId}>{title}</h3>);
};
This is a pretty simple setup. Here is what it looks like all together
import { useQuery } from "@apollo/react-hooks";
import { gql } from "apollo-boost";

const POSTS_QUERY = gql`
  {
    posts {
      nodes {
        postId
        title(format: RENDERED)
      }
    }
  }
`;

const Posts = () => {
  const { loading, error, data } = useQuery(POSTS_QUERY);

  if (loading) return <p>Loading Posts...</p>;
  if (error) return <p>Something wrong happened!</p>;

  const posts = data.posts.nodes;
  return posts.map(({ postId, title }) => <h3 key={postId}>{title}</h3>);
};

export default Posts;
This is everything we need in this component. Now we can bring it into our src/index.js file and place it inside the <ApolloProvider> tags.
Rendering Our Posts Component
Update your src/index.js file so that it imports the Posts component and then displays it on the page.
const { render } = wp.element;
import ApolloClient from "apollo-boost";
import { ApolloProvider } from "@apollo/react-hooks";
import Posts from "./components/posts";

const client = new ApolloClient({
  uri: "http://react-dev.local/graphql"
});

const App = () => {
  return (
    <ApolloProvider client={client}>
      <div>
        <Posts />
      </div>
    </ApolloProvider>
  );
};
render(<App />, document.getElementById(`react-app`));
There we have it! You now have an Apollo client setup to Query WP GraphQL and make requests for posts.
From here you can modify this as needed to query anything that WP GraphQL gets for you.
Next up in the series we will look at how to extend WP GraphQL as well as make mutations to our data. To do this we will add a simple reddit style voting feature to our posts.
If you like this post, please check out my Courses and Online Bootcamps at JavaScript for WordPress.


Top comments (0)