
Creating a google assistant app, how to avoid soldering, and discovering what makes projects motivating and fun. Warning: extreme Valentine cheesiness ahead.
If you don’t know about Pusheen yet, you’re in for a treat.
This month, I wanted to make something that involved Google Home. I usually just ask google what the time is and what the weather is, so I thought it’d be fun to make something that could work with it, instead of buying. I’ve been interested in smart lights for a while, so I wanted to see if create my own. I found this Pixar style lamp and printed it out, used a Neopixel Photon kit I had lying around, and made pretty good progress:

I could turn it off and on remotely using the Particle API. Project halfway done yay!
But there was no emotion, no joy in this (albeit cute) little lamp. I couldn’t tie it to any feels.
That’s when I realized that I enjoy creating things most when I’m creating them for more than just me. I suppose my hobby is to anticipate how to get a smile or a laugh out of someone, and then see if I can create something to make that happen. Its fun when I get to create something cool, but it’s more fun and meaningful when I get to create it for someone else. This lamp, though cute, didn’t hold a special meaning, or refer to a shared experience.
I suppose my hobby is to anticipate how to get a smile or a laugh out of someone, and then see if I can create something to make that happen.
Then it hit me: it’s February! Maybe I could make a cheesy valentine project for my valentine. He just happens to be as obsessed with Pusheen the cat as I am (maybe more), so a plan started to form. We’ve both always dreamed of having that huge Pusheen plush, but since I can’t make a huge plush (yet!), I’d find some other way to make a big Pusheen that’s connected to Google Home.
I came up with this:
Cheesy, as promised. Also quite sweet.
It’s a smart heart that lights up with an invocation to a google assistant app I called “Pusheen Heart”. It lights up when I say "Ok Google, ask Pusheen Heart to tell Bryan I love him", and it turns off when I say "Ask Pusheen Heart to turn off". 😄💖 Simple and sweet.
Prototype and circuit diagram
First, I wanted to quickly create a Google Assistant app and have it control Neopixel strips. So I started out with first creating the firmware on the Particle Photon (firmware is code that goes into the microcontroller which controls the color of the lights).
The notable part here is that the Particle API allows me to make POST requests directly to my device (with Particle.function(), line 25 above) so that I can trigger the light animation. Then, I made the Google Assistant app, which consists of these three parts:
- An agent named “Neopixel Strip”,
- A user intent (“power up Neopixel strip”)
- An action for that intent (POST request to my device)
I used Dialogflow for this, they made it really easy to get to a working prototype of the user interaction from scratch in under an hour. Highly recommend checking it out. They even have the boilerplate code for you right in the dashboard, ready to deploy, so all you have to do is edit the code. Here's what the prototype looked like:
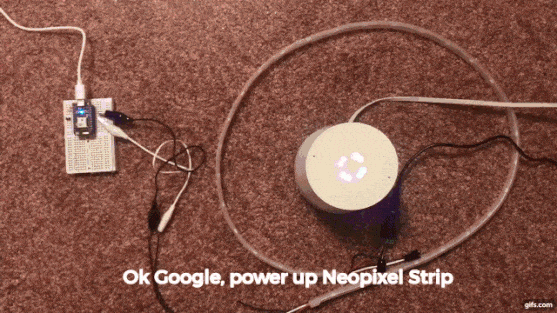
I changed the name of the agent “Neopixel strip” to “Pusheen Heart” later on. Didn’t wanna give the surprise away too quickly 😄.
Here’s the simple circuit diagram for this (the microcontroller is powered separately from the pixels through its micro-USB port):
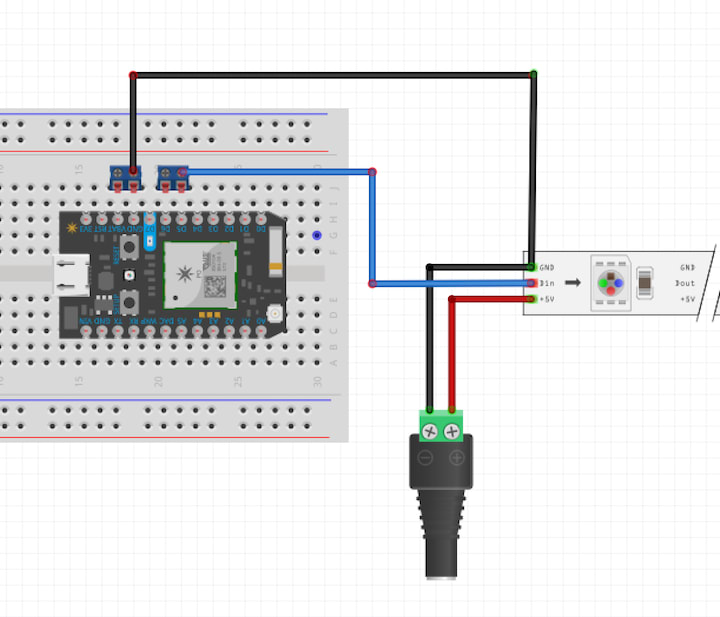
Made with Fritzing
Print parts and assemble!
After figuring out how to put the circuit together and prototyping the interaction, it was time to assemble the heart and the big Pusheen. This is only the second 3D design I’ve ever made, and the first one I’ve published in Thingiverse! I designed the heart in Fusion 360 (they have a 365 day free trial) since I couldn't find one in Thingiverse that fit my needs.
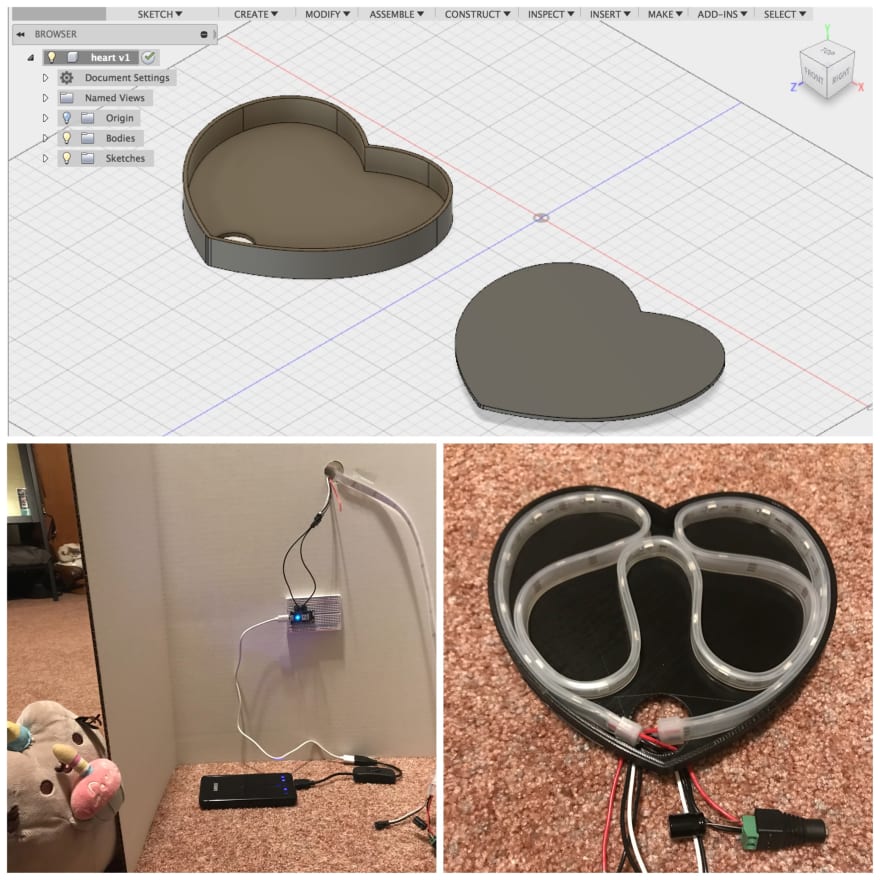
At first, I tried to cram an entire meter of Neopixel strip into this heart, but that didn't look nice when lit, so I ended up lining the edges instead and letting the rest hang out (as you can see in the bottom right part of the photo).
I opted to keep the project simple but delightful, so I went to a local print shop to print out the Pusheen, backed it with one of those 24" x 36" tri-fold poster boards, cut a hole to line up with the 3d printed heart’s hole and threaded the Neopixel strip through it.
I printed out the heart on my Monoprice Maker Select, and because was trying to surprise my valentine while living in the same house, I had to get creative:
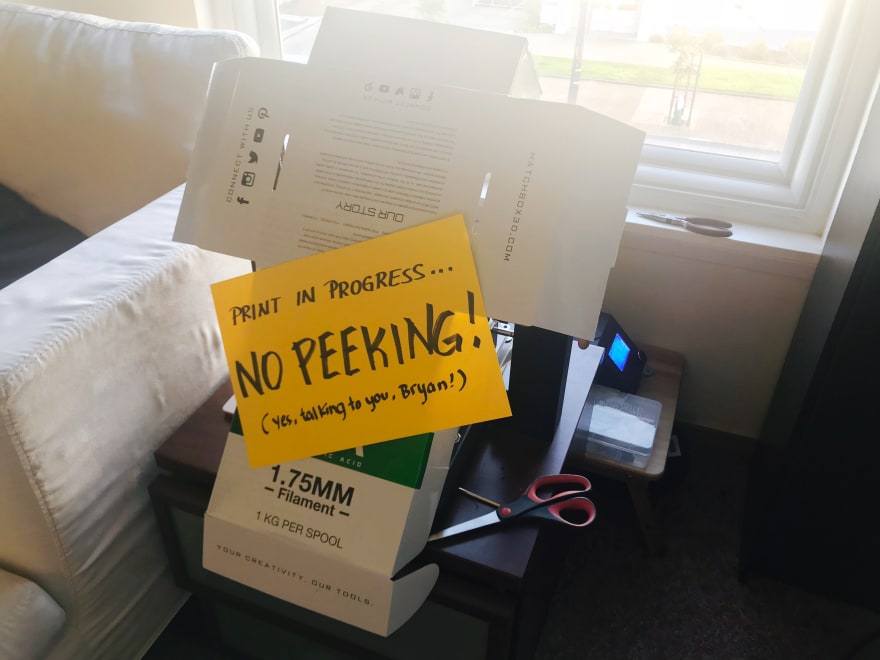
DIY recycled eco-friendly 3D printer cover! You think he’ll notice?
It worked! He knew something was coming, but he was surprised anyway. 💖
How to save some time and avoid soldering
I realize that to be able to learn fast and do all 12 of the projects I set out to do this year, I need to scope projects well and keep them small. I’m fascinated by soldering and I’m learning how to get faster at it, but I’m really slow right now. I found that if I could avoid soldering until absolutely necessary, that would shave off a significant amount of time, AND I’d expand my repertoire of known tools. Plus, then I can more easily re-use components. I managed to do that for this project, so I thought I would share some components that will help with creating projects without having to solder everything.
I think just knowing that these exist and what they’re called will help you decide if they are useful for your particular project situation.
-
Terminal Blocks: These handy connectors allow you to tighten a screw to clamp exposed wire ends, and then stick them onto breadboards. This means that if you have stranded wire you want to connect to a microcontroller, you can use one of these to connect those wires on a breadboard.

Look ma, no solder! Headers (male) (female): These come in “male” and “female” versions. The idea is you can avoid soldering your microcontroller directly to anything by using rows of these headers. Also useful to use for components that only have “pad” connections, like the Neopixel strips.
Jumper Cables (f-m)(f-f)(m-m): These come in all combinations of “male” to “female” connectors. You can use them on breadboards, or on headers directly.
Alligator Clips: These are useful when you have these circle conductive pads and can also be used to connect exposed wires to each other. Also, there are alligator clips to male jumper combos! What a world we live in.
Breadboard (of course): Breadboards have long clamps that hold pins in place so you can test your circuits easily. They’re like lego pads but for circuits.
Pogo sticks: I haven’t tried these yet, but they exist. They’re spring loaded metal pins. One day I’ll find out how useful they are.
Note that the linked items above are just to illustrate what they look like — there are so many different variations of these components. Let me know if there’s more of these prototyping components you’d recommend!
Conclusion
This was a really fun project, and it was extra special because I got to make someone smile. 💖 Projects in general are much more rewarding for me if they are also benefitting someone else, so thank you for being on this journey with me. I hope that you find some inspiration here to make your own project come to life!

Thank you for being awesome!
Connect with me!
I’m considering publishing step-by-step guides for all of my projects in #12MonthsOfMakes, as well as more in-depth dives into the world of making. If you’re interested, sign up for the newsletter to get notified once those are live!
Also, I’d love to hear about your projects. Tweet me @chardane with #12MonthsOfMakes, and let’s flood the Twitterverse with awesomeness.
Useful links
- Heart lamp on Thingiverse
- Dialogflow
- Getting started with Particle Photon
- Adafruit NeoPixel Überguide: The Magic of Neopixels
- Pusheen! By Claire Belton
This post was originally posted on Medium, lightly edited here for your reading pleasure.

Top comments (3)
Awwwwwwww
😍
dawwww