
Hi! You might wanna check part 1 first. If you are back from it we left with a bot in a folder in your computer (did you already set up a repo? pls do, if you have skip ahead). We have a working twitter bot and really we could just put it on a timer and that's it, we are good.

However, and you will have had this problem already if you started torrenting movies back in the 2Mb broadband days, you will also wanna turn off your computer at some point. And have the bot still running. The surprisingly uncontrived solution for this is just put it in somebody else's computer (like a website!)
Doing this is kinda cool because we are still doing a pointless shitposting exercise but we are using industry standard tools for this, which means this is a fantastic way to learn about fancy-ass things like CI or devops, or servers, or deployments, or containers all without actually doing any of the work.
First things first let's get this into a repository
So, the way code works most of the time is that you will have a repository (this is like dropbox but for nerds) and then from there services can deploy it to a server (this is moving the code to somebody else's computer and getting it to a state where it can run). Sometimes you run it on a different computer first to test it and if that's okay you then deploy it.
In most cases this is all automatic. When your code changes, the repo lets the testing computer know – it will then kick off the tests, and if they all pass then it'll let the deploy computer know to do it's thing. This is called CI and we are gonna do a very basic version of it (without testing bc we are lazy)
For this guide we'll be using GitHub as a repo and Heroku as a server. GitHub because it's super popular, and Heroku because it's free. Sign up for both if you haven't.
Getting our code ready for open source
So I forgot this on part 1!! You will need a package.json file to continue. When you were installing twitter in part 1 you might have gotten an error and a package-lock.json file was created. This is all good! Think of package.json as some basic info about your app. What it is, what it does, what dependencies does it have, etc. When we deploy the app we will install it and this file is how the other computer figures out what modules your app needs.
You can run npm init -y in the same folder your app is to generate one. Make sure it's adding twitter as a dependency! If it's not, you can run npm i twitter again to add it.
Now, as you might remember your code has secrets in it, the tokens and whatnot.
const client = new Twitter({
  consumer_key: "314gvas...12kjbh31n2",
  consumer_secret: "bd129u...21hjbv3",
  access_token_key: "89xzcyh...ads",
  access_token_secret: "98217...gyve98"
});
While you can store them on a private repository and call it a day this is a bit limiting. You can also just delete them and add them manually whenever you wanna run the bot? but this is not gonna fly when hosting it on a server, and it's a pain in the ass.
Like most problems you run in computer science, this is a problem many people have had before and we have a lovely industry standard way to handle secrets called environment variables.
The gist of it is that most operating systems have this concept of OS-level text-based key-value variables that:
- the entire computer has access to
- live outside of your code
You can set these via the terminal, but there's this handy little package on NPM that lets you set them in a file, the idea here is that you don't commit this file, and instead every computer that runs the code (every environment) has its own private and personal copy of these variables.
Let's try this! Install dotenv.
And now let's update our code.
require('dotenv').config() /*put this up top*/
...
const client = new Twitter({
  consumer_key: process.env.consumer_key,
  consumer_secret: process.env.consumer_secret,
  access_token_key: process.env.access_token_key,
  access_token_secret: process.env.access_token_secret
});
and put our secrets in a .env file
consumer_key=314gvas...12kjbh31n2
consumer_secret=bd129u...21hjbv3
access_token_key=89xzcyh...ads
access_token_secret=98217...gyve98
Give tweeting (node index.js) a go just to make sure everything still works!
if it doesn't (shit happens, it's okay) try console.log(process.env) to check if your variables are in there.
Okay, now back to git
GitHub has an amazing desktop app that lets you get away with not using the command line and makes the dropbox comparison very fair. use it and create a repository.
You may be asked about creating a .gitignore. This file lists directories and files you don't wanna commit to source control. it's where you can put stuff like node_modules or .env. Files here will be effectively invisible to git.
If you are asked to create one choose node, if you aren't, let's make one. in both cases, let's make sure to add our .env to it:
node_modules
.env
And now you wanna commit and push your code. There's this concept of branches that we are not gonna get into. master is considered the main branch (v problematic, sorry) and you can branch out if you wanna do some work that is gonna take a while and it's not ready to just go into the prime time. you can then merge your branch back to master. In any case, push to master for now.
You wanna end up with something like this, if you see a package.json at the top level you got this!
Coffee break
Not for you lol for me, i've been hiding in an office corner typing this for the last hour, gonna go replenish. I'm not actually having coffee, i have this whole thing about not drinking calories, not the point.
Okay So at this point we got our code at a point where it's deployable. This means that we can automate the steps required to get it to download and run in a fresh computer, which is what we are gonna be up to next.
Heroku time!
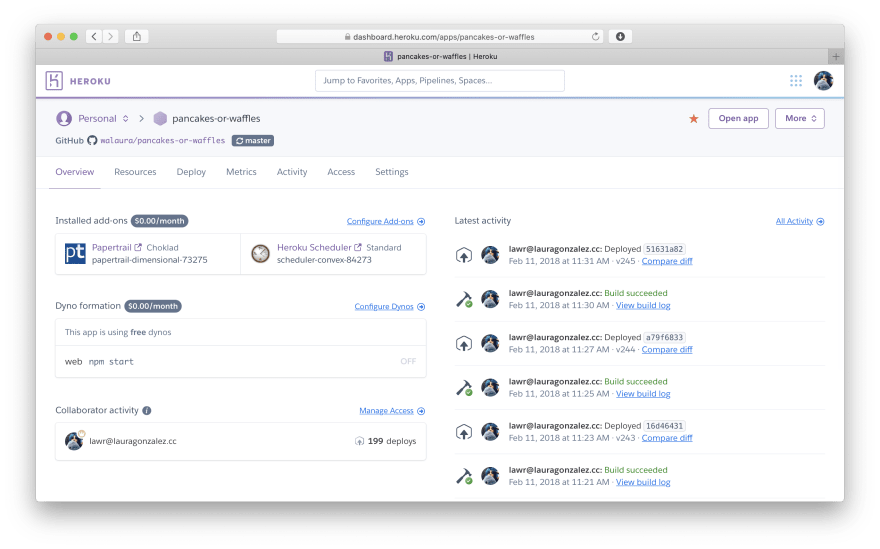
let's get into the Heroku dashboard and just like with the twitter API, we gotta create an app here. After doing that you'll notice there's a bunch of stuff (by the way, if you are skimming through, you can sync Heroku with dropbox instead of github! You can do that instead of everything in the previous steps)
The steps here are straightforward too, get our app into Heroku, put the environment variables in, give it a try, then finally set a timer to tweet for us and forget about it.
(We can also put the environment variables first but where's the fun in THAT)
At the time of writing the top navigation bar should have a literal 'deployments' button, and going there will get you to a page where you can sync with a GitHub repo. Connect yours and you are done. Just one more thing! there's a checkbox that lets you redeploy every time you push changes, you probably wanna tick this too. It's good practice to have your master branch in your repo in sync with the deployed code.
Now heroku is downloading our code and trying to install it in the background. Exciting! You can check the progress in the "Activity" tab.
While that's going let's throw in some variables! Again at the time of writing you can find 'em on settings, and you'll see that they follow the same key=value structure that we have in our .env file. Add all of them and save.
Buildpacks lol
If you have been keeping an eye on your deploy you'll have notice it has failed. That's because we are using node, and Heroku just gives us a barebones OS. To fix it you can add 'buildpacks' they call them in the Settings page. This is just a collection of preinstalled software. Add the one for nodejs and try deploying again. This one should work!!!
to quickly test if everything is in order you can open a console from the 'more' menu. This lets you run terminal commands on the remote computer, so you can do node index.js just like you did in yours. Except this time it's all in the cloud. Did you get a tweet out? Please tell me you got a tweet out.
If all is good this is pretty cool because this is how you deploy anything not just twitter bots. You could make a website on Netlify or dip your toes in CI with Travis if you wanted.
A fancy egg timer
Now, we sure have wasted a lot of time but we haven't fixed the problem we were trying to fix where we want the thing to run on its own lol. Heroku has this concept of addons and what you can do is install the scheduler, which runs console commands at set times.
After adding it to your app all that's left to do is configuring it to post node tweet.js as much as you wanna. if you have trust issues (like me) you can also install papertrail. This will let you see the logs for what your scheduler is doing and in the case your bot isn't posting, help you figure out why!

Woo!!
In the next part we are gonna make the bot actually funny. or not, but we are gonna go over some of the tools I use myself to make the actual bots. We'll be going through stuff like randomising posts as well as doing PICTURES.

Top comments (1)
Thanks for the article! Can you do a similar one for a facebook groups bot? 🤔