Introduction
Teams that work with Machine Learning (ML) workloads in production know that added complexity can bring projects for a grinding halt. While deploying simple ML workloads might seem like an easy task, the process becomes a lot more involved when you begin to scale and distribute these loads and implement tools like Kubernetes. Although Kubernetes allows teams to rapidly scale their organization's infrastructure, it also adds a layer of complexity that can become a major burden without the right tools.
Today I'm going to introduce you to an OSS project known as Kubeflow that seeks to assist engineering teams with deploying ML workloads into production in Kubernetes. The Kubeflow project is dedicated to making deployments of machine learning (ML) workflows on Kubernetes simple, portable and scalable.
What is Kubeflow?
Kubeflow is the machine learning toolkit for Kubernetes. Learn about Kubeflow use cases here.
To use Kubeflow, the basic workflow is:
- Download and run the Kubeflow deployment binary.
- Customize the resulting configuration files.
- Run the specified script to deploy your containers to your specific environment.
You can adapt the configuration to choose the platforms and services that you want to use for each stage of the ML workflow: data preparation, model training, prediction serving, and service management.
You can choose to deploy your Kubernetes workloads locally, on-premises, or to a cloud environment.
Deploying Kubeflow to Linode Kubernetes Service
This guide describes how to use the kfctl CLI to deploy Kubeflow on Linode Kubernetes Service.
Prerequisites
- Install kubectl
- Create LKS cluster
- Modify
.kubeconfig file to point to LKS cluster
We are going to use the Kubeflow Operator to help deploy, monitor and manage the lifecycle of Kubeflow. It is built using the Operator Framework which offers an open source toolkit to build, test, package operators and manage the lifecycle of operators.
The Kubeflow Operator is currently in incubation phase and is based on this design doc. It is built on top of kfdef CR, and uses kfctlas the nucleus for Controller.
Deployment Instructions
- Clone this repository and deploy the CRD and controller
# git clone https://github.com/kubeflow/kfctl.git && cd kfctl
OPERATOR_NAMESPACE=operators
kubectl create ns ${OPERATOR_NAMESPACE}
kubectl create -f deploy/crds/kfdef.apps.kubeflow.org_kfdefs_crd.yaml
kubectl create -f deploy/service_account.yaml -n ${OPERATOR_NAMESPACE}
kubectl create clusterrolebinding kubeflow-operator --clusterrole cluster-admin --serviceaccount=${OPERATOR_NAMESPACE}:kubeflow-operator
kubectl create -f deploy/operator.yaml -n ${OPERATOR_NAMESPACE}
- Deploy kfdef. You can optionally apply
ResourceQuotaif your Kubernetes version is 1.15+, which will allow only one kfdef instance or one deployment of Kubeflow on this cluster, which follows the singleton model.ResourceQuotais used to provide constraints that only one instance of kfdef is allowed within the Kubeflow namespace.
KUBEFLOW_NAMESPACE=kubeflow
kubectl create ns ${KUBEFLOW_NAMESPACE}
# kubectl create -f deploy/crds/kfdef_quota.yaml -n ${KUBEFLOW_NAMESPACE} # only deploy this if the k8s cluster is 1.15+ and has resource quota support
kubectl create -f <kfdef> -n ${KUBEFLOW_NAMESPACE}
The above can point to a remote URL or to a local kfdef file. For e.g., command will be:
kubectl create -f https://raw.githubusercontent.com/kubeflow/manifests/master/kfdef/kfctl_ibm.yaml -n ${KUBEFLOW_NAMESPACE}
Since we are using Linode, you will obviously replace IBM Cloud with Linode!
Testing Watcher and Reconciler
One of the major benefits of using kfctl as an Operator is to leverage the functionalities around being able to watch and reconcile your Kubeflow deployments. The Operator is watching all the resources with the kfctl label. If one of the resources is deleted, the reconciler will be triggered and re-apply the kfdef to the Kubernetes Cluster.
- Check the
tf-job-operatordeployment is running.
kubectl get deploy -n ${KUBEFLOW_NAMESPACE} tf-job-operator
# NAME                                          READY   UP-TO-DATE   AVAILABLE   AGE
# tf-job-operator                               1/1     1            1           7m15s
2.Delete the tf-job-operator deployment
kubectl delete deploy -n ${KUBEFLOW_NAMESPACE} tf-job-operator
# deployment.extensions "tf-job-operator" deleted
3.Wait for 10 to 15 seconds, then check the tf-job-operator deployment again. You will be able to see that the deployment is being recreated by the Operator's reconciliation logic.
kubectl get deploy -n ${KUBEFLOW_NAMESPACE} tf-job-operator
# NAME                                          READY   UP-TO-DATE   AVAILABLE   AGE
# tf-job-operator                               0/1     0            0           10s
Delete KubeFlow
Delete KubeFlow deployment
kubectl delete kfdef -n ${KUBEFLOW_NAMESPACE} --all
Delete KubeFlow Operator
kubectl delete -f deploy/operator.yaml -n ${OPERATOR_NAMESPACE}
kubectl delete clusterrolebinding kubeflow-operator
kubectl delete -f deploy/service_account.yaml -n ${OPERATOR_NAMESPACE}
kubectl delete -f deploy/crds/kfdef.apps.kubeflow.org_kfdefs_crd.yaml
kubectl delete ns ${OPERATOR_NAMESPACE}
Deploying a basic Kubeflow Pipeline
Now that you have Kubeflow running, let's port-forward to the Istio Gateway so that we can access the central UI.
Access the UI
Use the following command to set up port forwarding to the Istio gateway.
export NAMESPACE=istio-system
kubectl port-forward -n istio-system svc/istio-ingressgateway 8080:80
Access the central navigation dashboard at:
http://localhost:8080/
Depending on how you’ve configured Kubeflow, not all UIs work behind port-forwarding to the reverse proxy. For some web applications, you need to configure the base URL on which the app is serving.
Open the Pipelines UI
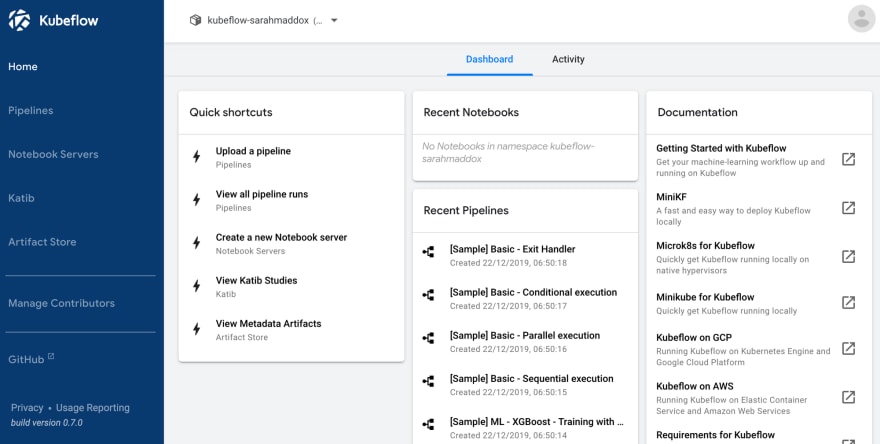
When Kubeflow is running, access the Kubeflow UI at http://localhost:8080. The Kubeflow UI looks like this:
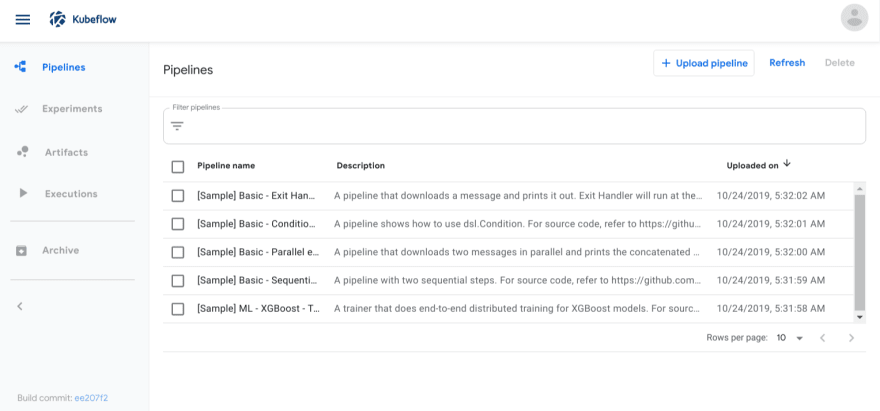
Click Pipelines to access the pipelines UI. The pipelines UI looks like this:
Run a Basic Pipeline
The pipelines UI offers a few samples that you can use to try out pipelines quickly. The steps below show you how to run a basic sample that includes some Python operations, but doesn’t include a machine learning (ML) workload:
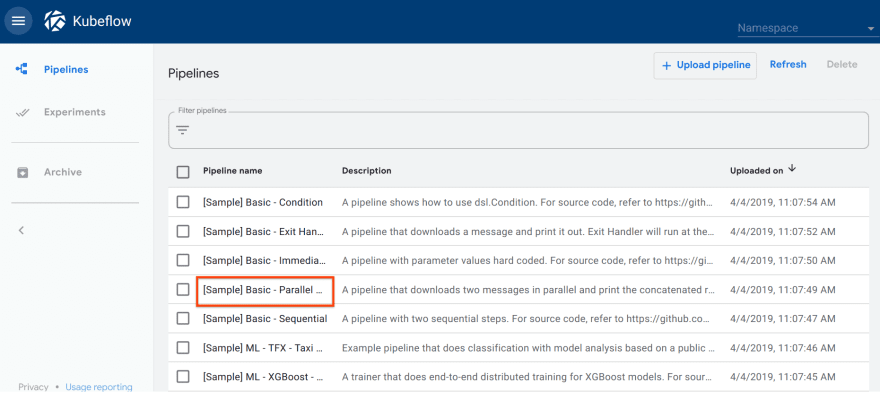
1.Click the name of the sample, [Sample] Basic - Parallel Execution, on the pipelines UI:
2.Click Create an experiment:
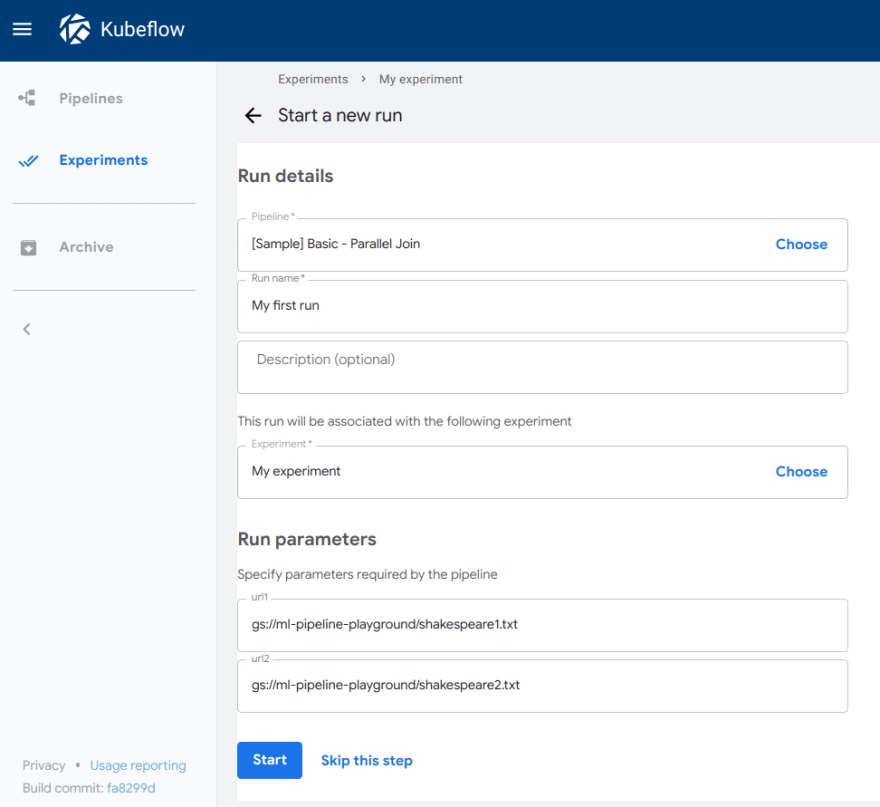
3.Follow the prompts to create an experiment and then create a run. The sample supplies default values for all the parameters you need. The following screenshot assumes you’ve already created an experiment named My experiment and are now creating a run named My first run:
4.Click Start to create the run.
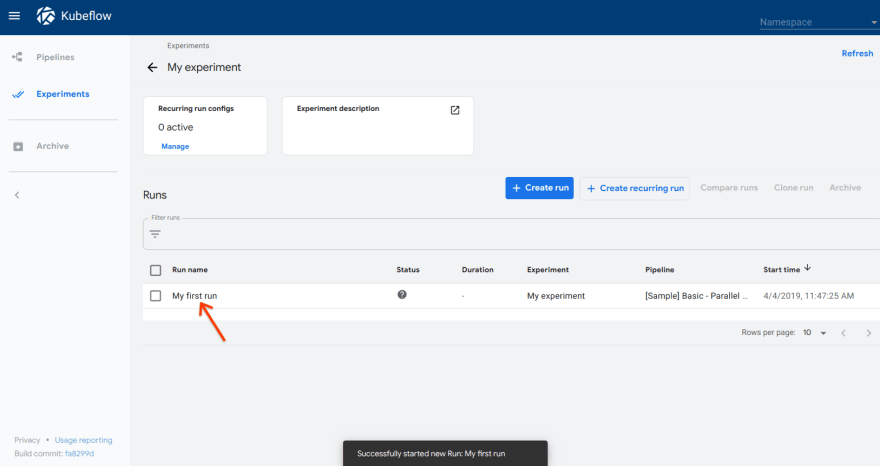
5.Click the name of the run on the Experiments dashboard:
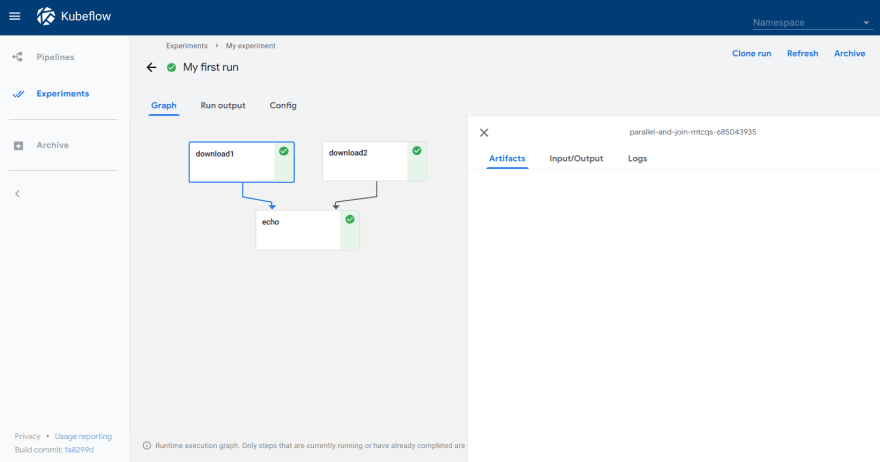
6.Explore the graph and other aspects of your run by clicking on the components of the graph and other UI elements:
Finishing up
And that's about it! Now you should be ready to start taking the complexity out of running your ML workloads in your own Kubernetes clusters with Kubeflow.




Top comments (0)