
Back in the day, when I was more actively playing the electric guitar, there was an interesting topic on my favorite guitar forum. Guitarists often add some attachment to the guitar but not to the amp or effects. And you need all of that to make your sound on electric guitar. One guy suggested that it's because we touch the instrument with our hands all the time, its physical connection creating a mental bond. I agree. I've bought and sold amps, effects, cables, and accessories, but my guitars are here to stay. I gave them names.
Do we, software engineers also develop a connection to things we use at work? Personally, not really. As long as it works and gets the job done, we don't touch our code with our hands. We do touch keyboards.
They are the most diversified and opinionated accessories we use. Chassis shapes, switches, keycaps, low—or high-profile... But can they be even more personalized?
Paraphrasing the first Polish encyclopedia, everyone knows how the keyboard looks. If you read this, you probably write fluently on a QWERTY row staggered keyboard without looking. We all grow up with those, writing school essays, typing The Sims cheat codes, and making angry comments online.
But then I saw this:
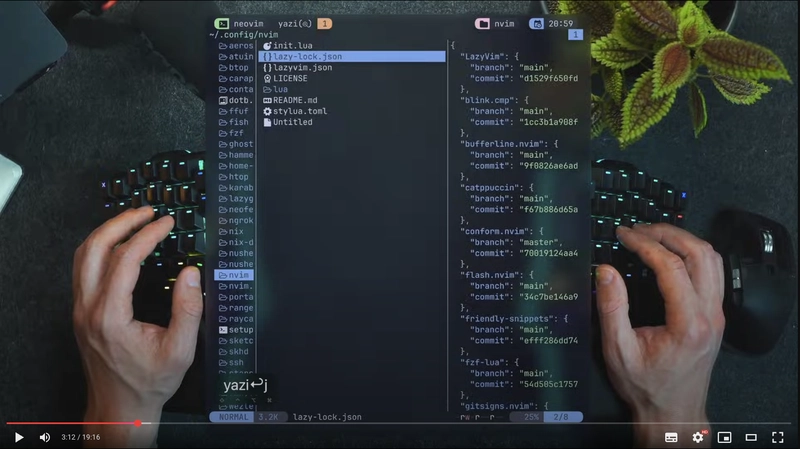
in the YT video
And I had 2 thoughts: incredible shoot with the terminal in the middle… the middle of what??? What is this typing device? Because it's not a regular keyboard?
It appears to be Dygma Defy. Interesting; I've never heard of those before. But 369$ for the base model is successfully discouraging me. Maybe there are cheaper options? Not really... and there are works of art like Naya that can go around 1000$, absolute units like Kinesis or more common ErgoDox EZ, which is still over 300$. There is none aftermarket where I live for those, so I can't even try them out. And I don't want to spend that much on something I might not like.
I have to admit, I like the idea of a different key layout; using column stagger rather than row stagger seems more natural.

It is also healthier for the hand. The idea is to make fingers move up and down, not diagonally. Staggered columns reflect differences in finger length. Ideally, there would be a single row above and below the home row, so fingers do not have to stretch and hands move.
But it means having fewer keys overall—no function keys, number keys, or arrows. How can it work for a programmer with wrist-bending IDE shortcuts?
Down the rabbit hole
I already own a slightly modded Keychron K2 (tape mod, sound damping, lubed switches, new keycaps) and a K11 low profile with Alice layout. I don't need a new keyboard with 2 nice ones and working, and I don't want to spend so much on that.
Wait. I'm an engineer. I have a 3D printer and a soldering iron. How hard can it be?
Macropad prototype
It's doable with what I know and have at home, or can easily get online. That is all I needed to start researching some Open Source projects. And boy, I've found so much more. A whole community of keyboard builders that, for free, share their 3d designs, board projects, software, firmware, tips, and tricks. There is a website that gathers intel about all that.
The catalog of keyboard switch sounds, popularity, and the whole DB of switches data. Do you want a lubed tactile cherry switch? There is a search with filters. You can then pick what fits your desired pressure force.
Designs range from pretty standard keyboards, through ortho-linear and split, to ergonomically shaped, or some monsters with the trackballs on the side or in the middle. Why not? There is no limit as long as it works for you. Check yourself!
Here are some of the most known designs:
I did some reading and gathered what I wanted to make and what I was comfortable doing. The number of options and places to fail makes it a bit more complex than a lego set, or even predefined keyboard kit. Let's do iterations rather than jump into deep water to sink. The MVP is a macropad, a small keyboard with a few keys, to get a feel for the switches, keycaps, and the whole process.
I found this hand-wired macropad, which seems just about what I need.
It requires just one cheap Arduino board, 15 switches, and an encoder. Chassis is a simple 3d print, so I don't have to get PhD before starting.
3d printing Learnings
Starting from 3d printing. I'm not experienced yet; I press print, and the printer goes brrr brrr brrr. And I faced some issues:
- my print was sticking to the board; I couldn't take it off
- prints often had a few layers broken, like the filament clogged the extruder
- embedding the screw threads into the print is not easy with a soldering iron without temperature control
- cheapest Aliexpress screws are shit
- model dimensions are not the same after printing; some post-processing is required to fit screws into their spots
The problem with clogging had a surprising solution. I use the Creality K1C, a fully enclosed 3D printer. The top cover should be opened when printing PLA, the most common filament. Otherwise, the inside temperature is too high, and the filament can melt too early in the extruder, expanding and clogging it. No, I didn't read the instructions. I said I'm an engineer.
I let the print cool down to solve the problem of sticking to the printer bed. I was too eager to use the model and tried to detach it immediately. Now, I just put it next to the window, where it's colder, and let it cool down for a few minutes. It works like a charm.
I got some post-processing tools, such as sanding paper, a special rotating knife, a hand driller, etc., like for a plastic plane or ship models. They make everything much more manageable.
And better, lighter soldering iron with temperature control. With some extra endings for precision soldering.
OK, now what?
I have the chassis printed and screwed down. Well, because I didn't put threads at a 90-degree angle, it doesn't fit perfectly, but it's good enough.
I got some pre-lubed linear switches from Aliexpress. I didn't want to get anything expensive because there is a huge chance I will screw it up. I put them in their places, printed encoder holder, and cap; all good for now.
And understand the pin assignment and electrical schema. The first surprise is that individual keys are not connected to separate pins on the board. It's a matrix of rows and columns. That way, a single board can handle many more keys. Genius. When key is pressed the board gets 2 signals, on row and column and can use it to map it to the key. Because of that, each key has to have a diode soldered in, otherwise the unintended electrical paths could be made when pressing multiple keys.
Switches have 2 pins, and the encoder has 5. The encoder has more functions: button press (handled by 2 pins) and left/right twist (managed by the other 3 pins). I had to check the technical diagram to figure out what goes where. University PTSD is kicking in.
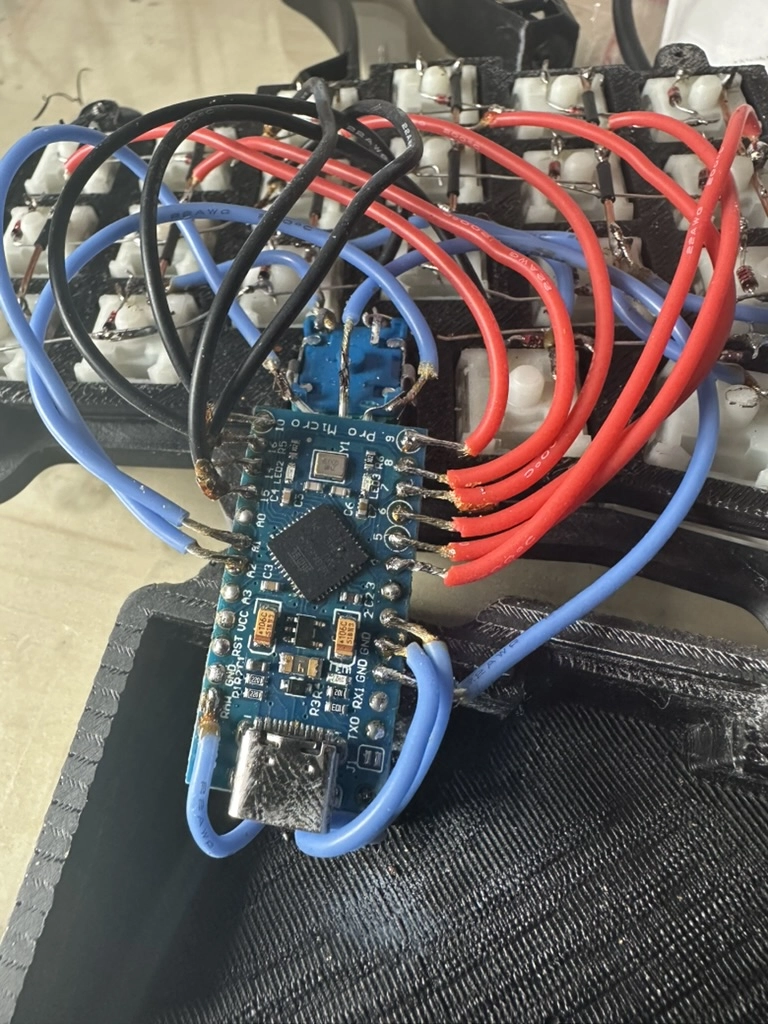
I've watched a few YouTube videos on hand-wiring keyboards (like this one and have somewhat of an idea how it should look like. I'll use diode wires to connect the rows. I've got copper wire, some heat-shrink bands for columns, and some silicon wire (awesome stuff) to connect it all to the board.
I had issues flashing my ProMicro board or putting it into a flash boot state. Eventually, it worked, but not like the official instructions promised. Shorting the RST and GND pins didn't work, but brute force pushing firmware exactly 1s after connecting the USB-C cable to the board did.
The project README wanted me to wire one column to pin E6 and another to pin C6 on the board, but my board has only one pin with number 6.
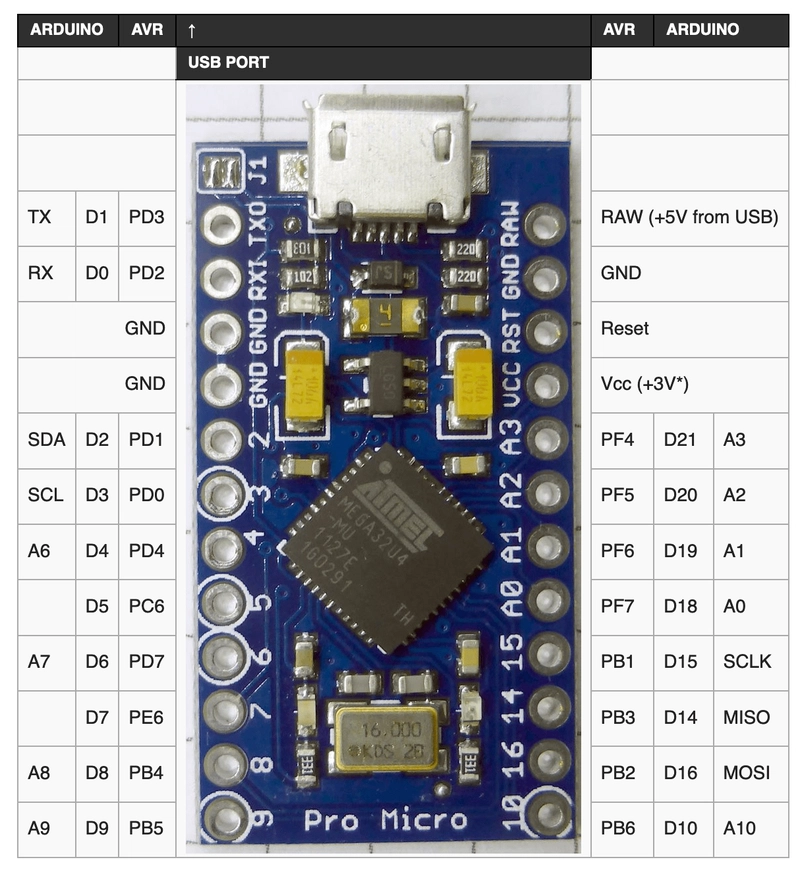
Official Arduino inputs are different from clones. In the diagram above, it can be described as one of three names. Why make stuff easy, right? It took me about an hour to learn it.
I've put everything together, and it worked!!! I pressed the button, and a digit was sent to my computer. My brother laughed a bit at my soldering skills, but it works, and that's all that matters.
The split
I can make something of a keyboard work. I can print the case, solder it, and flash the board. The next logical step is to create a regular split keyboard.
The number of options is scary. Switch type, case shape, number of keys, wired or wireless, PCB or hand-wired, hot-swap or fixed... So, I decided to not make any decisions and simply build
macropad author designed one.
It was more-less the same, with key matrix and encoders, with additional TRRS (Tip-Ring-Ring-Sleeve) sockets and cable to connect 2 boards.
I couldn't really understand how 2 microcontrollers communicate with each other, send power, and use the same exact software. At the same time, one is the main board connected to a computer, and the other only captures the key presses. And I didn't have to. QMK works like magic here. TRRS wire uses standard jack-jack cable like headphones with a microphone to send 5V, ground, and serial data, leaving 1 wire unused. Both boards use the same pins for that, so plugging the left MAIN board was powering the right one, and the key presses were flowing.
It took me a while to figure out which pin of TRRS goes where. The GitHub repo for the project expects the reader to have some idea of what they are doing.
Checking diagrams again:
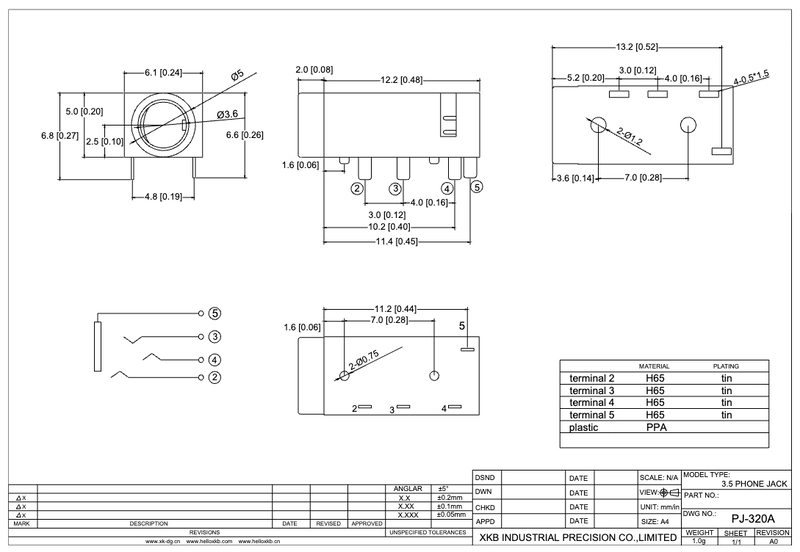
- Pin 5 (GND) → GND on Pro Micro
- Pin 4 (Tip) → D1 (Serial) on Pro Micro
- Pin 3 (Ring 1) → Not used
- Pin 2 (Ring 2) → VCC/RAW on Pro Micro
Trust me, I'm an engineer. I can do this. I do not know where is pin 1 and why pin 3 is used for ring 1 but at this point I'm too afraid to ask. I chose to believe there is logic there.
I didn't have issues printing and putting the case together this time, thanks to my previous experience with the macropad project. Soldering went better; everything fit inside.
But I used SuperGlue to make TRRS sockets stay in place, which made one of them not work, and I couldn't get it out of the case... so I had to print a new one. No more SuperGlue. Ever.
I also had a problem finding a short enough TRRS cable with both jack connectors having 4 sections and not importing it from Australia. So I bought 3 cheap ones when I saw some, just in case.
Putting everything together took a few evenings. I mostly spent time figuring out missing pieces and soldering 44 individual switches and 2 encoders.
And again, it worked. This whole text was clumsily written on my very own keyboard.
I started spending time with https://www.keybr.com/ to practice writing in the new alien key setup. It's painful—imagine learning to write with your non-dominant hand—but it's also enjoyable. It feels weird and uncomfortable, but there is progress every day, and that's a pleasant feeling. My fingers are actually barely moving, my hands are spread and angled as I feel comfortable. And I can put a coffee mug in the middle. Can your magic keyboard do that?
Layers
I've mentioned soldering 44 keys, while standard keyboard has 104. My old Keychrons are 75% and 60% keyboards, but now I have just 40%. And layers. 4 layers containing all I need and still some empty space. You may not be familiar what layers are in keyboard but you are using them anyway, with a shift key you switch to the upper layer with capital letters and symbols instead of numbers, etc. I just happen to have more layers like that :)
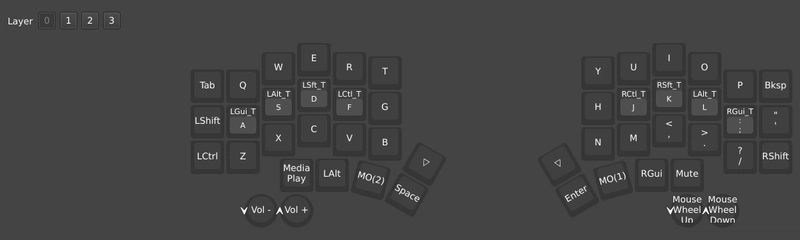
I use 2 extra thumb keys to switch between layers. I have a layer with numbers, symbols, and function keys, a layer with mouse movement, and a layer with macros. I can switch between them with a single key press.
The whole idea of the thumb cluster was very interesting for me. In standard keyboard thumb is used just for spacebar, which is waste of its potential. After all, evolving an opposable thumb allowed us to make tools and climb on top of the food chain. I can use it for 4 keys, and it's much more comfortable than stretching fingers to the top row.
I added there also home row mods which means if I longpress a I get cmd, and longpress on d gives me shift, etc. This setup is mirrored on both sides, so I don't have to move my hands to use modifier keys.
Compiling firmware
The QMK fork for the Void keyboard linked in the repo works fine. There is a Vial browser editor or standalone app to change keybindings, and it's powerful. From normal keys, to mouse movement and macros. However, I wanted to add some additional options that were turned off by default for some reason. How hard can it be to compile some keyboard firmware, right?
Well...
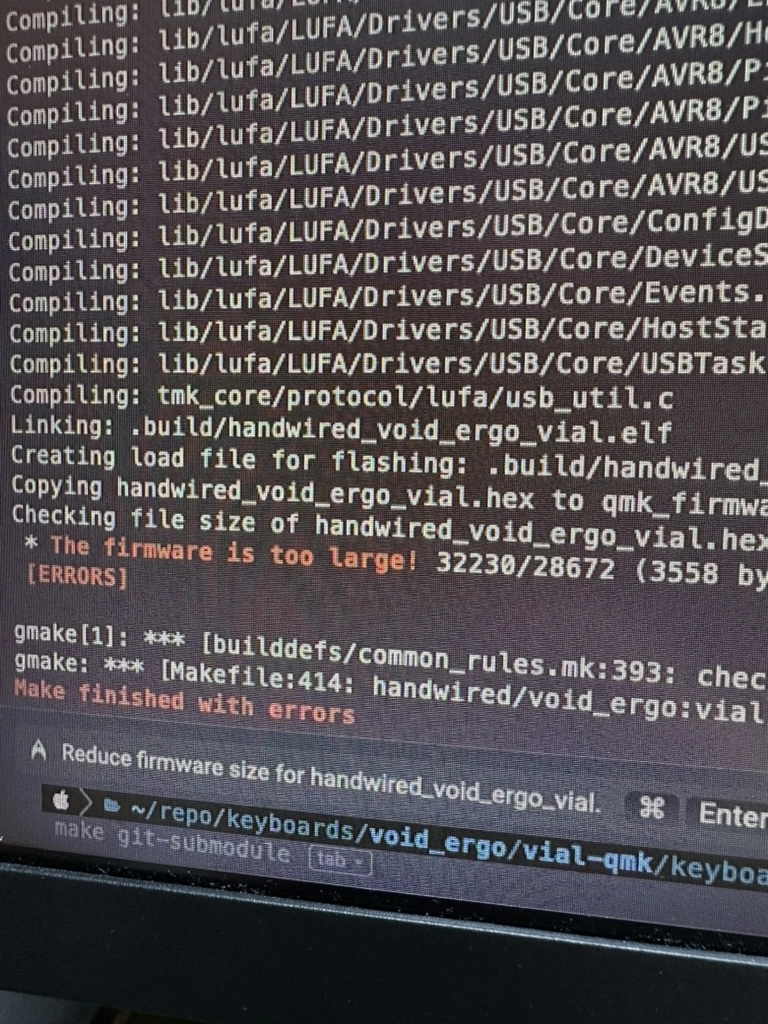
The board I used, a cheap basic ProMicro 32U4, has VERY limited memory, so the original QMK firmware barely fits there. No more space for fireworks like tap dance. It reminded me of the conversation I had with a colleague at the smart home system company, where he worked as embedded software engineer. He was jealous of us mobile engineers discussing best practises, code readability etc. while they had to write hacks on hacks to make compiled code fit on the energy efficient chips. Now I get your struggle a bit better man.
But I was able to add home row mods and change some timeouts to make them feel better. After fighting with config files written in C, installing QMK with homebrew, learning that it's broken, fixing some dependencies manually because I use Apple Silicone, and talking with Claude to guide me through compilation, I made it.
I had my own firmware.
The wrong, pure QMK one, without Vial GUI. Vial QMK is a separate repo with a different configuration and setup.

I fixed that eventually, works as expected.
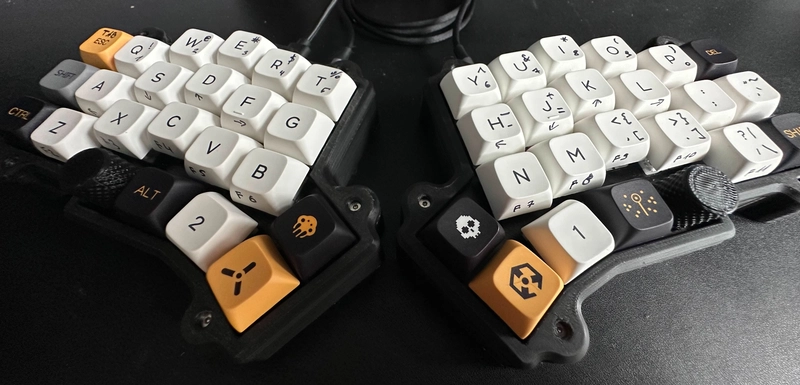
I got new keycaps. I wanted an XDA profile, primarily white. I had to put symbols with a Sharpie from other layers on them. The XDA profile means all keys are the same shape, no matter the row, which is useful for this build, since I may not put letters but symbols representing values from other layers.

This is just another variable to think about when building a keyboard.
Was it worth it?
Given how much time, materials, and profanity language I used while working on the keyboard, I'd be better off buying a basic assembled Corne keyboard.
But I had a lot of fun, learned a ton, and discovered a whole new world of my most commonly used computer peripheral.
And I want to play more with it. I want to make a concave shape keyboard like Dactyl, use hot swappable sockets, make a low profile wireless keyboard running on ZMK firmware, check tinting options for individual keys, or even 3d print a set of custom keycaps. I want to use Choc switches and PCB instead of hand-wiring and learn to design my own board from scratch.
The community around custom keyboards will be a fantastic inspiration for all that.
As I type this, a few packages from Aliexpress are heading to me and are full of parts I need for future keyboard projects. And they are wife-approved :)

Top comments (0)