Follow me on Twitter @dglover
| Author | Dave Glover, Microsoft Cloud Developer Advocate |
|---|---|
| Target Platform | Seeed Studio Azure Sphere MT3620 |
| Developer Platform | Windows 10 or Ubuntu 18.04 |
| Azure SDK | Azure Sphere SDK 19.11 or better |
| Developer Tools | Visual Studio (The free Community Edition or better) or Visual Studio Code (Free OSS) |
| Hardware | Seeed Studio Grove Shield, and the Grove Temperature and Humidity Sensor (SHT31) |
| Language | C |
| Date | As of December, 2019 |
What is Azure Sphere
Azure Sphere is a secured, high-level application platform with built-in communication and security features for internet-connected devices.
It comprises a secured, connected, crossover microcontroller unit (MCU), a custom high-level Linux-based operating system (OS), and a cloud-based security service that provides continuous, renewable security.
Hardware Required
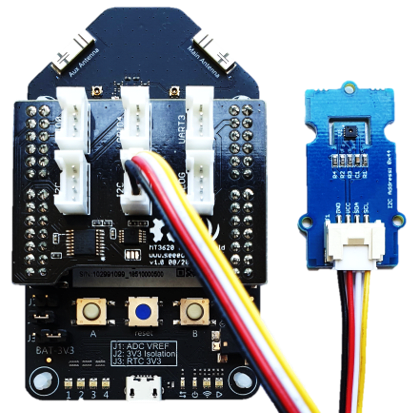
This tutorial requires the Seeed Studio Azure Sphere, the Seeed Studio Grove Shield, and the Grove Temperature and Humidity Sensor (SHT31). These parts are available from many online stores including Seeed Studio.
Be sure to plug the Grove Temperature Sensor into one of the I2C connectors on the Grove Shield.
Set up your Development Environment
This tutorial assumes Windows 10 and Visual Studio (The free Community Edition or better). For now, Azure Sphere templates are only available for Visual Studio. However, you can clone and open this solution on Windows and Ubuntu 18.04 with Visual Studio Code.
Follow the Azure Sphere Overview of set up procedures guide.
Azure Sphere SDK
This tutorial assumes you are using the Azure Sphere SDK 19.11 or better which uses the CMake Build System.
This tutorial uses a fork of the Seeed Studio Grove Shield Library that has been updated to support Azure Sphere SDK 19.11.
Clone the MT3620 Grove Shield Library
- Create a folder where you plan to build your Azure Sphere applications.
-
Clone the MT3620 Grove Shield Library.
Open a command window and change to the directory where you plan to build your Azure Sphere applications.
git clone https://github.com/gloveboxes/MT3620_Grove_Shield.git
Create a new Visual Studio Azure Sphere Project
Start Visual Studio and create a new project in the same directory you cloned the MT3620 Grove Shield Library.
It is important to create the Visual Studio Project in the same folder you cloned the MT3620 Grove Shield as there are relative links to this library in the application you will create.
azure-sphere
    |- MT3620_Grove_Shield
    |- YourAzureSphereApplication

Select Azure Sphere Project Template
Type sphere in the search box and select the Azure Sphere Blink template.

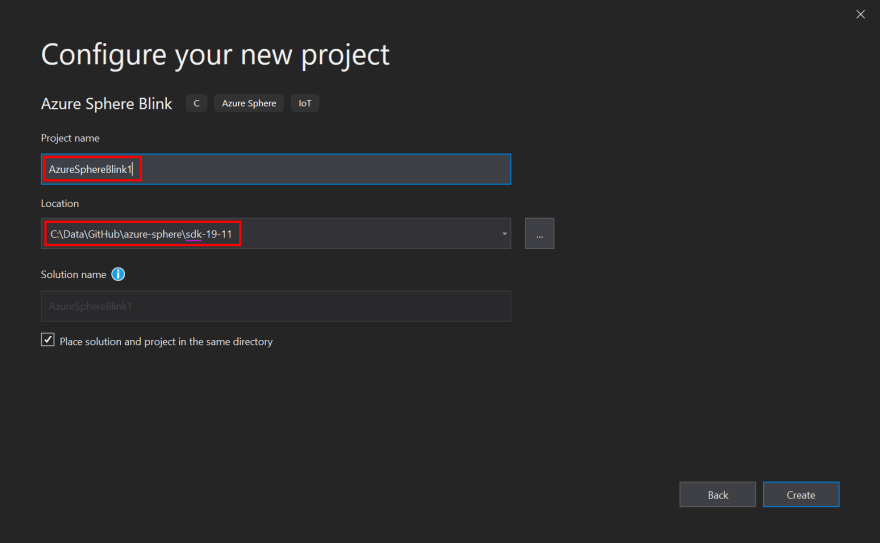
Configure new Azure Sphere Project
Name the project and set the save location.
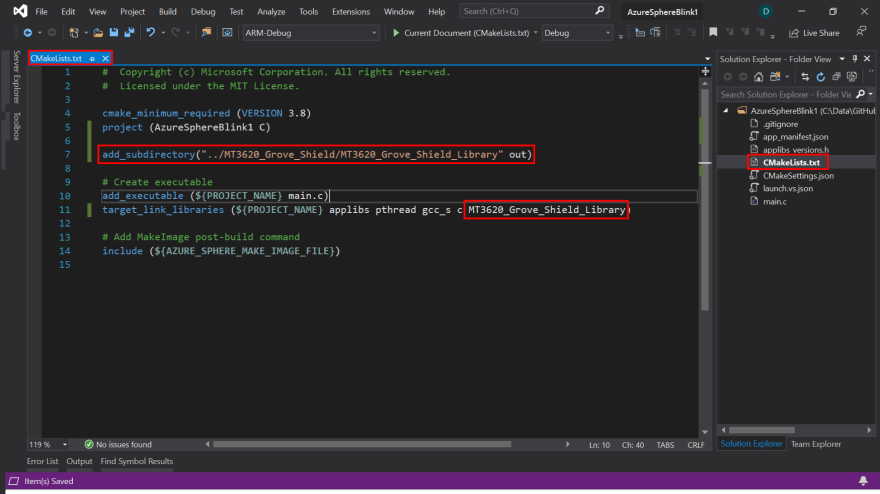
Open the CMakeLists.txt file
CMakelists.txt defines the build process, the files and locations of libraries and more.

Add a Reference to MT3620_Grove_Shield_Library
Two items need to be added:
- The source location on the MT3620 Grove Shield library. Note, this is the relative path to the Grove Shield library.
- Add MT3620_Grove_Shield_Library to the target_link_libraries definition. This is equivalent to adding a reference.
Set the Application Capabilities
The application manifest defines what resources will be available to the application. Define the minimum set of privileges required by the application. This is core to Azure Sphere security and is also known as the Principle of least privilege.
- Review the Grove Shield Sensor Capabilities Quick Reference to understand what capabilities are required for each sensor in the library.
- Open app_manifest.json
- Add Uart ISU0
- Note, access to the I2C SHT31 temperature/humidity sensor via the Grove Shield was built before Azure Sphere supported I2C. Hence calls to the sensor are proxied via the Uart.
- Note, GPIO 9 is used to control an onboard LED.
{
  "SchemaVersion": 1,
  "Name": "AzureSphereBlink1",
  "ComponentId": "a3ca0929-5f46-42b0-91ba-d5de1222da86",
  "EntryPoint": "/bin/app",
  "CmdArgs": [],
  "Capabilities": {
    "Gpio": [ 9 ],
    "Uart": [ "ISU0" ],
    "AllowedApplicationConnections": []
  },
  "ApplicationType": "Default"
}
Update the Code
The following code includes the Grove Sensor headers, opens the Grove Sensor, and the loops reading the temperature and humidity and writes this information to the debugger logger.
Replace all the existing code in the main.c file with the following:
#include <signal.h>
#include <stdbool.h>
#include <stdlib.h>
#include <string.h>
#include <time.h>
#include <errno.h>

#include <applibs/log.h>
#include <applibs/gpio.h>

// Grove Temperature and Humidity Sensor
#include "../MT3620_Grove_Shield/MT3620_Grove_Shield_Library/Grove.h"
#include "../MT3620_Grove_Shield/MT3620_Grove_Shield_Library/Sensors/GroveTempHumiSHT31.h"

static volatile sig_atomic_t terminationRequested = false;

static void TerminationHandler(int signalNumber)
{
    // Don't use Log_Debug here, as it is not guaranteed to be async signal safe
    terminationRequested = true;
}

int main(int argc, char* argv[])
{
    Log_Debug("Application starting\n");

    // Register a SIGTERM handler for termination requests
    struct sigaction action;
    memset(&action, 0, sizeof(struct sigaction));
    action.sa_handler = TerminationHandler;
    sigaction(SIGTERM, &action, NULL);

    // Change this GPIO number and the number in app_manifest.json if required by your hardware.
    int fd = GPIO_OpenAsOutput(9, GPIO_OutputMode_PushPull, GPIO_Value_High);
    if (fd < 0) {
        Log_Debug(
            "Error opening GPIO: %s (%d). Check that app_manifest.json includes the GPIO used.\n",
            strerror(errno), errno);
        return -1;
    }

    // Initialize Grove Shield and Grove Temperature and Humidity Sensor
    int i2cFd;
    GroveShield_Initialize(&i2cFd, 115200);
    void* sht31 = GroveTempHumiSHT31_Open(i2cFd);

    const struct timespec sleepTime = { 1, 0 };
    while (!terminationRequested) {

        GroveTempHumiSHT31_Read(sht31);
        float temp = GroveTempHumiSHT31_GetTemperature(sht31);
        float humi = GroveTempHumiSHT31_GetHumidity(sht31);
        Log_Debug("Temperature: %.1fC\n", temp);
        Log_Debug("Humidity: %.1f\%c\n", humi, 0x25);

        GPIO_SetValue(fd, GPIO_Value_Low);
        nanosleep(&sleepTime, NULL);

        GPIO_SetValue(fd, GPIO_Value_High);
        nanosleep(&sleepTime, NULL);
    }
}
Deploy the Application to the Azure Sphere
- Connect the Azure Sphere to your computer via USB
Ensure you have claimed, connected, and developer enabled your Azure Sphere.
Select GDB Debugger (HLCore) from the Select Startup dropdown.

From Visual Studio, press F5 to build, deploy, start, and attached the remote debugger to the Azure Sphere.
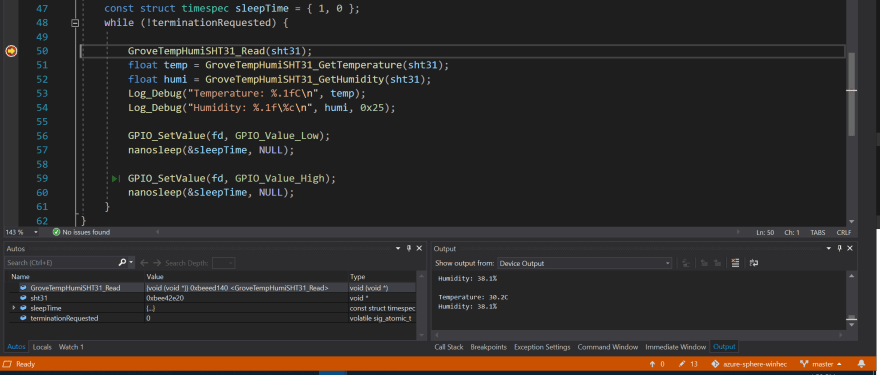
View the Debugger Output
Open the Output window to view the output from Log_Debug statements in main.c.
You can do this by using the Visual Studio Ctrl+Alt+O keyboard shortcut or click the Output tab found along the bottom/right of Visual Studio.

Set a Debug Breakpoint
Set a debugger breakpoint by clicking in the margin to the left of the line of code you want the debugger to stop at.
In the main.c file set a breakpoint in the margin of the line that reads the Grove temperature and pressure sensor GroveTempHumiSHT31_Read(sht31);.
Stop the Debugger
Stop the debugger by using the Visual Studio Shift+F5 keyboard shortcut or click the Stop Debugging icon.

Azure Sphere Application Cloud Deployment
Now you have learnt how to "Side Load" an application onto Azure Sphere it is time to learn about the Deployment Basics to Cloud Deploy an application.
Finished 完了 fertig finito ख़त्म होना terminado
Congratulations, you created a secure Internet of Things Azure Sphere application.

Appendix
Grove Shield Sensor Capabilities Quick Reference
| Sensors | Socket | Capabilities |
|---|---|---|
| Grove Light Sensor | Analog | "Gpio": [ 57, 58 ], "Uart": [ "ISU0"] |
| Grove Rotary Sensor | Analog | "Gpio": [ 57, 58 ], "Uart": [ "ISU0"] |
| Grove 4 Digit Display | GPIO0 or GPIO4 | "Gpio": [ 0, 1 ] or "Gpio": [ 4, 5 ] |
| Grove LED Button | GPIO0 or GPIO4 | "Gpio": [ 0, 1 ] or "Gpio": [ 4, 5 ] |
| Grove Oled Display 96x96 | I2C | "Uart": [ "ISU0"] |
| Grove Temperature Humidity SHT31 | I2C | "Uart": [ "ISU0"] |
| Grove UART3 | UART3 | "Uart": [ "ISU3"] |
| LED 1 | Red Green Blue |
"Gpio": [ 8 ] "Gpio": [ 9 ] "Gpio": [ 10 ] |
| LED 2 | Red Green Blue |
"Gpio": [ 15 ] "Gpio": [ 16 ] "Gpio": [ 17 ] |
| LED 3 | Red Green Blue |
"Gpio": [ 18 ] "Gpio": [ 19 ] "Gpio": [ 20 ] |
| LED 4 | Red Green Blue |
"Gpio": [ 21 ] "Gpio": [ 22 ] "Gpio": [ 23 ] |
For more pin definitions see the mt3620_rdb.h in the MT3620_Grove_Shield/MT3620_Grove_Shield_Library folder.
Azure Sphere Grove Kit
| Azure Sphere | Image |
|---|---|
| Azure Sphere MT3620 Development Kit | |
|
Azure Sphere MT3620 Development Kit Shield. Note, you can also purchase the parts separately. |
 |
Azure Sphere MT3620 Developer Board Pinmap
The full Azure Sphere MT3620 Board Pinmap can be found on the Azure Sphere MT3620 Development Kit page.


Oldest comments (0)