This tutorial walks through setting up a minimal template project for Next.js, ZEIT Now, and Firebase.
- I've included lots of screenshots, so even if you aren't interested in creating a project right now, you can get a feel for what working with these tools is like. I think this is a pretty good snapshot of the state of the art in 2020 for quick-start developer products.
- The template project is an extension of the official Next.js with-firebase-authentication-serverless example, with a bit more functionality.
- This tutorial provides some extra guidance on setting up staging & production environments in Firebase, and configuring ZEIT Now with your Firebase keys.
Recently, I started a new side project using:
- Next.js (React framework for server-rendered applications)
- ▲ ZEIT Now (Hosting)
- 🔥 Firebase (Authentication, Storage, Functions)
I like this combination of tools ✨ so I decided to put together this detailed tutorial.
You can follow along using this template project:
 benzguo
/
nextjs-now-firebase
benzguo
/
nextjs-now-firebase
Next.js + ZEIT Now + Firebase [template]
The template also includes Tailwind CSS (with ~zero styling). Here's what the sign up page looks like:

The app includes:
- Sign up, log in, log out
- Update display name
- Add object to a Firestore collection
- List objects in a Firestore collection (using firestore-pagination-hook)
- Fetch data with a simple Firebase function (server-side rendering using getInitialProps)
▲ Sign up for ZEIT
I used the email signup flow, and thought it was pretty nice ✨ You can check out screenshots of the ZEIT onboarding flow [ ⤵️ here ].
We'll set up a ZEIT Now project at the end of the tutorial – all you have to do for now is sign up.

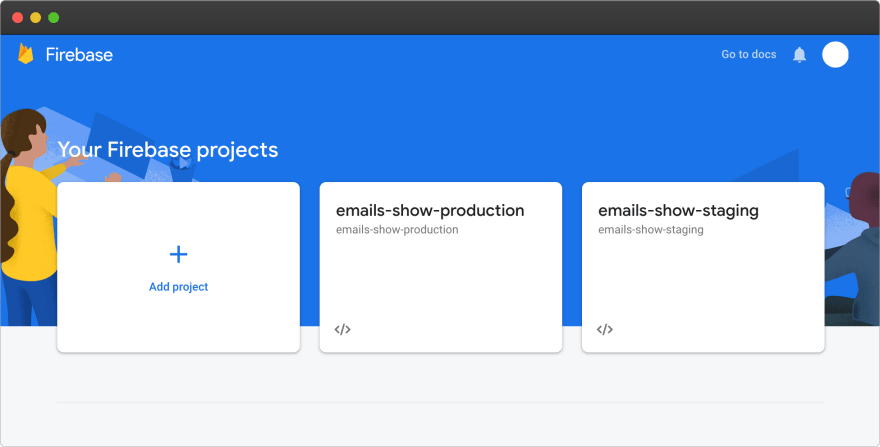
🔥 Set up Firebase projects
Sign into your Firebase account, and create two projects (one for your staging environment, and another for your production environment).
You'll have to do a bit of clicking around to fully configure a new Firebase project. Check out the full walkthrough here:

▲ Set up ZEIT Now CLI
Install the Now CLI and run now login

🔥 Set up Firebase CLI
Install the Firebase CLI and run firebase login

If you haven't done this already:
- generate a new project from the GitHub template repo
- clone it to your machine
- and navigate to the directory in your terminal.
benzguo
/
nextjs-now-firebase
Next.js + ZEIT Now + Firebase [template]
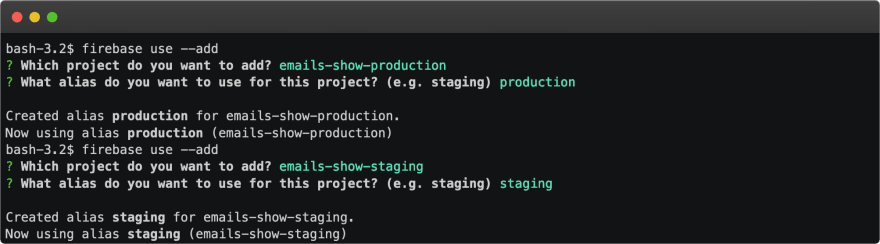
Add projects to Firebase CLI
Run firebase use --add to add the two projects you created to the Firebase CLI. Use "staging" and "production" as your project aliases.
Under the hood, this configuration is stored in your .firebaserc
▲🔥 Set up Now with Firebase keys
Staging environment
First, we'll configure our project's staging environment with keys from Firebase.
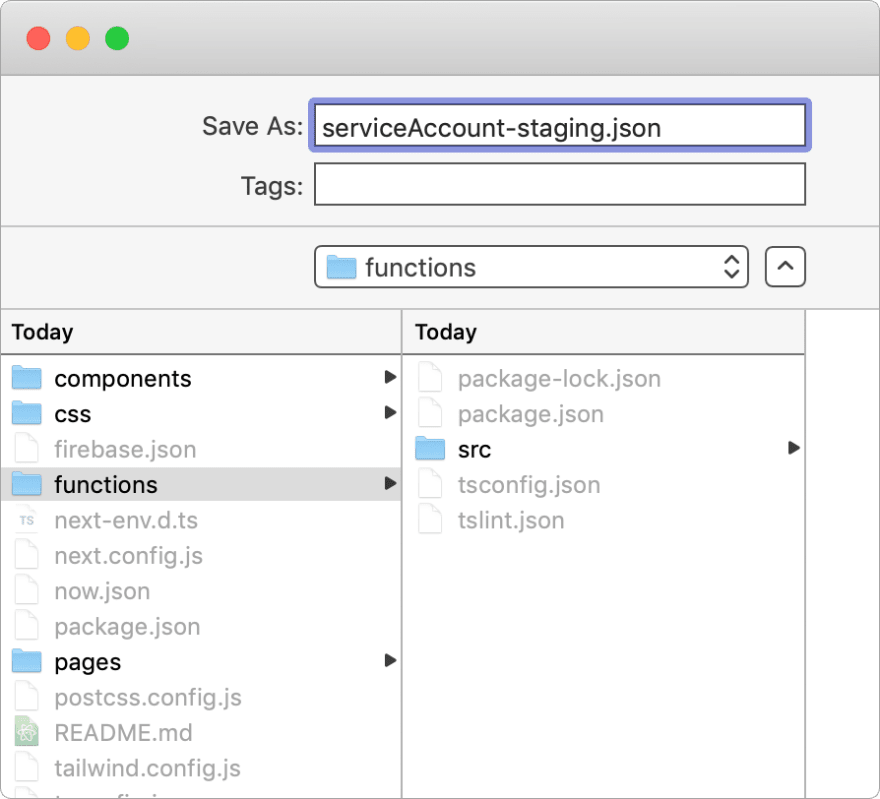
In the Firebase console, open your staging project, navigate to the "Service accounts" tab, and click "Generate new private key" to download your admin SDK keys.

Save the key file in the functions directory as serviceAccount-staging.json
📁 functions
├── serviceAccount-staging.json
⚠️ Your private key (in your service account key file) gives access to your project's Firebase services. Keep it confidential and never store it in a public repository.
Note that
serviceAccount*files are in the project's.gitignore, so they won't be checked into your repository. Make sure you follow best practices for keeping these keys safe! 🔒
Next, find your app keys (under Project settings).
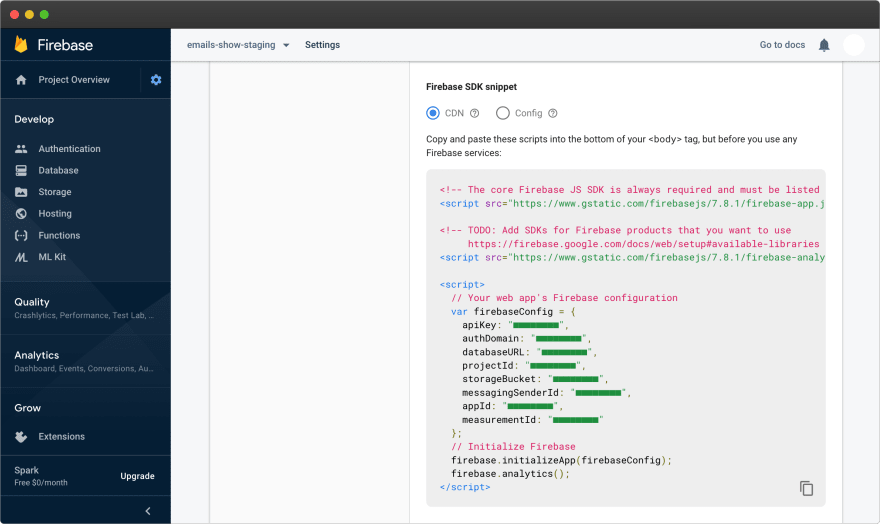
Enter these variables in the .env and .env.build files included in the template project.
Create two env files:
$ touch .env
$ touch .env.build
-
.env: runtime environment variables -
.env.build: build step environment variables
Open your editor, and add the content below to the two new .env files (filling in your Firebase keys):
.env
# .env
# == Firebase app keys (staging) ==
FIREBASE_API_KEY=■■■■■■■■-■■■■■■■■
FIREBASE_AUTH_DOMAIN=■■■■■■■■.firebaseapp.com
FIREBASE_DATABASE_URL=https://■■■■■■■■.firebaseio.com
FIREBASE_PROJECT_ID=■■■■■■■■
FIREBASE_STORAGE_BUCKET=■■■■■■■■.appspot.com
FIREBASE_MESSAGING_SENDER_ID=■■■■■■■■
FIREBASE_APP_ID=1:■■■■■■■■:web:■■■■■■■■
FIREBASE_MEASUREMENT_ID=G-■■■■■■■■
.env.build
# .env.build
# == Firebase app keys (staging) ==
FIREBASE_API_KEY=■■■■■■■■-■■■■■■■■
FIREBASE_AUTH_DOMAIN=■■■■■■■■.firebaseapp.com
FIREBASE_DATABASE_URL=https://■■■■■■■■.firebaseio.com
FIREBASE_PROJECT_ID=■■■■■■■■
FIREBASE_STORAGE_BUCKET=■■■■■■■■.appspot.com
FIREBASE_MESSAGING_SENDER_ID=■■■■■■■■
FIREBASE_APP_ID=1:■■■■■■■■:web:■■■■■■■■
FIREBASE_MEASUREMENT_ID=G-■■■■■■■■
# == Firebase admin keys (from serviceAccount-staging.json) ==
FIREBASE_CLIENT_EMAIL=firebase-adminsdk-■■■■@■■■■■■■■.iam.gserviceaccount.com
FIREBASE_PRIVATE_KEY=-----BEGIN PRIVATE KEY-----\n■■■■■■■■\n-----END PRIVATE KEY-----\n
⚠️ These keys give access to your project's Firebase services. Keep them confidential and never store them in a public repository.
Note that
.env*files are in the project's.gitignore, so they won't be checked into your repository. Make sure you follow best practices for keeping these keys safe! 🔒
Now, you're ready to try running the app locally.
$ npm install
$ npm run dev
When you open http://localhost:3000 in your browser, you should see this page:
Try creating an account! ✅
Production environment
Now, we'll configure the project's production environment with keys from Firebase.
Open your production project in the Firebase console, and follow the same steps as above:
- Download your admin keys to
/functions/serviceAccount-production.json - Find your app keys in the Firebase console's Project settings page.
Run the following commands to add your production Firebase keys to Now:
$ now secrets add firebase-api-key ■■■■■■■■-■■■■■■■■

$ now secrets add firebase-auth-domain ■■■■■■■■.firebaseapp.com

$ now secrets add firebase-database-url https://■■■■■■■■.firebaseio.com

$ now secrets add firebase-project-id ■■■■■■■■

$ now secrets add firebase-storage-bucket ■■■■■■■■.appspot.com

$ now secrets add firebase-messaging-sender-id ■■■■■■■■

$ now secrets add firebase-app-id 1:■■■■■■■■:web:■■■■■■■■

$ now secrets add firebase-measurement-id G-■■■■■■■■

$ now secrets add firebase-client-email firebase-adminsdk-■■■■@■■■■■■■■.iam.gserviceaccount.com

$ now secrets add -- firebase-private-key "-----BEGIN PRIVATE KEY-----\n■■■■■■■■\n-----END PRIVATE KEY-----\n"
🔥 Create a Firestore index
Here, we'll walk through creating an index in Firestore. You'll go through this flow pretty often as you iterate on your app's data model.
Navigate to http://localhost:3000/spaces, and open your browser's console.
You should see an error in the console, with a link to create an index.

Following the link takes you to the Firestore dashboard, with a modal to create a new index:

This workflow is great for prototyping. As you solidify your data model, you can switch to deploying indexes from the CLI.
🔥 Set up Firebase functions
Here, we'll configure Firebase functions to support deploying to staging & production, and then deploy functions.
Now, navigate to http://localhost:3000/account
You should see an error! 🛑
This page makes a request to a Firebase function, and we haven't deployed functions yet.
To set up functions, we'll configure our staging & production projects with an environment config variable. Functions use this config variable to decide which keys to use at runtime.
$ firebase use staging
Now using alias staging (my-project-staging)

$ firebase functions:config:set app.environment="staging"
✔  Functions config updated.

$ firebase use production
Now using alias production (my-project-production)

$ firebase functions:config:set app.environment="production"
✔  Functions config updated.
Now, we can deploy functions to staging and production.
First, install dependencies:
$ cd functions && npm install && cd ..
Deploy to staging:
$ firebase deploy -P staging --only functions
Deploy to production:
$ firebase deploy -P production --only functions
Open the account page again: http://localhost:3000/account.
You should now be able to load the page without errors! ✅
▲ Deploy to ZEIT Now
You've reached the final step! 🏁🥳
Run now to set up a ZEIT Now project and deploy to production.
$ now

In the future, you can deploy your app to production by running now --prod
To run the app locally, run now dev
📌 Reference
Run app locally (using staging environment)
$ now dev
Deploy functions to staging
$ firebase deploy -P staging --only functions
Deploy functions to production
$ firebase deploy -P production --only functions
Run functions locally
$ cd functions && npm run shell
Deploy to production
$ now --prod
Running functions locally
To run Firebase functions locally, navigate to the functions directory and run npm run shell
$ cd functions && npm run shell
...
✔  functions: Emulator started at http://localhost:5000
i  functions: Loaded functions: getEnvironment
firebase > getEnvironment({})
Sent request to function.
firebase >
RESPONSE RECEIVED FROM FUNCTION: 200, {
  "result": {
    "environment": "staging"
  }
}
This project is configured to use the staging environment when running functions locally.
Running functions locally can be convenient for development, but handling authenticated functions can be tricky. Firebase has some local emulators, but it's unclear what the story is for emulating authentication.
Often, I'll just deploy functions directly to staging, and open http://localhost:3000 to verify changes.


Oldest comments (18)
what's the value of using firebase functions versus api routes in next.js?
Good question!
I haven’t worked with next.js / zeit’s functions much yet - I hear the cold boot times are faster, but haven’t done a direct comparison with firebase.
Since I’m using firebase auth & firestore already, it’s kinda nice to have functions in the same console. Just anecdotally, it seems like function logs update faster using Firebase, and the console feels more mature than Zeit’s.
Going with cloud functions / firebase over next.js's functions would be ideal if you are heavily invested in firebase already but still want to use next. Firebase is nice because they have one of the most generous / useful free-tier's for authentication. They also tend to require a little bit less boilerplate than AWS.
Not an expert but I think it is also relevant that Zeit functions are not in the same datacenter and if you need to call firestore from a function it would add that latency. Additionally, you would miss out some functionality like Firestore and Auth Triggers
Thank you for sharing such a wonderful tutorial!
It took me only a single afternoon to build a functioning dashboard for managing a volunteer delivery service using your detailed guide.
I know this is out of the scope of your post, but would you be able to point me in the right direction or share resources for achieving following:
spaces) sortable on change. I'm using Firebase'sorderBybut that only sorts on the initial load, so I have to refresh the page to sort changes. I suppose I would have to extrapolate the Firebase data into a React state and sort/display that. Unfortunately, I'm not fully comprehending how you retrieve the collection and storing it intoitemsbecause it's compounded with other variables using some sort of shorthand. So I guess my question is how to get the Firebase data into a component state?I understand it's a lot to ask, but I'm sure any hints would help out many people in the future as well.
Thanks again for a great tutorial!
Yay, glad it was useful!
This example uses firestore-pagination-hook, which was useful for viewing a firestore collection quickly for this example. I'm not sure how well it scales to more complex use cases.
There are some other React + Firebase libraries out there, which I haven't tried, but you may want to check out as alternatives. This one looks popular: github.com/CSFrequency/react-fireb...
Thank you for sharing additional references. I will look through them and see where they take me.
nice tutorial! why can't we go full power firebase i.e. use firebase hosting instead of zeit
IIRC firebase hosting doesn't support SSR out of the box. It can be mimicked with the use of functions, but Vercel probably does much more optimizations with their Next.js hosting.
Awesome! Many thanks!
At cd functions/src/index.ts 9th and 11th line is your storage bucket URL. I believe people should change that to theirs. Don't see a mention of it in the article.
Thanks again! 🙌 🙌 🙌
First, I want to thank you for your effort. That article and steps are very well explained.
localhost:3000/spaces doesn't output an error. It just redirects me to the root again.
And I also get this error when I open localhost:3000/account
ReferenceError: Headers is not defined
at Service. (C:/Users/bhnas/OneDrive/Desktop/nextjs-now-firebase/node_modules/
firebase/functions/dist/index.node.cjs.js:524:25
Let me know if u want further details
Very nice! One minor nitpick, you should mention somewhere in the tutorial that you should enable email authentication in the firebase project to be able to create an account.
On the
/spacespage I get:Uncaught Error in onSnapshot: FirebaseError: "Missing or insufficient permissions."This was a really nice way to leave feedback 😊
Thanks for the tutorial.
Made an example of how to use firebase auth with nextjs, based on the with-iron-session. Instead of getinitialprops that the example up uses, this uses getServerSideProps. Hopefully it's a bit easier to understand for a beginner. The setup described in the article still applies for the most part. github.com/hajola/nextjs-firebase-...
This was really great, thank you!
I probably looked at 20 boilerplates, and tried at least 2 others, before finding yours. Thankful that I did, because yours is 1,000 times better than the rest. Great documentation, great architecture. Thank you so much.
Why not host on firebase? Why lock into two different platforms?