
Written by Diogo Souza✏️
Created by the minds behind Node.js, Deno is similarly gaining traction among developers.
After maturing and evolving features that Node failed to deliver such as security, modules, and dependencies, Deno is proving to be as powerful as its predecessor.
It’s basically a TypeScript runtime built on top of the robust Google V8 Engine. But don’t worry, Deno also supports vanilla JavaScript, which is what we’ll be using in this article.
Deno was created under a few conditions:
First off, it’s secure, meaning that its default execution is based in a sandbox environment.
There’s no access from runtime to things like network, file system, etc. When your code tries to access these resources, you’re prompted to allow the action.
It loads modules by URLs (like the browsers). This allows you to use decentralized code as modules and import them directly into your source code without having to worry about registry centers
It’s also browser-compatible. For example, if you’re using ES modules, you don’t have to worry about the usage of Webpack or Gulp.
Additionally, it’s TypeScript-based.
If you already work with TypeScript, it’s perfect for you: very straightforward, and there’s no need for extra settings. If you don’t work with TypeScript, that’s no problem. You can also use it with plain JavaScript.
You can read more about it here and in its official documentation.
In this article, we’re going to focus more on the how-to.
Specifically, we’ll go over how to create an API from scratch using only JavaScript, Deno, and a connection to a Postgres database.
The application we’ll develop is a basic CRUD over a domain of beers.

Setting things up
First, you need to have the tools and everything set up. For this article, you’ll need:
- And IDE of your choice — we’ll be using VS Code
- A Postgres server and your favorite GUI tool to manage it
- Deno.
In order to install Deno, please follow the commands for your respective OS:
// Linux:
curl -fsSL https://deno.land/x/install/install.sh | sh

// Homebrew (macOS or Linux):
brew install deno

// Using Chocolatey (Windows):
choco install deno
Then, run the command deno --version to check if the installation worked. You should see something like this:
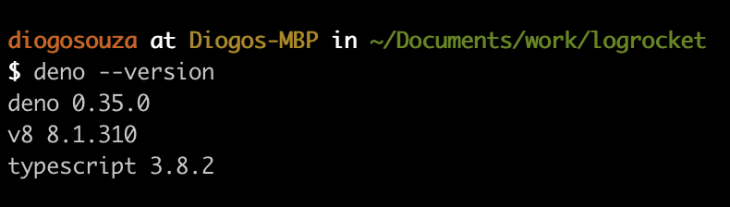
Checking for Deno version
Next, let’s create the project structure, including initial files and folders. Inside a folder of your preference, create the same structure as is seen in the image below:

Project structure
The structure can be described as follows:
controllers : hold the JS files that will handle the requests arriving, the further calls to the services and below layers and, finally, the delivery of the responses. All of those objects are inherited from Deno, so you don’t need to worry about whether you’ll need to handle requests/responses manually.
db: the folder hosting our SQL script of creation and the direct connection to our Postgres database.
repositories: these JS files will handle the management of the database operations. Each create, delete, or update will take place, in its logic, here.
services: these are the files that will handle the business logic of our operations, such as validations, transformations over the data, etc.
The application
Let’s start with the code of our first and most important file, index.js.
Take a look at the following code:
import { Application } from "https://deno.land/x/oak/mod.ts";
import { APP_HOST, APP_PORT } from "./config.js";
import router from "./routes.js";
import _404 from "./controllers/404.js";
import errorHandler from "./controllers/errorHandler.js";

const app = new Application();

app.use(errorHandler);
app.use(router.routes());
app.use(router.allowedMethods());
app.use(_404);

console.log(`Listening on port:${APP_PORT}...`);

await app.listen(`${APP_HOST}:${APP_PORT}`);
We need a web framework to deal with the details of the request and response handling, thread management, errors, etc.
For Node, it’s common to use Express or Koa for this purpose.
However, as we’ve seen, Deno doesn’t support Node libraries.
We need to use another one inspired in Koa, the Oak: a middleware framework for Deno’s net server.
It has a middleware framework inspired by Koa, and its middleware router was inspired by koa-router.
Its usage is very similar to Express, as you can see by the code listing. In the first line, we’re importing the TS module directly from the deno.land URL.
The rest of the imports will be configured further.
The Application class is where everything starts with Oak.
We instantiate it and add the error handler, the controllers, the routing system and, ultimately, call the method listen() to start the server passing the URL (host + port).
Here you can see the code for config.js (place it in the root of the project):
const env = Deno.env();

export const APP_HOST = env.APP_HOST || "127.0.0.1";
export const APP_PORT = env.APP_PORT || 4000;
Very familiar so far, isn’t it? Let’s go to the routing now.
Like with Express, we need to establish the routers that will redirect our requests to the proper JavaScript functions that, in turn, will handle them, store, or search for data and return the results.
Take a look at the code for routes.js (also in the root folder):
import { Router } from "https://deno.land/x/oak/mod.ts";

import getBeers from "./controllers/getBeers.js";
import getBeerDetails from "./controllers/getBeerDetails.js";
import createBeer from "./controllers/createBeer.js";
import updateBeer from "./controllers/updateBeer.js";
import deleteBeer from "./controllers/deleteBeer.js";

const router = new Router();

router
  .get("/beers", getBeers)
  .get("/beers/:id", getBeerDetails)
  .post("/beers", createBeer)
  .put("/beers/:id", updateBeer)
  .delete("/beers/:id", deleteBeer);

export default router;
So far, nothing should be working yet. Don’t worry — we still need to configure the rest of the project before starting it up.
This last listing shows that Oak will also take care of the routing system for us.
The Router class, more specifically, will be instantiated to allow the use of the correspondent methods for each HTTP GET, POST, PUT, and DELETE operation.
The imports at the beginning of the file correspond to each of the functions that will handle the respective request.
You can decide whether you prefer it this way, or if you’d rather have everything in the same controller file.
Database and repository
Before we proceed with more JavaScript code, we need to set up the database.
Make sure you have the Postgres server installed and running at your localhost. Connect to it, and create a new database called logrocket_deno.
Then, enter it. In the public schema, run the following create script:
CREATE TABLE IF NOT EXISTS beers (
    id SERIAL PRIMARY KEY,
    name VARCHAR(50) NOT NULL,
    brand VARCHAR(50) NOT NULL,
    is_premium BOOLEAN,
    registration_date TIMESTAMP
)
This script is also available at the /db folder of my version of the project.
It creates a new table, “beers,” to store the values of our CRUD.
Note that the primary key is auto-incremented (via SERIAL keyword) to facilitate our job with the id generation strategy.
Now, let’s create the file that will handle the connection to Postgres.
In the db folder, create the database.js file and add the following content:
import { Client } from "https://deno.land/x/postgres/mod.ts";

class Database {
  constructor() {
    this.connect();
  }

  async connect() {
    this.client = new Client({
      user: "postgres",
      database: "logrocket_deno",
      host: "localhost",
      password: "postgres",
      port: "5432"
    });

    await this.client.connect();
  }
}

export default new Database().client;
Make sure to adjust the connection settings according to your Postgres configurations. The config is pretty simple.
Deno has created its deno-postgres (PostgreSQL driver for Deno) based on node-postgres and pg.
If you’re a Node user, you’re going to be familiar with the syntax.
Just be aware that the settings slightly change depending on the database you use.
Here, we’re passing the setting object as a Client parameter.
In MySQL, however, it goes directly into the connect() function.
Inside the repositories folder, we’re going to create the file beerRepo.js, which will host the repositories to access the database through the file we’vecr eated above.
This is its code:
import client from "../db/database.js";

class BeerRepo {
  create(beer) {
    return client.query(
      "INSERT INTO beers (name, brand, is_premium, registration_date) VALUES ($1, $2, $3, $4)",
      beer.name,
      beer.brand,
      beer.is_premium,
      beer.registration_date
    );
  }

  selectAll() {
    return client.query("SELECT * FROM beers ORDER BY id");
  }

  selectById(id) {
    return client.query(`SELECT * FROM beers WHERE id = $1`, id);
  }

  update(id, beer) {
    var query = `UPDATE beers `;
    var hasSet = false;
    if (beer.name !== undefined) {
      query +=
        ` SET name = '${beer.name}'` + (beer.brand !== undefined ? "," : "");
      hasSet = true;
    }

    if (beer.brand !== undefined) {
      if (!hasSet) query += " SET ";
      query +=
        ` brand = '${beer.brand}'` + (beer.is_premium !== undefined ? "," : "");
      hasSet = true;
    }

    if (beer.is_premium !== undefined) {
      if (!hasSet) query += " SET ";
      query += ` is_premium = '${beer.is_premium}'`;
    }

    query += ` WHERE id = ${id}`;
    return client.query(query);
  }

  delete(id) {
    return client.query(`DELETE FROM beers WHERE id = $1`, id);
  }
}

export default new BeerRepo();
Import the database.js file that connects to the database.
Then, the rest of the file is just database-like CRUD operations. Go ahead and look them over. m
In order to prevent SQL injection — like every other major database framework — Deno allows us to pass parameters to our SQL queries as well.
Again, each database has its own syntax.
With Postgres, for example, we use the dollar sign followed by the number of the param in its specific order.
The order here is very important. In MySQL, the operator is a question mark (?).
The values of each param come after, as a varargs param (in Postgres: for MySQL, it would be an array).
Each item must be in the exact same position as its corresponding query operator.
The query() function is the one we’ll use every time we want to access or alter data in the database.
We’ll also pay special attention to our update method.
Since we’re mounting the query dynamically, we need to make sure that each SQL instruction is only going to appear on it if the value that needs to be updated also comes filled.
After each SET instruction, we also need a comma if another one is coming right after.
This is why we have the condition that checks for the existence of the next value.
Services
Our repository is set.
Now, let’s move on to the services layer.
Inside of the services folder, create the file beerService.js and add in the following code:
import beerRepo from "../repositories/beerRepo.js";

export const getBeers = async () => {
  const beers = await beerRepo.selectAll();

  var result = new Array();

  beers.rows.map(beer => {
    var obj = new Object();

    beers.rowDescription.columns.map((el, i) => {
      obj[el.name] = beer[i];
    });
    result.push(obj);
  });

  return result;
};

export const getBeer = async beerId => {
  const beers = await beerRepo.selectById(beerId);

  var obj = new Object();
  beers.rows.map(beer => {
    beers.rowDescription.columns.map((el, i) => {
      obj[el.name] = beer[i];
    });
  });

  return obj;
};

export const createBeer = async beerData => {
  const newBeer = {
    name: String(beerData.name),
    brand: String(beerData.brand),
    is_premium: "is_premium" in beerData ? Boolean(beerData.is_premium) : false,
    registration_date: new Date()
  };

  await beerRepo.create(newBeer);

  return newBeer.id;
};

export const updateBeer = async (beerId, beerData) => {
  const beer = await getBeer(beerId);

  if (Object.keys(beer).length === 0 && beer.constructor === Object) {
    throw new Error("Beer not found");
  }

  const updatedBeer = {
    name: beerData.name !== undefined ? String(beerData.name) : beer.name,
    brand: beerData.brand !== undefined ? String(beerData.brand) : beer.brand,
    is_premium:
      beerData.is_premium !== undefined
        ? Boolean(beerData.is_premium)
        : beer.is_premium
  };

  beerRepo.update(beerId, updatedBeer);
};

export const deleteBeer = async beerId => {
  beerRepo.delete(beerId);
};
This is one of the most important files we have.
It’s here where we interface with the repository and receives calls from the controllers.
Each method also corresponds to one of the CRUD operations and, since the Deno database nature is inherently asynchronous, it always returns a promise.
This is why we need to await until it finishes in our synchronous code.
Plus, the return is an object that does not correspond to our exact business object Beer, so we have to transform it into an understandable JSON object.
getBeers will always return an array, and getBeer will always return a single object.
The structure of both functions is very similar.
The beers result is an array of arrays because it encapsulates a list of possible returns for our query, and each return is an array as well (given that each column value comes within this array).
rowDescription, in turn, stores the information (including the names) of each column the results have.
Some other features, like validations, also take place here.
In the updateBeer function, you can see that we’re always checking if the given beerId in fact exists in the database before proceeding with updating.
Otherwise, an error will be thrown. Feel free to add whichever validations or additional code you want.
Controllers
Now it’s time to create the handlers of our requests and responses.
Input and output validations better adhere to this layer.
Let’s start with the error management files — the ones we’ve seen in the index.js.
In the controllers folder, create the files 404.js and errorHandler.js.
Code for 404.js:
export default ({ response }) => {
  response.status = 404;
  response.body = { msg: "Not Found" };
};
Code for errorHandler.js:
export default async ({ response }, nextFn) => {
  try {
    await nextFn();
  } catch (err) {
    response.status = 500;
    response.body = { msg: err.message };
  }
};
They are very simple. In the first one, we’re just exporting a function that will take care of business exceptions whenever we throw them, like HTTP 404.
The second one will take care of any other type of unknown errors that may happen in the application lifecycle, treat them like HTTP 500, and send the error message in the response body.
Now, let’s get to the controllers. Let’s start with the getters.
This is the content for getBeers.js:
import { getBeers } from "../services/beerService.js";

export default async ({ response }) => {
  response.body = await getBeers();
};
Each controller operation must be async.
Each controller operation receives either one or both request and response objects as parameters.
They’re intercepted by the Oak API and preprocessed before arriving at the controller or getting back to the client caller.
Regardless of the type of logic you put in there, don’t forget to set the response body since it is the result of your request.
The following is the content for getBeerDetails.js:
import { getBeer } from "../services/beerService.js";

export default async ({
  params,
  response
}) => {
  const beerId = params.id;

  if (!beerId) {
    response.status = 400;
    response.body = { msg: "Invalid beer id" };
    return;
  }

  const foundBeer = await getBeer(beerId);
  if (!foundBeer) {
    response.status = 404;
    response.body = { msg: `Beer with ID ${beerId} not found` };
    return;
  }

  response.body = foundBeer;
};
This content is similar to our content for getbeers.js, except for the validations.
Since we’re receiving the beerId as a parameter, it’s good to check if it’s filled. If the value for that param doesn’t exist, send a corresponding message in the body.
The next step is the creation file.
This is the content for the file createBeer.js:
import { createBeer } from "../services/beerService.js";

export default async ({ request, response }) => {
  if (!request.hasBody) {
    response.status = 400;
    response.body = { msg: "Invalid beer data" };
    return;
  }

  const {
    value: { name, brand, is_premium }
  } = await request.body();

  if (!name || !brand) {
    response.status = 422;
    response.body = { msg: "Incorrect beer data. Name and brand are required" };
    return;
  }

  const beerId = await createBeer({ name, brand, is_premium });

  response.body = { msg: "Beer created", beerId };
};
Again, a few validations take place to guarantee that the input data is valid regarding required fields. Validations also confirm that a body comes with the request.
The call for the createBeer service function passes each argument individually. If the beer object increases in its number of attributes, it would not be wise to maintain such a function.
You can come up with a model object instead, which would store each one of your beer’s attributes and be passed around the controllers and service methods.
This is our updateBeer.js content:
import { updateBeer } from "../services/beerService.js";

export default async ({ params, request, response }) => {
  const beerId = params.id;

  if (!beerId) {
    response.status = 400;
    response.body = { msg: "Invalid beer id" };
    return;
  }

  if (!request.hasBody) {
    response.status = 400;
    response.body = { msg: "Invalid beer data" };
    return;
  }

  const {
    value: { name, brand, is_premium }
  } = await request.body();

  await updateBeer(beerId, { name, brand, is_premium });

  response.body = { msg: "Beer updated" };
};
As you can see, it has almost the same structure. The difference is in the params config.
Since we’re not allowing every attribute of a beer to be updated, we limit which ones will go down to the service layer.
The beerId must also be the first argument since we need to identify which database element to update.
And finally, the code for our deleteBeer.js:
import { deleteBeer, getBeer } from "../services/beerService.js";

export default async ({
  params,
  response
}) => {
  const beerId = params.id;

  if (!beerId) {
    response.status = 400;
    response.body = { msg: "Invalid beer id" };
    return;
  }

  const foundBeer = await getBeer(beerId);
  if (!foundBeer) {
    response.status = 404;
    response.body = { msg: `Beer with ID ${beerId} not found` };
    return;
  }

  await deleteBeer(beerId);
  response.body = { msg: "Beer deleted" };
};
Note how similar it is to the others.
Again, if you feel it is too repetitive, you can mix these controller codes into one single controller file.
That would allow you to have less code, since the common code would be together in a function, for example.
Now let’s test it.
To run the Deno project, go to your prompt command line. In the root folder, issue the following command:
deno -A index.js
The logs will show Deno downloading all the dependencies our project needs. The message “Listening on port:4000...” must appear.
To test the API, we’ll make use of the Postman utility tool. Feel free to use whichever one you prefer.
This is the example of a POST creation in action:
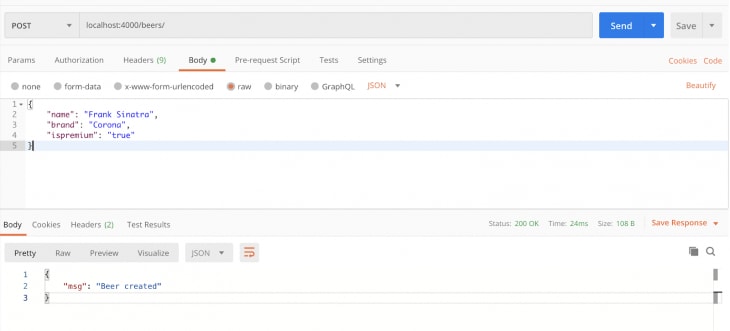
Creating a beer in our Deno API
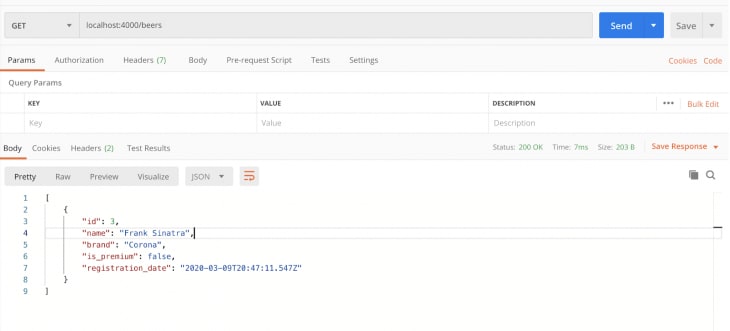
After that, go to the GET operation to list all the beers in the database:
Conclusion
I’ll leave the rest of the operation tests to you.
You can also go to the database and check directly from there for the values to be inserted, updated, or deleted.
The final code for this tutorial can be found here.
Note that we’ve finished a complete functional CRUD-like API without having to make use of Node.js or a node_modules directory (since Deno maintains the dependencies in cache).
Every time you want to use a dependency, just state it through the code and Deno will take care of downloading it (there’s no need for a package.json file).
Also, if you want to use it with TypeScript, there’s no need to install it either.
Just go ahead and start coding with TypeScript right away.
Plug: LogRocket, a DVR for web apps

LogRocket is a frontend logging tool that lets you replay problems as if they happened in your own browser. Instead of guessing why errors happen, or asking users for screenshots and log dumps, LogRocket lets you replay the session to quickly understand what went wrong. It works perfectly with any app, regardless of framework, and has plugins to log additional context from Redux, Vuex, and @ngrx/store.
In addition to logging Redux actions and state, LogRocket records console logs, JavaScript errors, stacktraces, network requests/responses with headers + bodies, browser metadata, and custom logs. It also instruments the DOM to record the HTML and CSS on the page, recreating pixel-perfect videos of even the most complex single-page apps.
Try it for free.
The post Creating your first REST API with Deno and Postgres appeared first on LogRocket Blog.

Top comments (0)