
Written by Nwose Lotanna✏️
In this post, we will look at how data can be passed from a parent component to child components in Vue JS.
Before you start
This post is suited for developers of all stages including beginners. Here are a few things you should already have before going through this article.
You will need the following in your pc:
- Node.js version 10.x and above installed. You can verify if already have it installed by running the command below in your terminal/command prompt:
node -v
- A code editor: Visual Studio Code is highly recommended
- Vue’s latest version, installed globally on your machine
- Vue CLI 3.0 installed on your machine. To do this, uninstall the old CLI version first:
npm uninstall -g vue-cli
then install the new one:
npm install -g @vue/cli
- Download a Vue starter project here
- Unzip the downloaded project
- Navigate into the unzipped file and run the command to keep all the dependencies up-to-date:
npm install
The efficiency problem
If you have a data object (say of the Billboard top 10 artists list) you want to display in two different components but in very different ways, the first instinct will be to create these two separate components, add the array inside the data object and then display them in the template.
This solution is really great but as you add more components, it becomes a non-efficient solution. Let us demonstrate this with the starter project you have opened in VS Code.
Demo
Open the test.vue file and copy in this code block below:
<template>
  <div>
    <h1>Vue Top 20 Artists</h1>
    <ul>
      <li v-for="(artist, x) in artists" :key="x">
      <h3>{{artist.name}}</h3>
      </li>
    </ul>
  </div>
</template>
<script>
export default {
  name: 'Test',
  data (){
    return {
      artists: [
       {name: 'Davido', genre: 'afrobeats', country: 'Nigeria'},
       {name: 'Burna Boy', genre: 'afrobeats', country: 'Nigeria'},
       {name: 'AKA', genre: 'hiphop', country: 'South-Africa'},
       {name: 'Sarkodie', genre: 'hiphop', country: 'Ghana'},
       {name: 'Stormzy', genre: 'hiphop', country: 'United Kingdom'},
       {name: 'Lil Nas', genre: 'Country', country: 'United States'},
       {name: 'Nasty C', genre: 'hiphop', country: 'South-Africa'},
       {name: 'Shatta-walle', genre: 'Reagae', country: 'Ghana'},
       {name: 'Khalid', genre: 'pop', country: 'United States'},
       {name: 'ed-Sheeran', genre: 'pop', country: 'United Kingdom'}
      ]
    }
  }
}
</script>
Create a new file in the components folder, call it test2.vue and paste the code block below inside it:
<template>
  <div>
    <h1>Vue Top Artist Countries</h1>
    <ul>
      <li v-for="(artist, x) in artists" :key="x">
      <h3>{{artist.name}} from {{artist.country}}</h3>
      </li>
    </ul>
  </div>
</template>
<script>
export default {
  name: 'Test2',
  data (){
    return {
      artists: [
       {name: 'Davido', genre: 'afrobeats', country: 'Nigeria'},
       {name: 'Burna Boy', genre: 'afrobeats', country: 'Nigeria'},
       {name: 'AKA', genre: 'hiphop', country: 'South-Africa'},
       {name: 'Sarkodie', genre: 'hiphop', country: 'Ghana'},
       {name: 'Stormzy', genre: 'hiphop', country: 'United Kingdom'},
       {name: 'Lil Nas', genre: 'Country', country: 'United States'},
       {name: 'Nasty C', genre: 'hiphop', country: 'South-Africa'},
       {name: 'Shatta-walle', genre: 'Reagae', country: 'Ghana'},
       {name: 'Khalid', genre: 'pop', country: 'United States'},
       {name: 'ed-Sheeran', genre: 'pop', country: 'United Kingdom'}
      ]
    }
  }
}
</script>
<style scoped>
li{
    height: 40px;
    width: 100%;
    padding: 15px;
    border: 1px solid saddlebrown;
    display: flex;
    justify-content: center;
    align-items: center;
  }
a {
  color: #42b983;
}
</style>
To register the new component you just created, open the App.vue file and copy the code below inside it:
<template>
  <div id="app">
    <img alt="Vue logo" src="./assets/logo.png">
    <Test/>
    <test2/>
  </div>
</template>
<script>
import Test from './components/Test.vue'
import Test2 from './components/Test2'
export default {
  name: 'app',
  components: {
    Test, Test2
  }
}
</script>
Serve up the application in the development environment with this command in the VS Code terminal:
npm run serve
It should look like this:

You see that if you had about five more components, you will have to keep copying the data in every component. Imagine if there is a way you can define the data in a parent component and then bring it into every child component that needs it with the property name.

Solution: Vue props
The Vue team provides what they call props which are custom attributes you can register on any component. The way it works is that you define your data on the parent component and give it a value, then you go to the child component that needs that data and pass the value to a prop attribute so the data becomes a property in the child component.
The syntax looks like this:
Vue.component('blog-post', {
  props: ['title'],
  template: '<h3>{{ title }}</h3>'
})
You can use the root component (App.vue) as the parent component and store the data and then register props to access this data dynamically from any component that needs it.
Defining data in the parent component
As you have chosen the root component to be your parent component, you have to first define the data object you want to share dynamically inside the root component. If you have followed this post from the start, open up your app.vue file and copy the data object code block inside the script section:
<script>
import Test from './components/Test.vue'
import Test2 from './components/Test2'
export default {
  name: 'app',
  components: {
    Test, Test2
  },
  data (){
    return {
      artists: [
       {name: 'Davido', genre: 'afrobeats', country: 'Nigeria'},
       {name: 'Burna Boy', genre: 'afrobeats', country: 'Nigeria'},
       {name: 'AKA', genre: 'hiphop', country: 'South-Africa'},
       {name: 'Sarkodie', genre: 'hiphop', country: 'Ghana'},
       {name: 'Stormzy', genre: 'hiphop', country: 'United Kingdom'},
       {name: 'Lil Nas', genre: 'Country', country: 'United States'},
       {name: 'Nasty C', genre: 'hiphop', country: 'South-Africa'},
       {name: 'Shatta-walle', genre: 'Reagae', country: 'Ghana'},
       {name: 'Khalid', genre: 'pop', country: 'United States'},
       {name: 'Ed Sheeran', genre: 'pop', country: 'United Kingdom'}
      ]
    }
  }
}
</script>
Receiving props
After defining the data, go into the two test components and delete the data objects in them. To receive props in a component, you have to specify the props you want to receive inside that component. Go inside the two test components and add the specifications in the script section as shown below:
<script>
export default {
  name: 'Test',
  props: ['artists']
}
Registering props
To let the Vue engine know that you have some props you will want to dynamically pass to some child components, you have to indicate it in the Vue instance. This is done in the template section like this:
<template>
  <div id="app">
    <img alt="Vue logo" src="./assets/logo.png">
    <Test v-bind:artists="artists"/>
    <test2 v-bind:artists="artists"/>
  </div>
</template>
Here, we use the v-bind directive to bind artists which is the name of the data object array down in the script section and artists which is the prop name in the test components, the one you set up in the section above. In this case, where you set it up without the directive like this:
    <Test artists="artists"/>
    <test2 artists="artists"/>
You will not see any output and Vue compiler or even ESLint will not flag it as an error or warning, so it is important you pay attention and remember to use v-bind for every dynamic binding.
Using props
After you have set up the props, you can then use it inside your component as though the data was defined inside the same component. This means you can set up method calls and easily access this.artists in our demo case.
Strongly typing props
You can also ensure that your component only receives exactly the data type you want it to receive by strongly typing the props. In our demo, for instance, you can ensure that it is only arrays that get passed down to your component by setting up authentication like this:
<script>
export default {
  name: 'Test',
  props: {
    artists: {
      type: Array
    }
  }
}
</script>
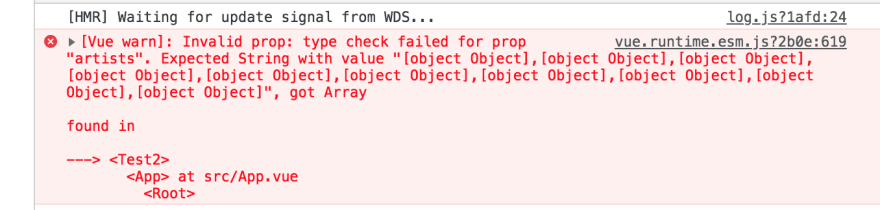
So whenever you add a wrong type say String, you will get a warning in the console telling you that the type it got is not the type it expected.
You can get the complete code to this tutorial here.
Conclusion
In this post, we looked at Vue props and how they can help to encourage the DRY (don’t repeat yourself) approach by creating a platform for reusability of data objects. We have also learned how to set up props in your Vue project. Happy hacking!
Editor's note: Seeing something wrong with this post? You can find the correct version here.
Plug: LogRocket, a DVR for web apps

LogRocket is a frontend logging tool that lets you replay problems as if they happened in your own browser. Instead of guessing why errors happen, or asking users for screenshots and log dumps, LogRocket lets you replay the session to quickly understand what went wrong. It works perfectly with any app, regardless of framework, and has plugins to log additional context from Redux, Vuex, and @ngrx/store.
In addition to logging Redux actions and state, LogRocket records console logs, JavaScript errors, stacktraces, network requests/responses with headers + bodies, browser metadata, and custom logs. It also instruments the DOM to record the HTML and CSS on the page, recreating pixel-perfect videos of even the most complex single-page apps.
Try it for free.
The post How to use props to pass data to child components in Vue JS appeared first on LogRocket Blog.

Top comments (0)