In this tutorial, we'll build a blog application that allows users to create new blog posts and list all posts on a homepage. The purpose of this post is to show you how to leverage Buildable and MongoDB to build your blog. We'll dive into how easy it is to generate API endpoints in Buildable and explore your MongoDB Atlas within Buildable's IDE.
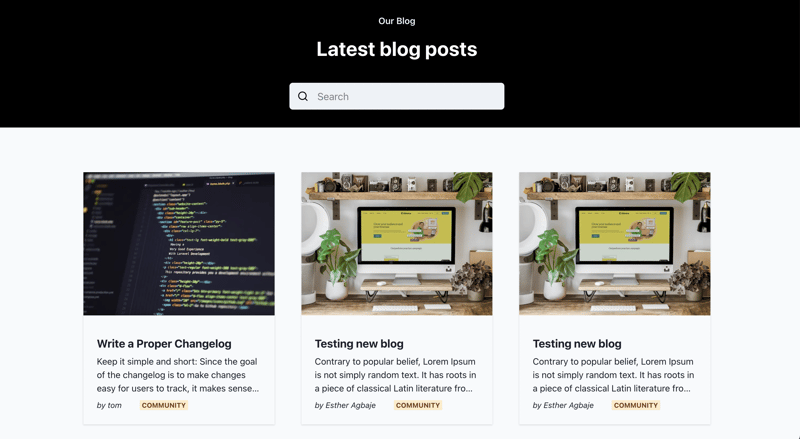
Here's a sneak peek of the blog homepage we'll create together.
Prerequisites
For this tutorial, you'll need the following:
- NextJS app - To create the frontend of our blog application
- MongoDB Atlas - To manage our database
- Buildable Account - To create REST endpoints (Create your free account here)
- Chakra UI (Optional) - To style our app
Step 1: Bootstrapping a NextJS app
To bootstrap a NextJS app, you'd need to run this command in your terminal window:
npx create-next-app@latest
You'll be prompted to give your app a name. Let's call it "blog-app." Once this installation is complete, navigate to this directory by running cd blog-app.
At this point, go ahead to install and set up the styling or component library of your choice. For this tutorial, we'll be using Chakra UI.
Now, let's start up our local development server. To do this, we'll run yarn dev.
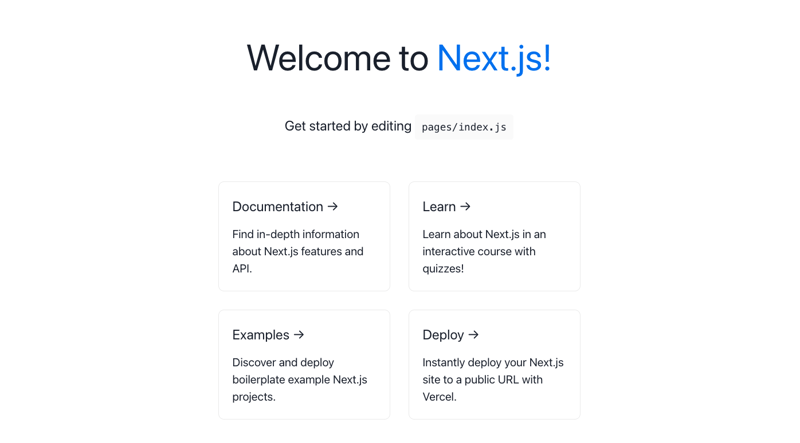
Navigate to localhost:3000 and you should see this
Step 2: Connecting your MongoDB Atlas
Now that we have installed our NextJS app, we need to connect our MongoDB database to Buildable. To do this, we can either connect an existing MongoDB Atlas Instance or spin up a new MongoDB Atlas instance (coming soon). For now, we'll be connecting an existing instance.
In your Buildable app, navigate to Databases and click on New. Pick MongoDB as the datasource and select Connect Existing.
Add in your credentials and connect.
💡 If you get stuck on this step, go ahead to check our docs for more details
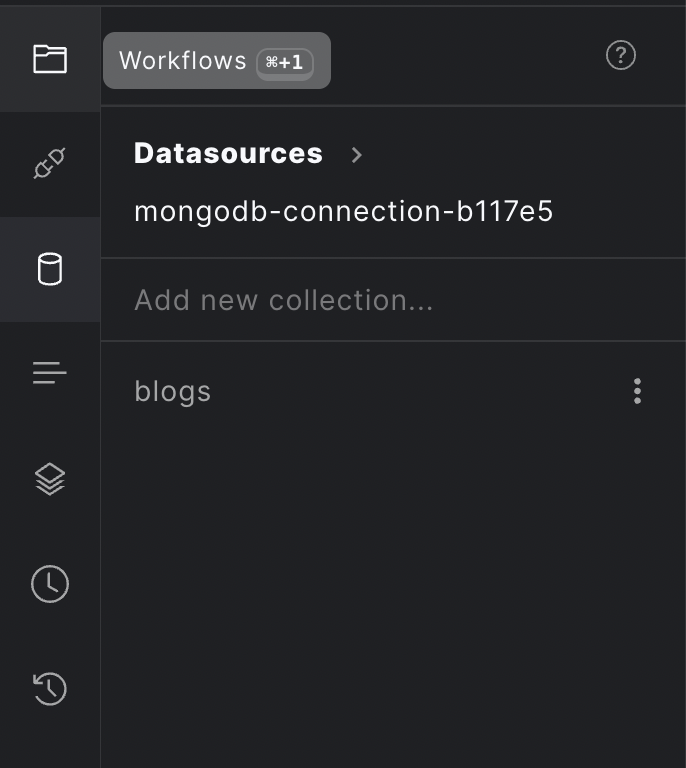
Thanks to Buildable, we can create a new collection directly in our IDE. Click MongoDB and create a new collection. Let’s call it blogs.
Step 3: Defining the blog post schema
With the database connected with Buildable, it is time to create the schema for a single blog post. We'll create a basic schema that contains the following:
- title
- image
- tags
- content
- author
{
    _id: '1',
    title: 'How to write a great blog post',
    image:
      'https://images.unsplash.com/photo-1524492449090-a4e289316d9c?ixlib=rb-1.2.1&ixid=MnwxMjA3fDB8MHxwaG90by1wYWdlfHx8fGVufDB8fHx8&auto=format&fit=crop&w=1694&q=80',
    tags: ["community", "webdev"],
        content: "Lorem ipsum is a pseudo-Latin text used in web design, typography, layout, and printing in place of English to emphasize design elements over content. It's also called placeholder (or filler) text."
    author: "Esther Agbaje"
  },
Step 4: Creating the POST endpoint for new blog posts
Now that we have completed the schema of our blog posts, we need API endpoints to insert new posts into our database. So, let's create a POST endpoint to achieve that.
In the Buildable IDE, click REST and create a new folder called blog.
Next, to create an endpoint, click Create new flow and give it a name, new-post.
💡 It's important to note that the folder structure or naming affects the URL. We'll be organizing all endpoints in this "blog" folder.
You'd notice this workflow provides a POST endpoint to create new posts and send the data to our MongoDB Atlas.
Next, we need a way to insert data via the API into our MongoDB database. Buildable provides a list of action templates for MongoDB.
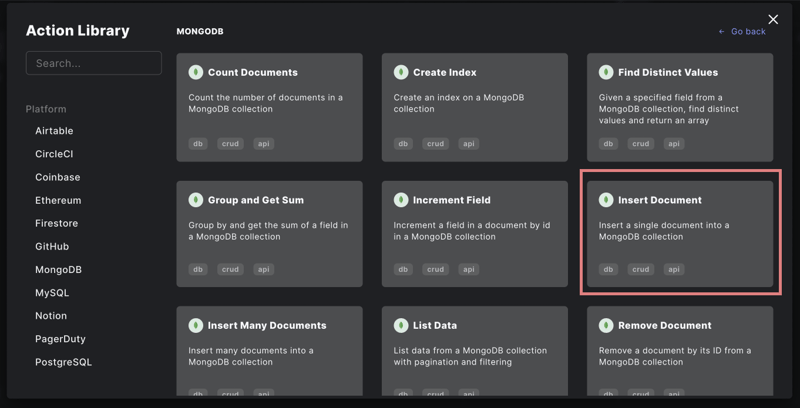
Click Add action, and select MongoDB from the list. Now choose the Insert Document template.
Navigate to the Body tab and put some dummy data in the request body as follows:
{
  "title": "Testing new blog",
  "image": "https://images.unsplash.com/photo-1661956602944-249bcd04b63f?ixlib=rb-1.2.1&ixid=MnwxMjA3fDF8MHxwaG90by1wYWdlfHx8fGVufDB8fHx8&auto=format&fit=crop&w=1770&q=80",
  "tag": "community",
  "content": "Contrary to popular belief, Lorem Ipsum is not simply random text. It has roots in a piece of classical Latin literature from 45 BC, making it over 2000 years old. Richard McClintock, a Latin professor at Hampden-Sydney College in Virginia, looked up one of the more obscure Latin words, consectetur, from a Lorem Ipsum passage, and going through the cites of the word in classical literature, discovered the undoubtable source.",
  "author": "Esther Agbaje"
}
Next, go to the Actions tab. In the action templates, we need to make a couple of edits to the code.
Remember, the collection is called blogs so we adjust this.
💡
$bodyrepresents the entire payload data.
To access the key values dynamically, we use
        title: $body.title,
    tag: $body.tag,
    image: $body.image,
    content: $body.content,
    author: $body.author
Now, take out unused code and save the workflow.
Lastly, in the Response tab, we need to modify the response on success. Copy the action and paste into the response. Save changes in the response tab.
Now, run this workflow. Excellent!
Grab the POST endpoint, as we'd be using shortly in our NextJS app.
Step 5: Building out the User Interface (UI) to create a new blog post
A blog isn't very useful without posts. We need to be able to add new posts via the API we just created.
Back in our Next JS app, in the pages directory, create a new page called create-post.jsx.
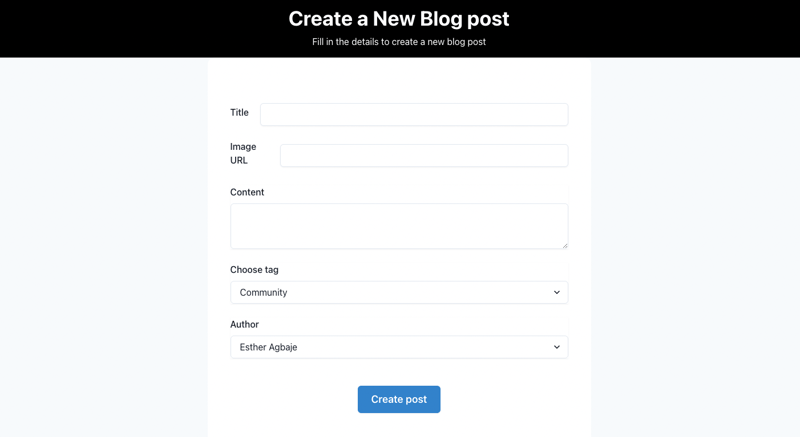
Here's what we're working towards
From our schema, we need to be able to send the following fields from a form:
- Title
- Image URL
- Content
- Tag
- Author
Here's the snippet of the code for you to easily follow along:
import {
  Box,
  Button,
  Center,
  Container,
  FormControl,
  FormLabel,
  Heading,
  HStack,
  Input,
  Select,
  Stack,
  Text,
  Textarea,
} from '@chakra-ui/react';

import React from 'react';

const CreatePost = () => {
  return (
    <Box>
      <Stack spacing='2' p='4' bg='black' color='white' textAlign='center'>
        <Heading>Create a New Blog post</Heading>
        <Text>Fill in the details to create a new blog post</Text>
      </Stack>
      <Box bg='gray.50' h='100vh'>
        <Container
          bg='white'
          maxW='2xl'
          py='20'
          px='10'
          borderRadius={{ base: 'none', sm: 'xl' }}
        >
          <form>
            <Stack spacing='6'>
              <FormControl>
                <HStack>
                  <FormLabel htmlFor='title'>Title</FormLabel>
                  <Input boxShadow='sm' id='title' type='text' name='title' />
                </HStack>
              </FormControl>
              <FormControl>
                <HStack>
                  <FormLabel htmlFor='image'>Image URL</FormLabel>
                  <Input boxShadow='sm' id='image' type='text' name='image' />
                </HStack>
              </FormControl>
              <FormControl boxShadow='sm'>
                <FormLabel htmlFor='content'>Content</FormLabel>
                <Textarea id='content' name='content' />
              </FormControl>
              <FormControl boxShadow='sm'>
                <FormLabel htmlFor='tag'>Choose tag</FormLabel>
                <Select name='tag' id='tag'>
                  <option value='community'>Community</option>
                  <option value='web-development'>Web Development</option>
                  <option value='automation'>Automation</option>
                </Select>
              </FormControl>
              <FormControl boxShadow='sm'>
                <FormLabel htmlFor='author'>Author</FormLabel>
                <Select name='author' id='author'>
                  <option value='Esther Agbaje'>Esther Agbaje</option>
                  <option value='Tom Jones'>Tom Jones</option>
                  <option value='Sara Nze'>Sara Nze</option>
                </Select>
              </FormControl>
            </Stack>
            <Center>
              <Button
                boxShadow='sm'
                size='lg'
                mt='12'
                colorScheme='blue'
                type='submit'
              >
                Create post
              </Button>
            </Center>
          </form>
        </Container>
      </Box>
    </Box>
  );
};

export default CreatePost;
Now, we need to be able to post data via our API to our database.
We create a function called handleSubmit to post our data.
const handleSubmit = () => {
    const formEl = e.currentTarget;
    e.preventDefault();
 toast({
      title: 'New Post created.',
      status: 'success',
      duration: 9000,
      isClosable: true,
    });
    const formData = new FormData(formEl);
    const data = Object.fromEntries(formData);
    fetch(
      'INSERT POST ENDPOINT HERE',
      {
        method: 'POST',
        body: JSON.stringify(data),
        headers: {
          'Content-type': 'application/json; charset=UTF-8',
        },
      }
    )
      .then((res) => {
        res.json();
        formEl?.reset();
      })
      .catch((err) => {
        console.log(err.message);
      });
  };
Remember to switch out 'INSERT POST ENDPOINT HERE' with your actual POST endpoint.
Now, we need to connect the handleSubmit function to the onSubmit event in our form by adding onSubmit={handleSubmit}
Finally, create a post and see what happens. Your post is successfully created, but of course, you don't see it. Why? We can only create new posts with the POST endpoint.
We need to set up a GET endpoint that fetches all the posts. Let's do that in the next step.
Step 6: Creating a GET endpoint to fetch all blog posts
Go to the Buildable IDE and create a new flow within the blog folder. We'll call it get-posts.
Set the flow method to GET.
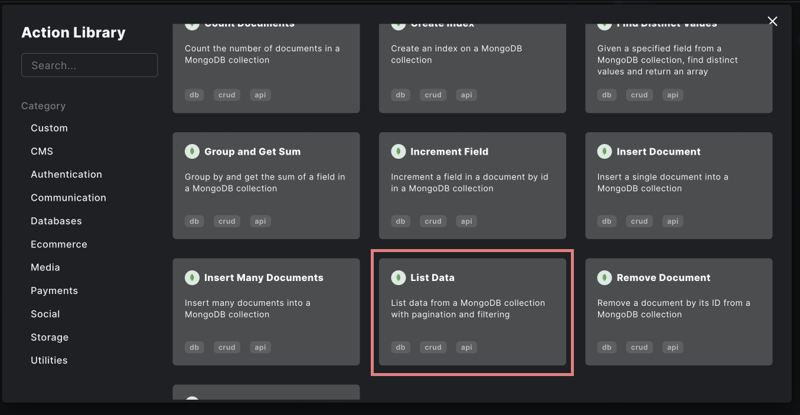
Click Add action button. You should see a list of templates. First select MongoDB as the platform and choose the List Data template.
Now, let's edit the template accordingly. The collection is blogs, and we need the following fields:
- title
- image
- content
- tag
- author
With that completed, copy the actions, navigate to the response tab and paste it in. Save the changes in the response tab.
Next, save the entire workflow and run it. Now copy the GET endpoint. We'd be using it in our NextJS app.
Step7: Building the UI that shows all blogs
Back in our NextJS app, open up index.jsx located in the pages directory. Let's clean it up and add the components we need.
import { Box, Heading, Input, InputGroup, Stack, Text } from '@chakra-ui/react';

const Home = () => {
  return (
    <Box>
      <Stack
        bg='black'
        color='white'
        spacing={{ base: '8', md: '10' }}
        align='center'
        p='8'
      >
        <Stack spacing={{ base: '4', md: '6' }} textAlign='center'>
          <Stack spacing='4'>
            <Text
              fontWeight='semibold'
              color='blue.50'
              fontSize={{ base: 'sm', md: 'md' }}
            >
              Our Blog
            </Text>
            <Heading size='xl'>Latest blog posts</Heading>
          </Stack>
        </Stack>
        <InputGroup size='lg' maxW={{ md: 'sm' }}>
          <Input placeholder='Search' variant='filled' colorScheme='blue' />
        </InputGroup>
      </Stack>
    </Box>
  );
};

export default Home;
Now, let's fetch the blogposts from the database using NextJS' GetStaticProps.
export async function getStaticProps() {
  const res = await fetch(
    'INSERT GET ENDPOINT HERE'
  );
  const result = await res.json();
  const posts = result.rows;

  return {
    props: {
      posts,
    },
  };
}
Remember to switch out 'INSERT GET ENDPOINT HERE' with your actual POST endpoint.
P.S I'm getting the image URLs from unsplash.com, so we need to add the domain in the next.config.js file.
Your next.config.js should look like this:
/** @type {import('next').NextConfig} */
const nextConfig = {
  reactStrictMode: true,
  swcMinify: true,
  images: {
    domains: ['images.unsplash.com'],
  },
};

module.exports = nextConfig;
Finally, let's render the fetched post in the UI, the final code should be
import {
  Badge,
  Box,
  Container,
  Heading,
  HStack,
  Input,
  InputGroup,
  Link,
  SimpleGrid,
  Stack,
  Text,
} from '@chakra-ui/react';
import Image from 'next/image';

const Home = ({ posts }) => {
  return (
    <Box>
      <Stack
        bg='black'
        color='white'
        spacing={{ base: '8', md: '10' }}
        align='center'
        p='8'
      >
        <Stack spacing={{ base: '4', md: '6' }} textAlign='center'>
          <Stack spacing='4'>
            <Text
              fontWeight='semibold'
              color='blue.50'
              fontSize={{ base: 'sm', md: 'md' }}
            >
              Our Blog
            </Text>
            <Heading size='xl'>Latest blog posts</Heading>
          </Stack>
        </Stack>
        <InputGroup size='lg' maxW={{ md: 'sm' }}>
          <Input placeholder='Search' variant='filled' colorScheme='blue' />
        </InputGroup>
      </Stack>

      <Box bg='gray.50' minH='900px'>
        <Container pt='20' maxW='6xl'>
          <SimpleGrid spacing={12} margin='auto' columns={3} pb='8'>
            {posts.map((post) => (
              <Link key={post._id} _hover={{ textDecor: 'none' }} role='group'>
                <Stack boxShadow='base'>
                  {post.image && (
                    <Box overflow='hidden'>
                      <Image
                        src={post.image}
                        alt={post.title}
                        width={400}
                        height={300}
                        objectFit='cover'
                      />
                    </Box>
                  )}
                  <Stack spacing='2' p='6'>
                    <Heading size='md'>{post.title}</Heading>
                    <Text noOfLines={3}>{post.content}</Text>

                    <HStack spacing='8'>
                      <Text as='i' fontSize='sm'>
                        by {post.author}
                      </Text>

                      <Badge colorScheme='orange'>{post.tag}</Badge>
                    </HStack>
                  </Stack>
                </Stack>
              </Link>
            ))}
          </SimpleGrid>
        </Container>
      </Box>
    </Box>
  );
};

export async function getStaticProps() {
  const res = await fetch(
    'INSERT GET ENDPOINT HERE'
  );
  const result = await res.json();
  const posts = result.rows;

  return {
    props: {
      posts,
    },
  };
}

export default Home;
Now, go over to localhost:3000/create-post page to create a couple more posts.
Check your homepage, and you should be able to see all the posts you created.
Next Steps
In this tutorial, we built the basic blocks of a blog application - creating new posts and getting all posts. We set up a NextJS app, connected our MongoDB Atlas database in Buildable, and created our API endpoints.
We also learned how to consume our POST API and display data on the frontend. Feel free to add more enhancements to this application, like the ability to edit and delete posts.
If you have any questions, comment below or reach out to us via our Discord Community.
Till next time, keep building with Buildable!








Top comments (1)
buildable can't login and main page 404.