Making A Remote Control Drone

Demo Code
In the last few posts on ARKit, most of the content we placed was pretty static. For this example, I want to switch gears and make something in ARKit that is a bit more interactive.
Send in the drones!
If you’ve ever wanted to play around with a remote-controlled drone but have never had the opportunity to do so, this tutorial is for you. I know the controls look a bit stupid at the moment, but the point of this post isn’t to create a genuinely impressive interface, it’s to get you started down the road where you’re interacting with the augmented world.
Getting Started

Given the complexity presented to us in rendering a drone, the best place for us to start would be by finding a good 3D drone model to use. I’ve found that COLLADA files are the easiest for interfacing with Apple’s SceneKit and are the easiest file type to convert to .scn files. COLLADA files use the file extension .dae and can be viewed in Apple’s preview application.
A file with the DAE file extension is a Digital Asset Exchange file. As the name implies, it’s used by various graphics programs to exchange digital assets under the same format. They may be images, textures, 3D models, etc. — Source
For this example, we’re going to be using a 3D model of a drone that found on free3d.com. If you’re wary of signing up, you can download the .dae file from the link I will post below, or alternatively, you can you can get the file that I’ve converted to .scn in the finished project files.
Here is a link to the .dae file:
Converting From .dae To .scn
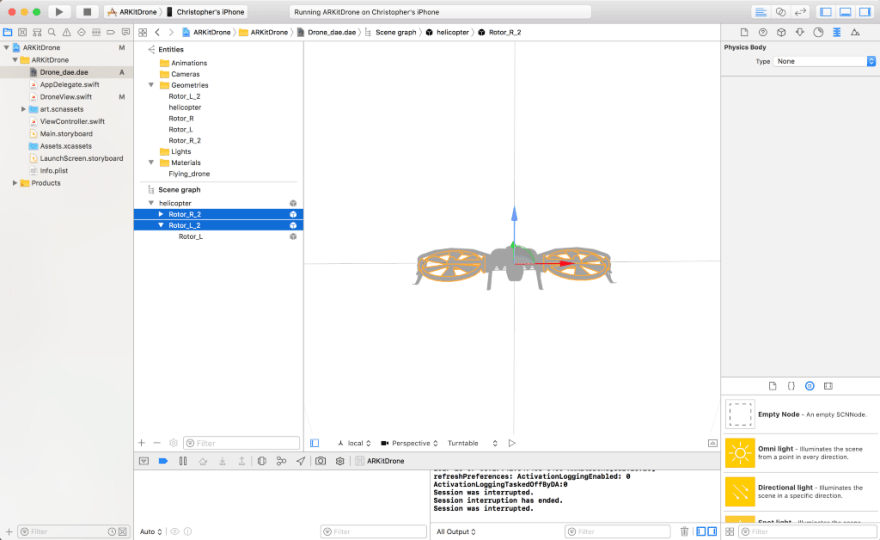
While SceneKit can handle working with .dae files just fine, for simplicity, we’ll just go ahead and convert it to a .scn file. There might be a better way to do this, I stumbled across this feature while playing around with SceneKit’s settings. To convert to a .scn file, select the .dae file, and in the inspector, on the right side of the screen, there should be a tab for the physics inspector like below:

Once you select a physics body, XCode should pop up a prompt asking you whether you want to convert the document to SCN format.

DroneSceneView
Now that we have our model we can start coding our drone. I want to start off by creating a subclass of ARSCNView called DroneSceneView. In this view, we’ll try to encapsulate the behaviors and properties of our drone. We’ll use the controller to connect these behaviors to the UI.
Setup
We should give our DroneSceneView five properties which will be of type SCNNodes. The helicopterNode gives us a hook into the main body of the drone, the blade1 and blade2 nodes hook us into the the framework surrounding the drones left or right rotors and the rotorR and rotorL nodes hooks into the blade themselves.
The first method we should create will be the overall setup method which I called setupDrone. In setupDrone, we should assign the appropriate parts of our drone model to these nodes. The names passed to the method childNode(withName:, recursively:) match up with the names in our model’s scene graph.

Style
Next we’ll add a bit of styling to our drone. This part isn’t hugely important but it can help make it seem more realistic, which is generally a key aspect of augmented reality and it gives you a better visual sense of the different parts.
SpinBlades
Because we want our drone to look like the real thing, we’ll need to animate the rotors to rotate. To simplify things, I’m setting it so that the drones rotors are going constantly. To do this need to access the blades themselves, and manipulate them along their z-axis.
let rotate = SCNAction.rotateBy(x: 0, y: 0, z: 200, duration: 0.5)
The drones rotators will now spin, but it doesn’t actually make any difference in terms of motion.
Controls
The spinning blades are purely cosmetic. Let’s actually make it do something. To create an animation sequence we’re going to call SCNTransaction.begin
SCNTransaction.begin()
SCNTransaction.animationDuration = 0.5

// Animation sequence

SCNTransaction.commit()
Lateral

// Right
helicopterNode.position = SCNVector3(helicopterNode.position.x + 0.5, helicopterNode.position.y, helicopterNode.position.z)

// Left
helicopterNode.position = SCNVector3(helicopterNode.position.x - 0.5, helicopterNode.position.y, helicopterNode.position.z)
To make our drone move to left or right we’ll manipulate the x element in its position property. To move to the left we’ll subtract a float value of -0.5 from x and conversely to move to the right we’ll add a float value of 0.5 to x.
Forward/Back

// Forward
helicopterNode.position = SCNVector3(helicopterNode.position.x, helicopterNode.position.y, helicopterNode.position.z - 0.5)

// Backward
helicopterNode.position = SCNVector3(helicopterNode.position.x, helicopterNode.position.y, helicopterNode.position.z + 0.5)
To make our drone move forward or backward we’ll manipulate the z element in its position property. To move to the left we’ll subtract a float value of -0.5 from z and conversely to move to the right we’ll add a float value of 0.5 to z.
Altitude
helicopterNode.position = SCNVector3(helicopterNode.position.x, value, helicopterNode.position.z)
To make our drone move up or down we’ll manipulate the y element in its position property. By add a flow value to the drones y position property value the drone will move up, if you subtract a float value from the drones y position property value it will descend.
Special Effects
These animations are mainly for decoration. They tilt the drone when it moves and then resets it to normal resting position. This is more an experiment of mine to try to make the flight look as natural as possible.
blade2Node.runAction(SCNAction.rotateBy(x: 0.3, y: 0, z: 0, duration: 1.5))
blade1Node.runAction(SCNAction.rotateBy(x: 0.3, y: 0, z: 0, duration: 1.5))
SCNTransaction.commit()
blade2Node.runAction(SCNAction.rotateBy(x: -0.3, y: 0, z: 0, duration: 0.25))
blade1Node.runAction(SCNAction.rotateBy(x: -0.3, y: 0, z: 0, duration: 0.25))
Controls UI

As you can tell from the picture, I’ve constructed rudmentary UI to get us going. It’s basically some arrows and a slider. We’ll use the slider to control our altitude and the arrows to control the direction that our drone moves in.
Sources:
- 3DHaupt
- Controllable Drone - Blender Game Engine - 3d model - .3ds, .obj, .dae, .blend, .fbx, .mtl, .dxf, .stl

Top comments (0)