
Preface
I wanted to build a Discord bot with TypeScript that had:
- A database
- A dashboard/website/domain
- An API for interactions & authentication with Discord
I previously created this same "hbd" bot that ran on nodejs runtime, built with the discord.js library.
hbd 
ARCHIVED!!!
This is the old version of the hbd bot running on Node.js runtime. To view the new and improved (yet work in progress) version of this bot that is on edge runtime, click here.
a discord bot for user's birthdays, horoscopes, and wishing user's a happy birthday.
-
🔗 INVITE
📖 WIKI
- Getting Started — Information about configuring the bot for your guild

how it works
-
data is stored in mongoose models
- guild settings (channels, roles)
- user's birthdays
- birthday wishes
-
when the bot logs in, the
timeevent is emitted:
client.login(process.env.BOT_TOKEN!).then(() => client.emit("time"));
- which checks the time, if it is midnight, the
intervalis emitted- this returns an interval that runs every 24 hrs and checks for birthdays
- if there's a…
While, the discord.js library offers a lot of essential utilities for interacting with discord, it doesn't quite fit for a bot that's going to be running through Nextjs/Vercel.
I wanted the bot to respond to interactions through edge runtime rather than running in an environment 24/7 waiting for interactions.
Now, bare with me... I am merely learning everything as I go along. 🤖
- Getting started
- OAuth2
- Vercel postgres
- Prisma
- OAuth2 (continued)
- Encryption
- Cookies / JWT
- What's next?
- Final product
Getting started
- Copy all the Discord bot values (token, application ID, oauth token, public key, etc.) place them your environment variables locally and on Vercel.
- Clone the template repository
- Either the initial one: jzxhuang/nextjs-discord-bot
- Or the one I built that already has oauth2 (but I will discuss both): clxrityy/nextjs-discord-bot-with-oauth
Alright, as much as I'd like to take credit for the whole "discord bot with nextjs" implementation, my starting point was finding this extremely useful repository that had already put an interactions endpoint & command registration script into place.
Interactions endpoint
- Set your discord bot's interactions endpoint url to
https://<VERCEL_URL>/api/interactions.
/api/interactions
- Set the the runtime to edge:
export const runtime = "edge";
- The interaction is verified to be received & responded to within the route using some logic implemented by the template creator that I haven't bothered to understand.
- The interaction data is parsed into a custom type so that it can be interacted with regardless of it's sub-command(s)/option(s) structure:
export interface InteractionData {
    id: string;
    name: string;
    options?: InteractionSubcommand<InteractionOption>[] | InteractionOption[] | InteractionSubcommandGroup<InteractionSubcommand<InteractionOption>>[];
}
The last bit of the interactions endpoint structure (that I'm not entirely proud of) is that I'm using switch cases between every command name within the route to execute an external function/handler that generates the response for that specific command. But, this could be more efficient/easier-to-read in the future
import { commands } from "@/data/commands";

const { name } = interaction.data;
// ...
switch (name) {
    case commands.ping.name:

        embed = {
             title: "Pong!",
             color: Colors.BLURPLE
        }

        return NextResponse.json({
               type: InteractionResponseType.ChannelMessageWithSource,
               data: {
                    embeds: [JSON.parse(JSON.stringify(embed))]
               }
        });
// ...
}

OAuth2
Authentication endpoint
That template had everything necessary to lift this project off the ground, use interactions, and display UI elements based on the bot's data.
However, I wanted to create another template I could use that implemented authentication with Discord so that there can be an interactive dashboard.
I will go over the whole process, but you can see in-depth everything I changed about the initial template in this pull request:
 With oauth2
#4
With oauth2
#4
- Production URL: https://nextjs-discord-bot-with-oauth.vercel.app/
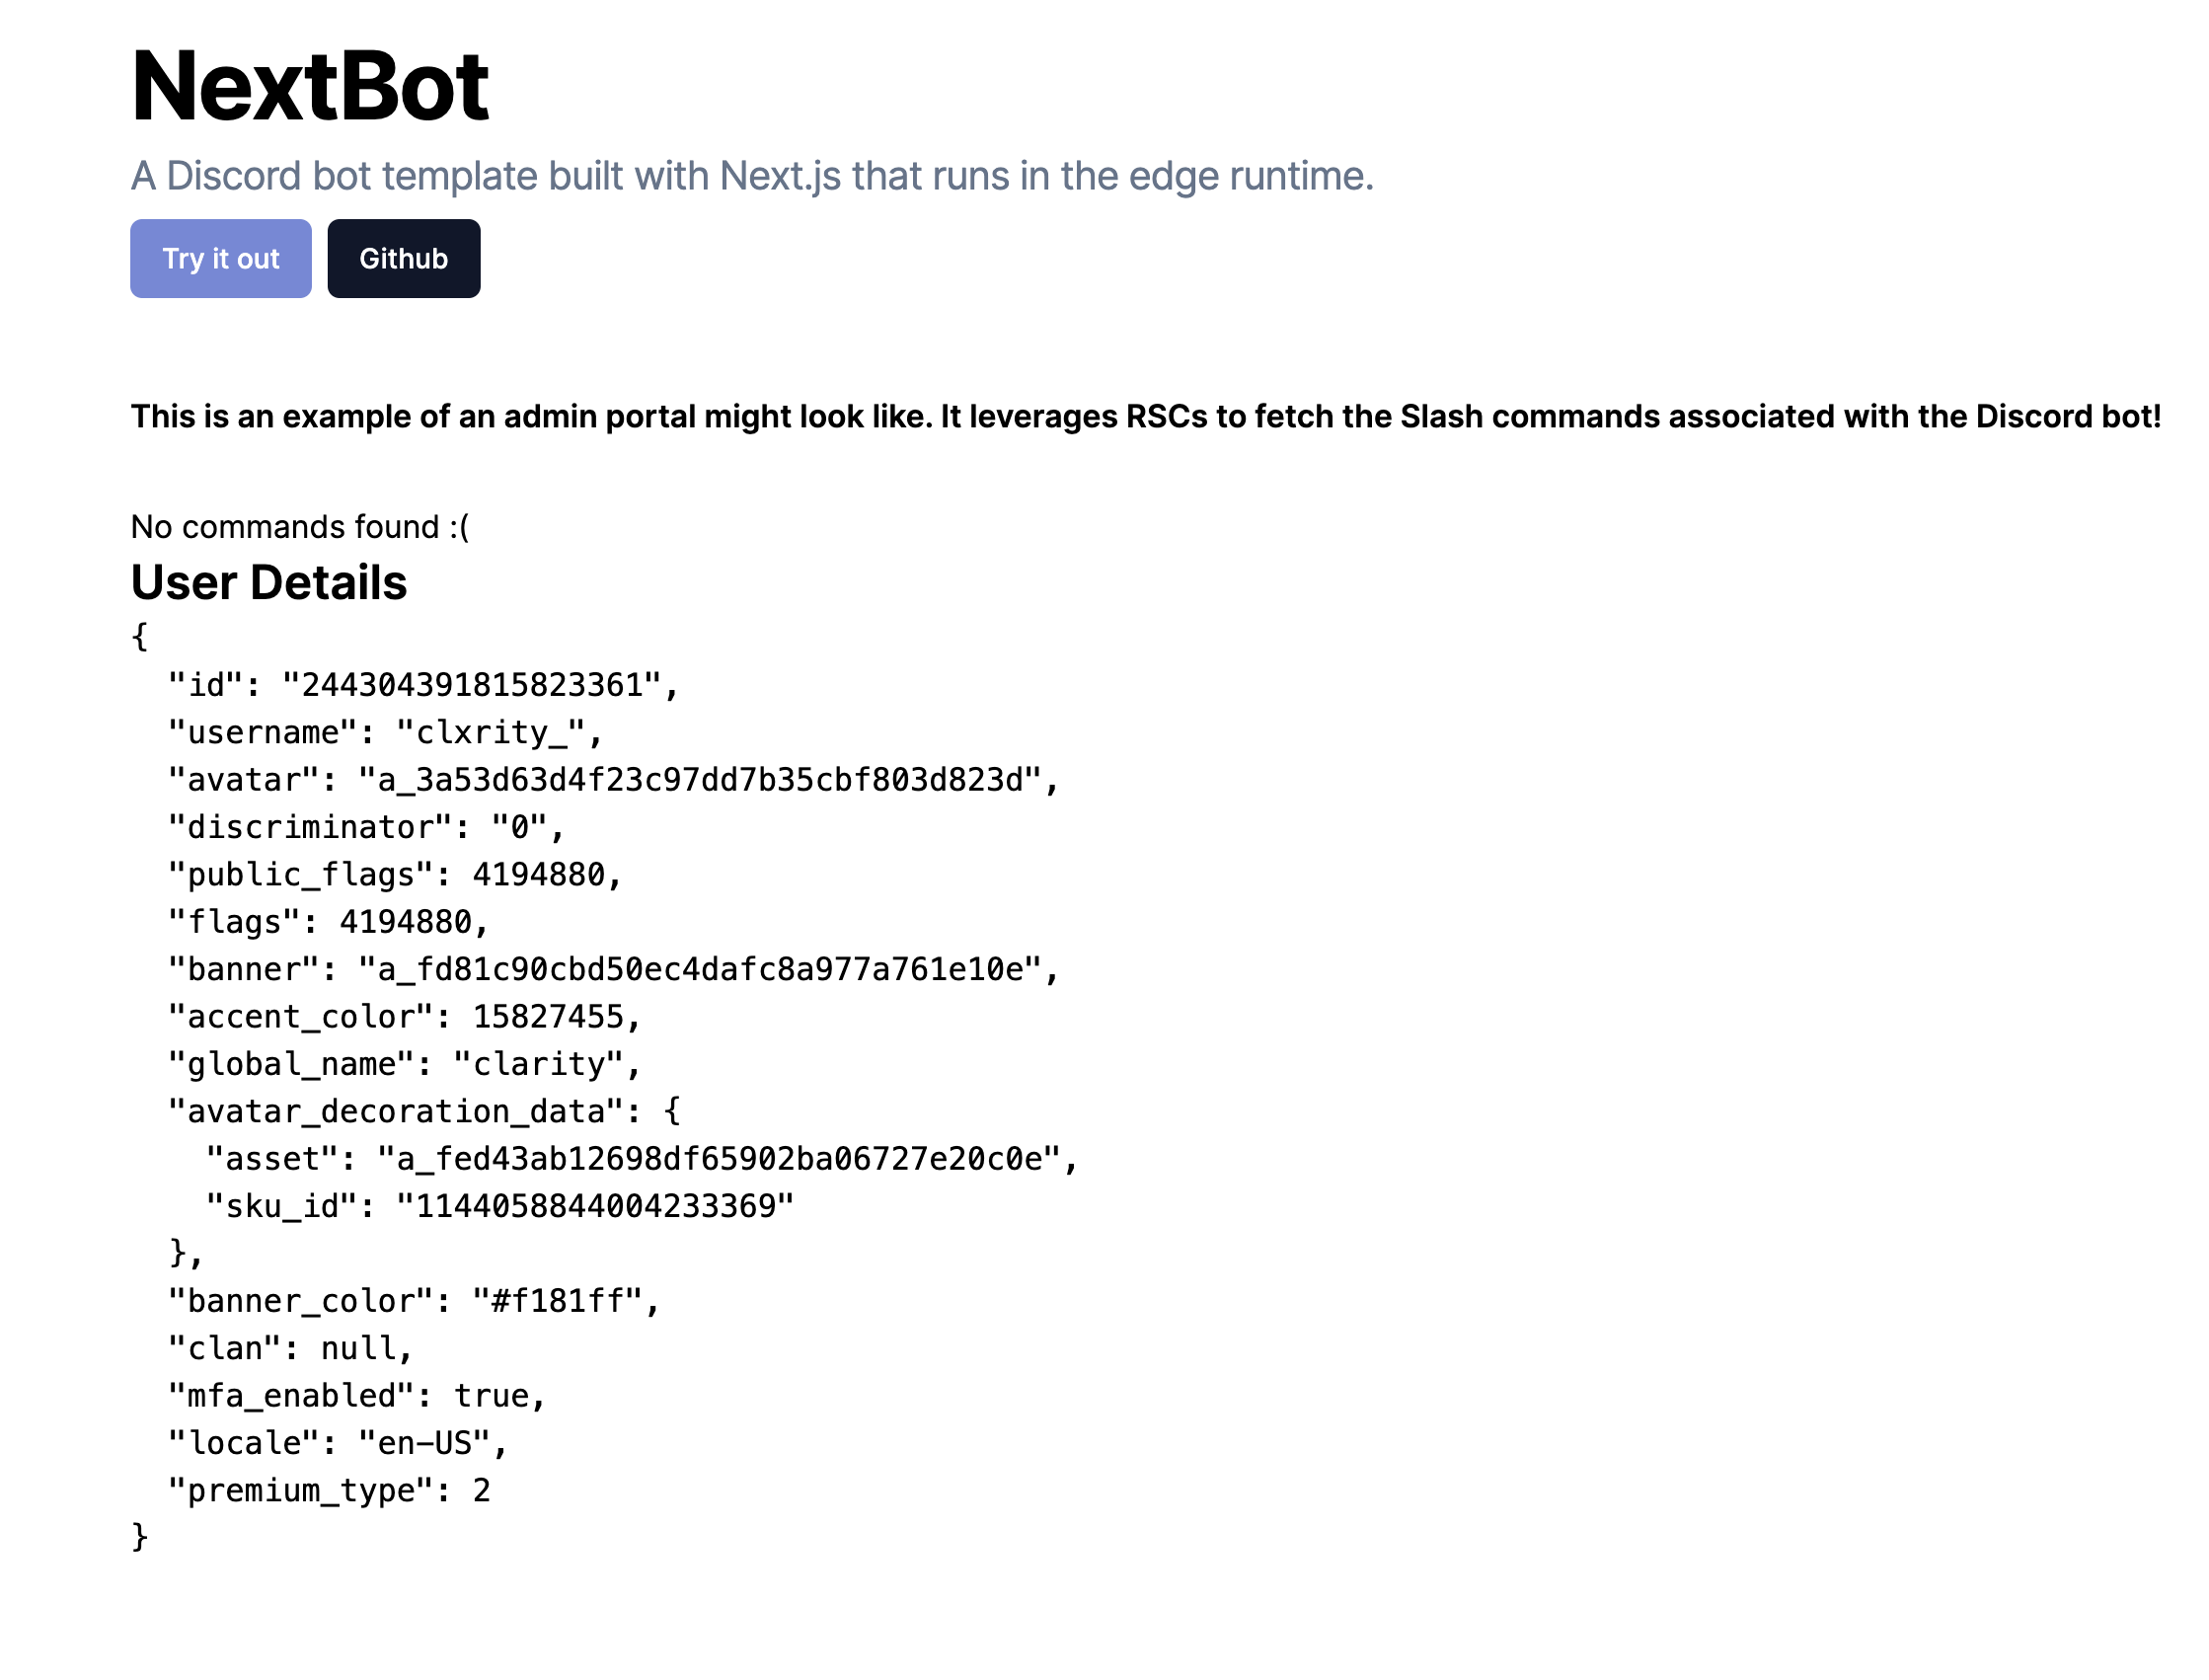
Accessing the designated root url (/) will require authentication with Discord. Upon authorizing, the user will be
redirected back to the root url (with additional user details displayed)
ex.
-
Generate your own OAuth2 redirect URI with every additional scope needed (
discord.com/applications/CLIENT_ID/oauth2)- The path should be
/api/auth/discord/redirect
- The path should be
-
Add these urls (development and production) to
config.ts:export const CONFIG = { REDIRECT_URI: process.env.NODE_ENV === "development" ? "http://localhost:3000/api/auth/discord/redirect" : "https://yourdomain.com/api/auth/discord/redirect", // REPLACE WITH YOUR DOMAIN OAUTH2_INVITE_URL: process.env.NODE_ENV === "development" ? "" : "", // (copy the generated url) ROOT_URL: process.env.NODE_ENV === "development" ? "http://localhost:3000" : "", // REPLACE WITH YOUR DOMAIN }

- After making a
POSTrequest to Discord's oauth token endpoint (discord.com/api/v10/oauth2/token)- The
access_tokenfrom the data given is used to receive the Discord user's details by making aGETrequest to thediscord.com/api/v10users/@meendpoint:export async function getUserDetails(accessToken: string) { return await axios.get<OAuth2UserResponse>(CONFIG.OAUTH2_USER, { headers: { Authorization: `Bearer ${accessToken}`, }, }) }
- The
I've implemented a prisma table which will store the encrypted access & refresh token from the user data. This can be used later, but for now has minimal impact on the application.
Prisma is used to store the User model:
model User {
  id           String @id @default(uuid())
  userId       String @unique
  accessToken  String @unique
  refreshToken String @unique
}
Create a postgres database on your vercel dashboard
- This will automatically generate the necessary environment variables for the database.
Retreive the environment variables locally:
vercel env pull .env.development.local
Generate the prisma client:
npx prisma generate
Create the table(s) in your database based on your prisma schema:
npx prisma db push
- The
buildscript withinpackage.jsonhas been altered to support the prisma database in production:"build": "prisma generate && next build"
crypto-js is used to encrypt the access_token & refresh_token before storing into the User model.
import CryptoJS from 'crypto-js';

export const encryptToken = (token: string) => CryptoJS.AES.encrypt(token, process.env.ENCRYPTION_KEY);
- Add a custom
ENCRYPTION_KEYenvironment variable (make sure to also add this to your vercel project environment variables)
jsonwebtoken & cookie are used for signing & serializing the cookie for the user session.
- Add a custom
JWT_SECRETenvironment variable (make sure to also add this to your vercel project environment variables)
import { CONFIG } from "@/config";
import { serialize } from "cookie";
import { sign } from "jsonwebtoken";
import { cookies } from "next/headers";

const token = sign(user.data, process.env.JWT_SECRET, {
    expiresIn: "24h"
});

cookies().set(CONFIG.cookieName, serialize(CONFIG.cookieName, token, {
    httpOnly: true,
    secure: process.env.NODE_ENV === "production",
    sameSite: "lax",
    path: "/"
}))
- The
.env.local.examplehas been updated to include:
# discord.com/developers/applications/APP_ID/oauth2
DISCORD_CLIENT_SECRET=

# Encryption: a custom secret key for encrypting sensitive data
# This is used to encrypt the user's Discord token in the database
# If you don't set this, the app will use a default key
ENCRYPTION_KEY=

# JWT for cookies
# This is used to sign the JWT token for the user's session
# If you don't set this, the app will use a default key
JWT_SECRET=

# Prisma / Postgres
# These are used to connect to the database
# See here: https://vercel.com/docs/storage/vercel-postgres/quickstart
POSTGRES_DATABASE=
POSTGRES_HOST=
POSTGRES_PASSWORD=
POSTGRES_PRISMA_URL=
POSTGRES_URL=
POSTGRES_URL_NON_POOLING=
POSTGRES_URL_NO_SSL=
- An additional
config.tshas been made to include necesssary authentication URLs
/api/auth/discord/redirect
- Add your redirect URI to your Discord application: (should be found at
https://discord.com/developers/applications/{APP_ID}/oauth2)-
Development -
http://localhost:3000/api/auth/discord/redirect -
Production -
https://VERCEL_URL/api/auth/discord/redirect
-
Development -
I know off the bat I'm gonna need to start implementing the database aspect of this application now; as I need a way to store user data (such as refresh tokens, user id, etc.)
... Let's take a brief intermission and talk about Prisma & Vercel Postgres
Vercel has this amazing feature, you can create a postgresql database directly through Vercel and connect it to any project(s) you want.
I'm not sponsored but I should be
Vercel Postgres
pnpm add @vercel/postgres- Install Vercel CLI
pnpm i -g vercel@latest
- Create a postgres database
- Get those environment variables loaded locally
vercel env pull .env.development.local
Prisma
- Install prisma
pnpm add -D prismapnpm add @prisma/client
-
Since I'm going to be using prisma on the edge as well, I'm going to install Prisma Accelerate
pnpm add @prisma/extension-accelerate
-
Initialize the prisma client
npx prisma init
You should now have prisma/schema.prisma in your root directory:
generator client {
  provider = "prisma-client-js"
}

datasource db {
  provider  = "postgresql"
  url       = env("POSTGRES_URL")
  directUrl = env("POSTGRES_URL_NON_POOLING")
}
Make sure
url&directUrlare set to your environment variable values
- Get your accelerate URL: console.prisma.io
src/lib/db.ts
import { PrismaClient } from "@prisma/client/edge";
import { withAccelerate } from '@prisma/extension-accelerate';

function makePrisma() {
    return new PrismaClient({
        datasources: {
            db: {
                url: process.env.ACCELERATE_URL!,
            }
        }
    }).$extends(withAccelerate());
}

const globalForPrisma = global as unknown as {
    prisma: ReturnType<typeof makePrisma>;
}

export const db = globalForPrisma.prisma ?? makePrisma();

if (process.env.NODE_ENV !== "production") {
    globalForPrisma.prisma = makePrisma();
}
Don't ask me why it's set up this way, or why this is the best way... just trust~
- Lastly, update your
package.jsonto generate the prisma client upon build.- Adding
--no-engineis recommended when using prisma accelerate.
- Adding
scripts: {
   "build": "npx prisma generate --no-engine && next build",
},
Back to OAuth2
- Create your route (mine is
api/auth/discord/redirect/route.ts)
This route is automatically going to give a code url parameter upon successful authentication with Discord (make sure the route is set as the REDIRECT_URI in your bot settings).
export async function GET(req: Request) {
    const urlParams = new URL(req.url).searchParams;

    const code = urlParams.get("code");
}
You need this code to generate an access token and a refresh token.
Access token
Consider the access token as an item (such as a token) that authorizes the client (authorized website user) to interact with the API server (being Discord in this instance) on behalf of that same user.
Refresh token
Access tokens can only be available for so long (for security purposes), and the refresh token allows users to literally refresh their access token without doing the entire log in process again.
- Set up a query string that says "hey, here's the code, can I have the access and refresh tokens"
const scope = ["identify"].join(" ");

const OAUTH_QS = new URLSearchParams({
    client_id: process.env.CLIENT_ID!,
    redirect_uri: CONFIG.URLS.REDIRECT_URI,
    response_type: "code",
    scope
}).toString();

const OAUTH_URL = `https://discord.com/api/oauth2/authorize?${OAUTH_QS}`;
- Build the OAuth2 request payload (the body of the upcoming request)
export type OAuthTokenExchangeRequestParams = {
    client_id: string;
    client_secret: string;
    grant_type: string;
    code: string;
    redirect_uri: string;
    scope: string;
}
const buildOAuth2RequestPayload = (data: OAuthTokenExchangeRequestParams) => new URLSearchParams(data).toString();

const body = buildOAuth2RequestPayload({
    client_id: process.env.CLIENT_ID!,
    client_secret: process.env.CLIENT_SECRET!,
    grant_type: "authorization_code",
    code,
    redirect_uri: CONFIG.URLS.REDIRECT_URI,
    scope
}).toString();
- Now we should be able to access the
access_tokenandrefresh_tokenby deconstructing the data from thePOSTrequest to the OAUTH_URL.
const { data } = await axios.post<OAuth2CrendialsResponse>(CONFIG.URLS.OAUTH2_TOKEN, body, {
    headers: {
        "Content-Type": "application/x-www-form-urlencoded",
    }
});
const { access_token, refresh_token } = data;
I'm gonna wanna store these as encrypted values, along with some other user data, in a User model, and set up functions to update those values.
model User {
  id           String     @id @default(uuid())
  userId       String     @unique
  accessToken  String     @unique
  refreshToken String     @unique
}
- Get the user details using the access token
export async function getUserDetails(accessToken: string) {
    return await axios.get<OAuth2UserResponse>(`https://discord.com/api/v10/users/@me`, {
        headers: {
            Authorization: `Bearer ${accessToken}`
        }
    })
};
Encryption
In order to store the access_token & refresh_token, it's good practice to encrypt those values.
I'm using crypto-js.
- Add an
ENCRYPTION_KEYenvironment variable locally and on Vercel.
import CryptoJS from 'crypto-js';

export const encryptToken = (token: string) => CryptoJS.AES.encrypt(token, process.env.ENCRYPTION_KEY!);
export const decryptToken = (encrypted: string) => CryptoJS.AES.decrypt(encrypted, process.env.ENCRYPTION_KEY!).toString(CryptoJS.enc.Utf8);
- Now you can store those values in the
Usermodel
import { db } from "@/lib/db";

await db.user.create({
    data: {
        userId,
        accessToken, // encrypted
        refreshToken, // encrypted
    }
});
Cookies / JWT
- Add a
JWT_SECRETenvironment variable locally & on Vercel.
Cookies are bits of data the website sends to the client to recount information about the user's visit.
I'm going to be using jsonwebtoken, cookie, & the cookies() (from next/headers) to manage cookies.
Within this route (if the code exists, there's no error, and user data exists) I'm going to set a cookie, as users should only be directed to this route upon authentication.
- Sign the token
import { sign } from "jsonwebtoken";

const token = sign(user.data, process.env.JWT_SECRET!, { expiresIn: "72h" });
- Set the cookie
- You can name this cookie whatever you want.
import { cookies } from "next/headers";
import { serialize } from "cookie";

cookies().set("cookie_name", serialize("cookie_name", token, {
    httpOnly: true,
    secure: process.env.NODE_ENV === "production", // secure when in production
    sameSite: "lax",
    path: "/"
}));
Then you can redirect the user to the application!
import { NextResponse } from 'next/server';
//...
return NextResponse.redirect(BASE_URL);
Check for a cookie to ensure a user is authenticated:
import { parse } from "cookie";
import { verify } from "jsonwebtoken";
import { cookies } from "next/headers";

export function parseUser(): OAuth2UserResponse | null {

    const cookie = cookies().get(CONFIG.VALUES.COOKIE_NAME);
    if (!cookie?.value) {
        return null;
    }

    const token = parse(cookie.value)[CONFIG.VALUES.COOKIE_NAME];
    if (!token) {
        return null;
    }
    try {
        const { iat, exp, ...user } = verify(token, process.env.JWT_SECRET) as OAuth2UserResponse & { iat: number, exp: number };

        return user;
    } catch (e) {
        console.log(`Error parsing user: ${e}`);
        return null;
    }
}
What's next?
With this, you have a fully authenticated Discord application with Nextjs!
Utilizing discord & user data, you can add on by...
- Add pages for guilds / user profiles
- Give guild admins the ability to alter specific guild configurations for the bot through the dashboard
- Display data about commands
- Add premium features
- Integrate stripe for paid features only available to premium users
- Leaderboards / statistics
- Guild with the most members, user who's used the most commands, etc...
The possibilities are endless, and your starting point to making something amazing is right here.
Final product
You can clone the template repository here.
- My bot (hbd) is hosted here:
hbd.mjanglin.com-> hbd.clxrity.xyz - 🔗 Invite
- Support server
- GitHub repo
- Source structure overview
Thanks for reading! Give this post a ❤️ if you found it helpful!
I'm open to comments/suggestions/ideas!

Top comments (0)