Introduction
HarperDB is a database management system that supports both SQL and NoSQL. It's fully indexed, doesn't duplicate data, and can be used on any device, from the edge to the cloud. It is a complete data collection, distribution, and analysis system that allows you to finish projects that would normally require months (or even years) of consultation, configuration, and bespoke development in days or weeks.
HarperDB offers unrivaled versatility, security, and value for nearly every use case, and it does so with a single installation that may run in the cloud, on-premise, or at the edge.
HarperDB has added a new feature known as Custom Functions, which are serverless and highly customizable API endpoints that interact with the HarperDB Core to perform insert, search_by_hash, update, and delete operations.
In this tutorial, you'll learn how to set up a HarperDB instance in a Node.js REST API.
Without much ado, let's get to get started.
What we are building
For the demonstration in this tutorial, we'll be building a Fastify REST API using the HarperDB custom functions, we'll create CRUD endpoints using the REST standard to create, read, update and delete a todo.
Setting Up HarperDB instance
To get started setting up a HarperDB project, you need to Sign up/log in here.
Once you've signed up, follow the steps below to create a HarperDB instance.
- On your HarperDB studio, click the Create New HarperDB Cloud Instance button.
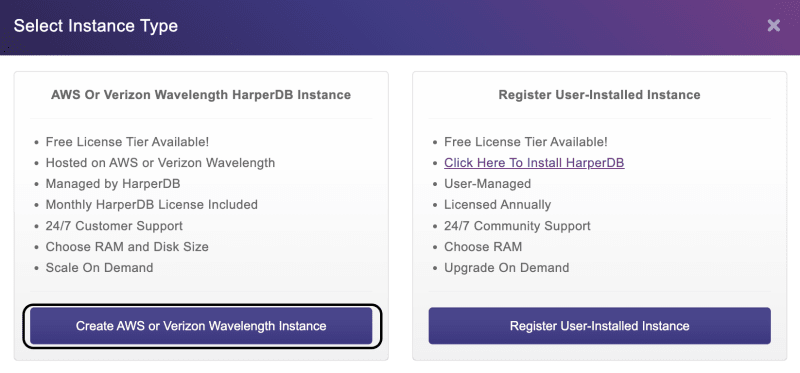
- Select the instance type. Click the AWS Or Verizon Wavelength HarperDB Instance button.
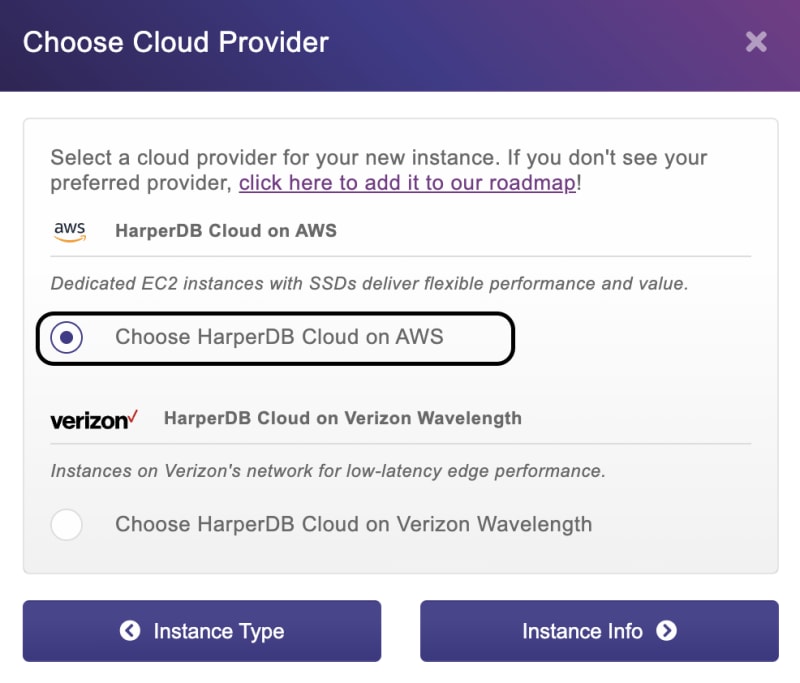
Select the cloud provider. Choose HarperDB Cloud on AWS and click the Instance Info button to add the details of your instance
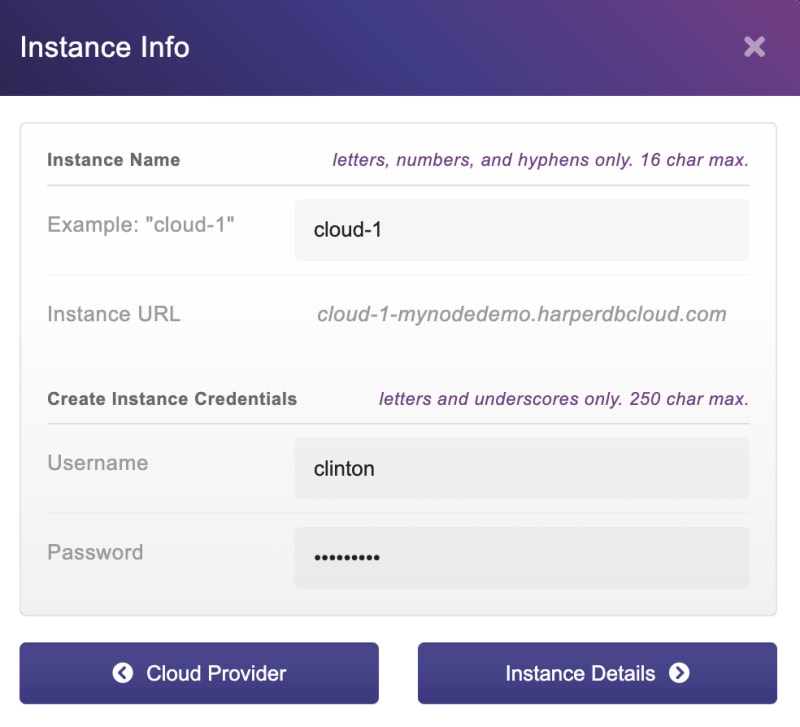
Enter the instance info and click the Instance Details button. Feel free to enter a different value from the one I have entered.
Choose the specs for your instance. If you are using the HarperDB for free, you might want to leave things the way they appear in the screenshot below.

- Confirm your instance details and agree to the terms and conditions.

Create HarperDB Schema and Table
With the HarperDB instance setup, let's quickly create a Schema and a table for our instance. Click on the HaperDB instance (cloud-1) you just created, on the left-hand side of your instance, you will see two empty fields for the schema and table. For the demonstration in this tutorial, let's name the schema todos and the table todo. Then specify the hash attribute which should be used by HarperDB to uniquely identify each data in our table. Let's name it id.

You can add more schema and tables to your instance by clicking the + button close to each input field.
Enable HarperDB custom Functions
Now let's add the HarperDB custom functions to our instance. In your instance dashboard, click on functions.

Then on the functions page, click the Enable Custom Functions button to enable custom functions for your instance.
Next, you need to give the function a name. In the input field on the left side of the function page, enter a name for the function as shown in the screenshot below.
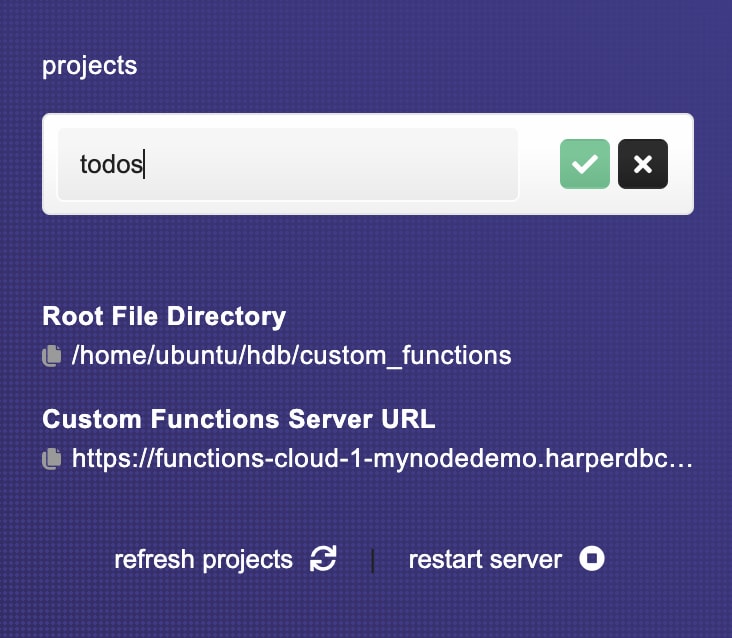
When you allow custom functions in your HarperDB instance, HaperBD will generate some sample routes and handler code and create a folder for the custom functions on your computer. So you can choose to modify your functions from your computer using your favorite text editor or use the online editor. Also, HaperDB generates a Server URL to enable you to test your functions before deploying them.
When you make changes on the project locally, ensure your refresh the project.
Create Custom Functions
With custom functions enabled in your project. Let's go ahead and create the CRUD endpoints.
Get All Todo Route
We'll start with the GET route to read all the todos in our todo table.
Open the /todos/routes/example.js file and update the get route with the code snippet below:
...
 server.route({
    url: '/',
    method: 'GET',
    handler: (request) => {
      request.body = {
        operation: 'sql',
        sql: 'SELECT * FROM todos.todo'
      };
      return hdbCore.requestWithoutAuthentication(request);
    }
  });
  ...
The above code snippet is a Fastify route that will listen to a GET request to execute the SQL statement to get all the todos in the todo table.
Create Todo Route
Now, let's modify the POST route by adding a SQL statement to create a new todo.
 server.route({
    url: '/',
    method: 'POST',
    //preValidation: hdbCore.preValidation,
    handler: (request) => {
      request.body = {
        operation: 'sql',
        sql: `INSERT INTO todos.todo (name,completed) VALUES('${request.body.name}','${request.body.completed}')`
      };
      return hdbCore.requestWithoutAuthentication(request);
    },
  });
Here we commented on the preValidation function that checks if the user creating the todo is authorized. But since this is a demo project we won't be needing any form of authentication to create a todo.
GET a Todo Route
We also need to do some modifications on the GET /:id route to get a todo with id in the request parameter.
server.route({
    url: '/:id',
    method: 'GET',
    //preValidation: (request) => customValidation(request, logger),
    handler: (request) => {
      request.body = {
        operation: 'sql',
        sql: `SELECT * FROM todos.todo WHERE id = '${request.params.id}'`
      };

      /*
       * requestWithoutAuthentication bypasses the standard HarperDB authentication.
       * YOU MUST ADD YOUR OWN preValidation method above, or this method will be available to anyone.
       */
      return hdbCore.requestWithoutAuthentication(request);
    }
  });
Update Todo Route
We don't have this route created by default, so let's have it created with the code snippet below:
server.route({
    url: '/:id',
    method: 'PATCH',
    //preValidation: (request) => customValidation(request, logger),
    handler: (request) => {
      request.body = {
        operation: 'sql',
        sql: `UPDATE todos.todo SET completed = true WHERE id = '${request.params.id}'`
      };

      /*
       * requestWithoutAuthentication bypasses the standard HarperDB authentication.
       * YOU MUST ADD YOUR OWN preValidation method above, or this method will be available to anyone.
       */
      return hdbCore.requestWithoutAuthentication(request);
    }
  });
Here we are using a PATCH request since we are only changing the status of a todo. Then we execute the UPDATE SQL statement to modify the content of the todo whose id was specified in the request params.
Delete a Todo Route
Finally, let's create another route that deletes a todo from the todo table with the code snippet below:
server.route({
    url: '/:id',
    method: 'DELETE',
    //preValidation: (request) => customValidation(request, logger),
    handler: (request) => {
      request.body = {
        operation: 'sql',
        sql: `DELETE from todos.todo WHERE id = '${request.params.id}'`
      };

      /*
       * requestWithoutAuthentication bypasses the standard HarperDB authentication.
       * YOU MUST ADD YOUR OWN preValidation method above, or this method will be available to anyone.
       */
      return hdbCore.requestWithoutAuthentication(request);
    }
  });
Test Functions
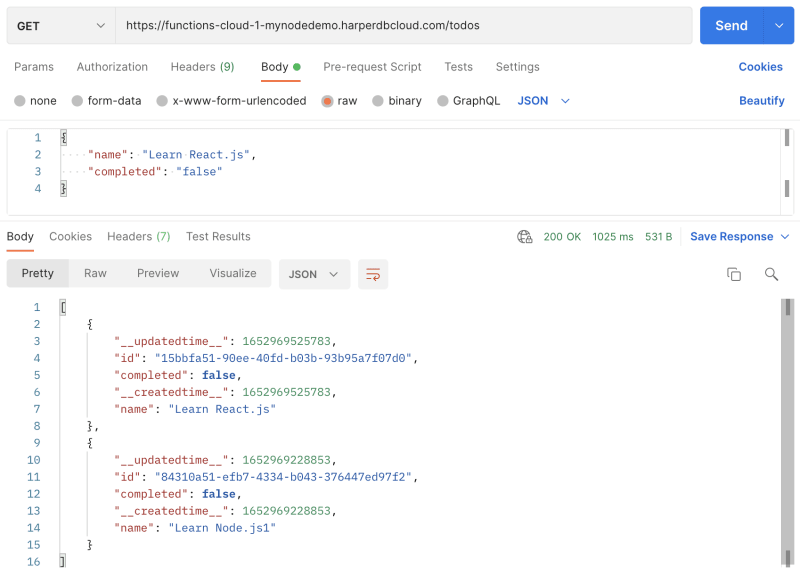
You have successfully created all your function endpoints. Go ahead and test it out using the Server URL in your functions page with any API testing tool like Postman.
Let's start with the create endpoint.

Then test the read endpoint.
Feel free to test the other endpoints like the get a todo, update, and delete endpoints.
Conclusion
Throughout this tutorial, you've learned how to set up a HarperDB Instance in a Node.js REST API. You started from the introduction of HarperDB, then we built a todo API for the demonstration. Now that you've gotten the knowledge you seek, how would you use HarperDB in your next project? Perhaps you can learn more about HarperDB from the official documentation.

Top comments (0)