Cross Posted: https://www.codewall.co.uk/how-to-remove-unused-css-from-your-website/
A cascading style sheet can gradually build up into a bulky file over time. And in most cases, over time, you’ve added lots of new CSS and stopped using some classes that were there before.
This means two things, your CSS file is messy, and it’s unnecessarily bigger. A bigger CSS file indicates more significant download times, and we don’t want that if it’s not necessary!
Of course, this isn’t the only scenario to why you may have a larger CSS file, and it could be that you’ve used a pre-built theme and stripped it down a bit. But how do you know what’s required still and whats not? Unless you were super-careful and stripped out each class as you edited the theme.
In this article, you will see how we reduced CodeWall’s CSS file size by a considerable ratio.
So, to recap, who is this article for?
- Developers who have downloaded a theme but only need some parts of it
- Developers who have downloaded a theme and have customized it considerably
- Developers who have been working on a website for a while and want to get rid of old fluff
- Developers who, like myself, want to speed up their website in general
If any of the points above is why your reading, then stay tuned!
In this article, the blog (CodeWall.co.uk) will be the guinea pig, as the CSS file currently stands at a size of 19.2kb. I know it’s not super huge, and there will undoubtedly be bigger ones out there, but the concept of this activity can go a long way in most cases.
Let’s begin
There are already tools available for use with getting rid of old, unused CSS, so I will be utilizing one of them in this tutorial, namely PurifyCSS.
Prerequisites
- If you haven’t already got it, you will need to install Node, as this will be used to execute our code. Download and install Node here which will include the package manager NPM.
- You will also need a text editor, and if you haven’t got one, I strongly recommend using Visual Studio Code.
Understanding how PurifyCSS works
PurifyCSS works by grabbing all HTML files specified for process comparison against any given CSS file. So, the important thing here is not to miss that you most likely can’t just supply your index.html file. This is because you will probably have different HTML and classes on through a range of templates on your website.
For example, In the case of CodeWall, the following pages are slightly different so they will need to be included.
- Homepage
- Category Page
- Contact Page
- Newsletter Page
- Standard Page
This list of files will then vet against one or more CSS files supplied, like style.css and custom.css. In your case, this will probably be different, so try to think of which pages on your website are using the same layouts and which are not. The more unique pages will need to have their source code compared to the CSS file. Otherwise, you will wind up losing CSS that is required.
Heres a diagram of how it works on the virtual level –
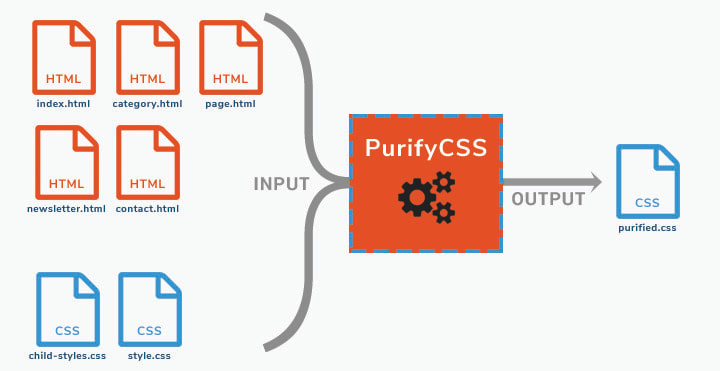
How PurifyCSS Works
Installing PurifyCSS
Once you have Node installed, you will have access to its package manager, NPM. PurifyCSS has a ready NPM Package for installation, and you can install it by running the following command in your terminal at the root directory of your project folder –
npm i -D purify-css
Prepping our files
So, for the purifier to work, we need some input in the form of HTML source code also with some CSS source code, which could be of multiple instances. In our case, the main bulk of our CSS is in the style.css file, which comes with the WordPress theme we use.
In your root directory, you will need to create an HTML file for each HTML layout you want to process, in our case, it will be of the following templates –
- Homepage
- Category
- Contact
- Newsletter
- Page
- Post
Once you’ve created the template files to match your site, directly navigate to the actual working template pages of your website, view the source, copy and paste it into the new files you created in your root directory.
Then to create a .css file or a few if you have more you want to process, in this example, we re-created a style.css file and copied our full live style.css file contents into it.
So our root directory for the purify tool looks like this –
- node_modules/
- category.html
- contact.html
- index.html
- newsletter.html
- page.html
- post.html
- style.css
Creating the JS Purifier Script
Now go ahead and create a new .js file in the root directory, something like purifyMyCSS.js
Add the following JS to the file –
    const purify = require("purify-css")


    let content = ['*.html']; // Glob pattern to ref all HTML files from root directory.

    let css = ['*.css']; // Glob pattern to ref all CSS files from root directory.

    let options = {
        // Will write purified CSS to this file.
        output: 'purified.css', // Output file name
        minified: true, // Minify boolean
        info: true // Output information on how much reduction was achieved
    };

    purify(content, css, options, function (purifiedAndMinifiedResult) {
        console.log(purifiedAndMinifiedResult);
    });
The above code is all is needed to initiate the CSS purifying magic. All is left to do now is run the file via node.
Purifying
With all the points followed in this article, you are now prepared to drop all your unused CSS. So let’s do it.
Run the following command in a terminal at the root directory level –
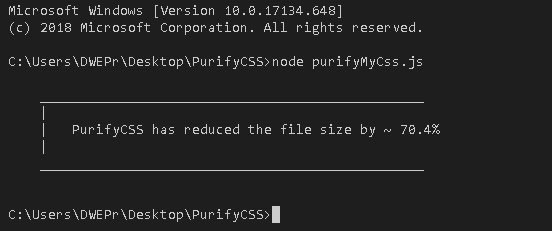
node purifyMyCss.js
And boom, you should get an output similar to the following –
Now, you will have a new file in your root directory, named purified.css, and all the unwanted fluff will have vanished. All that is left to do is copy and paste the contents of the purified.css file over your live CSS file, result!
References
Summary
PurifyCSS helped shed 13kb from our CSS file, which was a 70% reduction. That CSS was completely unused and unnecessary. As I mentioned before, this doesn’t seem like much but imagine if your CSS file started at 200kb, 70% stripped from that is a great deal! PurifyCSS isn’t the only tool JS plugin out there, but it’s certainly a pleasure to use.
If you have a single page website, then there is an online tool available for just this use case. Check out https://uncss-online.com/, which allows you to paste HTML contents in one input and CSS in the other. Hit the button, and your stripped CSS will be appended to an output box!
Until next time!

Oldest comments (1)
Great Post! How does this work against css that are in the css file targeting different screen sizes? E.g. Will it consider those only for smaller screen sizes and keep those or delete it?