In this article, I will provide an overview of Microsoft Azure, Azure Functions, and Cosmos DB, along with a tutorial on how to create an Azure Function that is triggered by HTTP and utilizes Cosmos DB as an input binding.
What is Microsoft Azure?
Microsoft Azure is a, "cloud computing service created by Microsoft for building, testing, deploying, and managing applications and services through Microsoft-managed data centers." It provides users with the ability to scale their infrastructure and applications to a global level, increase security, and improve productivity. A user's experience on Azure can be customized in a way that best fits their needs.
What is Azure Functions?
Azure Functions is Microsoft's take on Functions as a Service. Google's FaaS offering is known as Google Cloud Functions and Amazon's is known as Lambda Functions. Azure Functions allows developers to create stateless, event-driven applications, that can take advantage of all the benefits cloud has to offer. They can be triggered in several ways such as by HTTP, timer, or whenever a change occurs within Cosmos DB. Azure Functions also helps developers create applications faster through the use of input and output bindings. Bindings provide a mechanism for attaching additional resources to a function. More detailed information on bindings can be found here
What is Cosmos DB?
Cosmos DB is "Microsoft's globally distributed, multi-model database service." It provides high availability, and the ability to scale throughput and storage across multiple regions. It features extremely low latency, and supports SQL and NoSQL APIs.
Creating an HTTP Triggered Azure Function that Utilizes Cosmos DB as an Input Binding
I'm creating this tutorial with the assumption that you have already created a Microsoft Azure account. If not, you can click here to sign up for a free account that provides you with $200 in credits for 30 days.
Creating Entries in Cosmos DB
First, navigate to the Azure Portal and click Azure Cosmos DB located under the Favorites tab on the left hand side of the screen.
Click Add to create a new Cosmos DB account
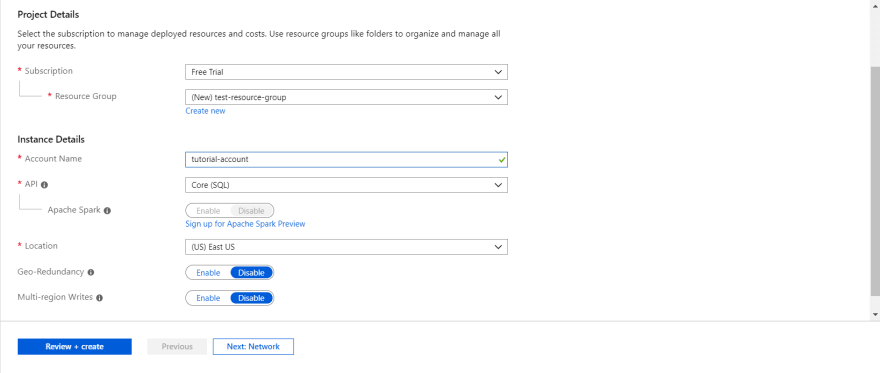
Now we can specify the details for our account. First specify a resource group name. I decided to name mine test-resource-group. Next provide an account name. I chose to name my account tutorial-account. Finally, select a location that works best for you. Once that is complete, select Review + Create. Then click Create on the next screen. Now we will have to wait for a few minutes for our Cosmos DB deployment to be created.
Navigate back to the Cosmos DB page, and we should be able to see our newly created account
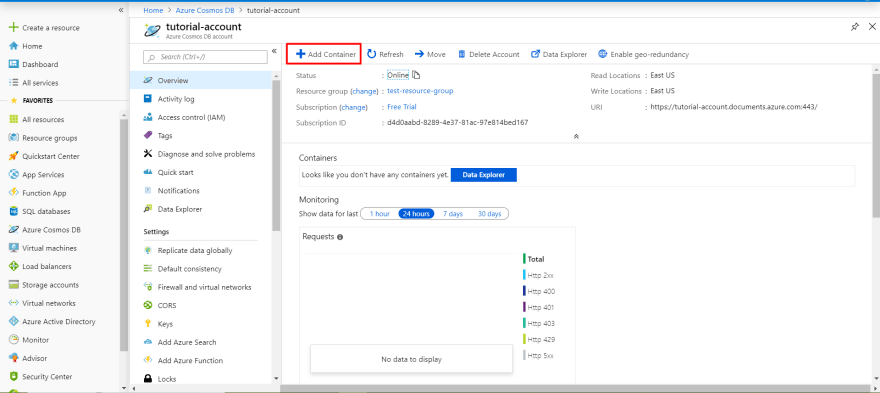
Click Overview and Add Container
Specify a Database id, Container id, a Partition Key, and then select OK. I set my Database id to be tutorial-db, my Container id to be tutorial-container, and my Partition Key to be /facts
From here, we can access our new database. Select tutorial-db, then tutorial-container, then Items. Finally, click New Item.
We now should be at a page that looks like this
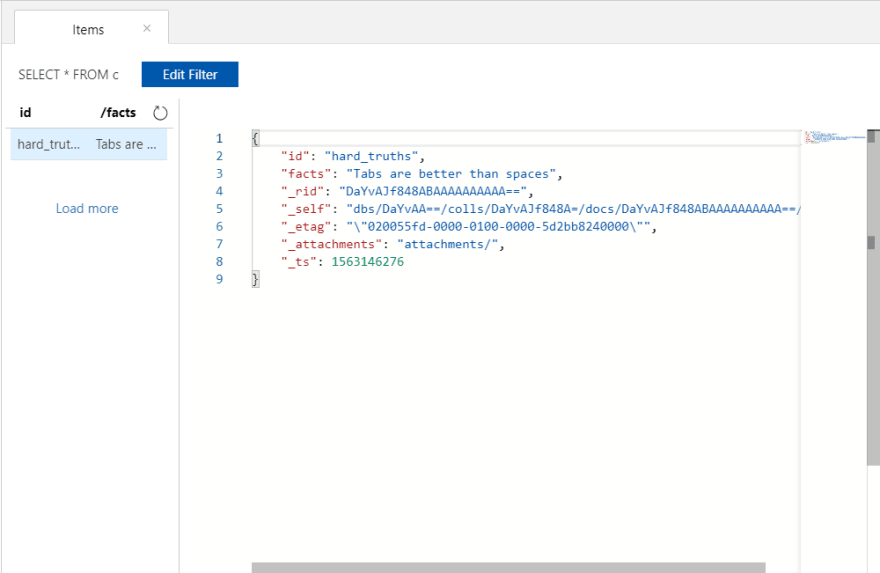
Now we can create the JSON files that we will use. In our first file, we will set the id to be hard_truths and create a new key called facts with a value of: Tabs are better than spaces. Then click Save. (Additional key-value pairs will be added, but they will be different for everyone and can be ignored.) Our first file should look like this
Create a second JSON file with an id of colors and a key called facts with a value of: Red, Blue, and Green are colors. The second file should look like this
Creating an Azure Function
Now navigate to the Function App page by clicking Function App in the left hand side menu
Click Add to begin configuring our new Function App
Create an App Name, Location, and Runtime Stack. I named my App factsmachine, set my Location as East US, and selected NodeJS as my Runtime Stack. Select Create and wait for a few minutes while your Function App is deployed. Note: App names must be unique!
Navigate to the new Function App and select New Function
We'll now follow the New Function Quickstart. Select In Portal for the development environment
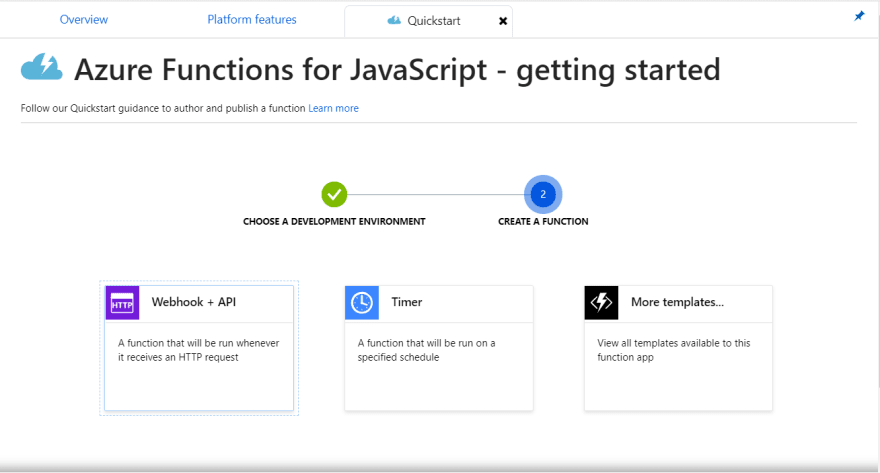
Select Webhook + API for Create a Function and click create.
A new function with the name HttpTrigger1 is created and contains the following code
Integrating Cosmos DB with Azure Functions
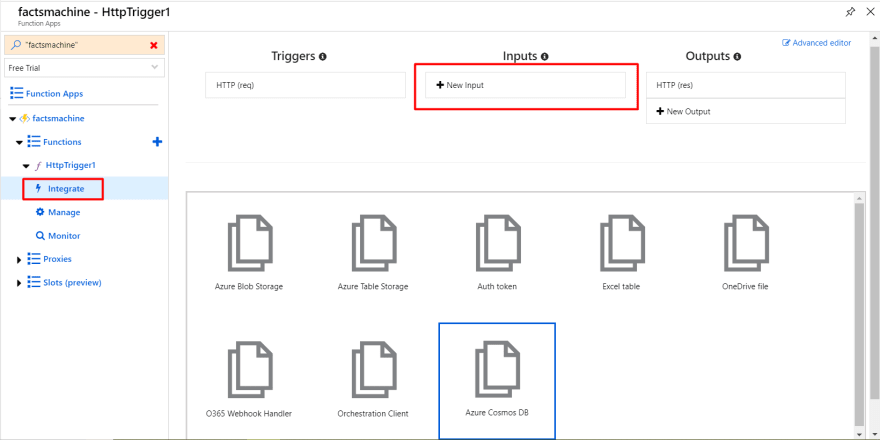
Select Integrate, then select New Input and select Azure Cosmos DB Click Select and Install the Azure Cosmos DB dependencies if they aren't already installed.
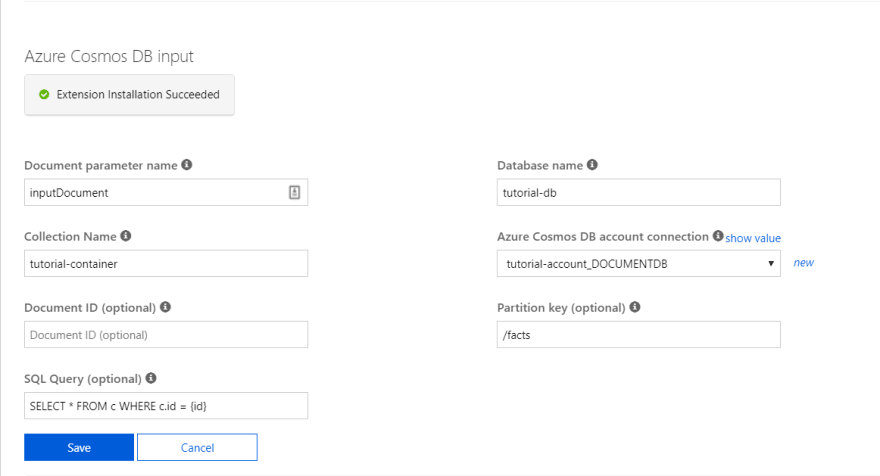
To configure Cosmos DB as our input binding, we need to first specify a document parameter name. By default it's inputDocument. Next we specify the Collection Name. This corresponds to the name of the container we created for our Cosmos DB file entires which is tutorial-container. We now need to set our SQL Query. This will allow us to filter the files in our database by id. When we run our function, we will provide the id as an HTTP request parameter. Our SQL Query will be SELECT * FROM c WHERE c.id = {id} Our Database name will be tutorial-db and we can specify our Azure Cosmos DB account collection by clicking new and selecting our database from the dropdown list in the popup. Finally, we specify our Partition Key to be /facts Then click Save
Navigate back to the index.js file for our function and edit the code to be
We access the document stored in Cosmos DB by using context.bindings.{document parameter name}. Since the information we care about is the value of the facts key, we use context.bindings.inputDocument[0].facts to get this information.
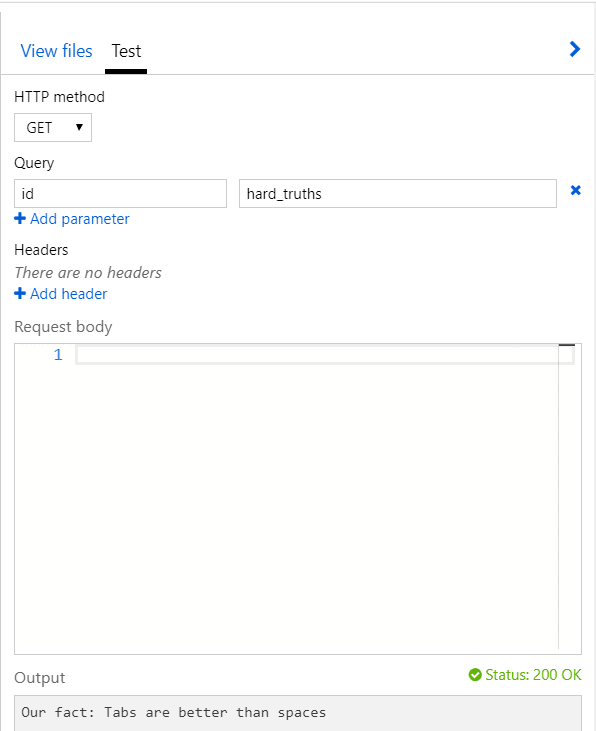
Now we can finally test our function! Click Test on the right hand side of the screen and open the Test tab.
Our HTTP method is GET our Query parameter is id with a value of hard_truths. Click Save and run and we can see that our output is: Our fact: Tabs are better than spaces
If we change our id value to be colors we can see that our output changes to Our fact: Red, Blue and Green are colors
Congratulations!
That's it! You've now created an instance of Cosmos DB with two JSON files, and you've created an Azure Function that's triggered by an HTTP request that can get a file from Cosmos DB by an id parameter that's provided in the HTTP request!











Latest comments (0)