Progressive Web Apps (PWAs) are revolutionizing how web applications are built and delivered. If you’re running a Laravel app and want to give it the power of offline access, installability, and mobile-native experience — you’re in the right place!
In this step-by-step tutorial, we’ll show you how to convert any Laravel application into a fully-functional PWA in just 5 minutes using the eramitgupta/laravel-pwa package.
🧠 What is a PWA?
A Progressive Web App (PWA) is a web application that:
- Works offline
- Loads instantly
- Can be added to your home screen
- Feels like a native mobile app
PWAs combine the best of web and mobile applications — and Laravel makes it super easy to integrate.
🧰 Requirements
- Laravel 8, 9, 10, 11, or 12
- HTTPS (required for service workers)
- PHP 8.0+
- Composer
📦 Step 1: Install the Laravel PWA Package
In your Laravel project root, run:
composer require erag/laravel-pwa
This installs the official eramitgupta/laravel-pwa package.
⚙️ Step 2: Publish the Configuration Files
Now publish the configuration and asset files:
php artisan erag:install-pwa
This creates:
-
config/pwa.php– the main configuration -
public/manifest.json– the manifest file - Service worker files in
public/
🧾 Step 3: Configure Your PWA Manifest
Open config/pwa.php and customize it as per your app:
return [
    'install-button' => true,

    'manifest' => [
        'name' => 'My Laravel App',
        'short_name' => 'MyApp',
        'background_color' => '#ffffff',
        'theme_color' => '#3f51b5',
        'display' => 'standalone',
        'description' => 'A Laravel-based Progressive Web App',
        'icons' => [
            [
                'src' => 'logo.png',
                'sizes' => '512x512',
                'type' => 'image/png',
            ],
        ],
    ],

    'debug' => env('APP_DEBUG', false),
];
After updating, regenerate the manifest file:
php artisan erag:update-manifest
🧩 Step 4: Add PWA Blade Directives
Open your resources/views/layouts/app.blade.php (or any base layout) and insert these:
In <head> section:
@PwaHead
Before </body>:
@RegisterServiceWorkerScript
These will handle PWA meta tags and service worker registration automatically.
🖼️ Step 5: Upload a Custom PWA Logo (Optional)
Want to update your PWA logo from the dashboard?
- Create an upload form:
<form method="POST" action="{{ route('upload.logo') }}" enctype="multipart/form-data">
    @csrf
    <input type="file" name="logo" accept=".png" required>
    <button type="submit">Upload</button>
</form>
- Add this controller method:
use EragLaravelPwa\Core\PWA;
use Illuminate\Http\Request;

public function uploadLogo(Request $request)
{
    $response = PWA::processLogo($request);
    return $response['status']
        ? back()->with('success', $response['message'])
        : back()->withErrors($response['errors'] ?? ['Upload failed.']);
}
The uploaded logo replaces the existing public/logo.png.
🔍 Step 6: Test Your PWA
- Deploy your site over HTTPS (required).
- Open it on mobile or desktop (Chrome).
- You’ll see an “Install App” prompt.
✅ Congrats! Your Laravel app is now PWA-ready!
⚡ PWA with Vue.js or React.js (Vite + SPA)
If your frontend is Vue or React, no problem:
- Make sure your Blade layout includes
@PwaHeadand@RegisterServiceWorkerScript. - The PWA functionality will wrap your SPA correctly, handling the offline mode and install behavior as expected.
📸 Screenshots
| App Install Prompt | Offline Page |
|---|---|
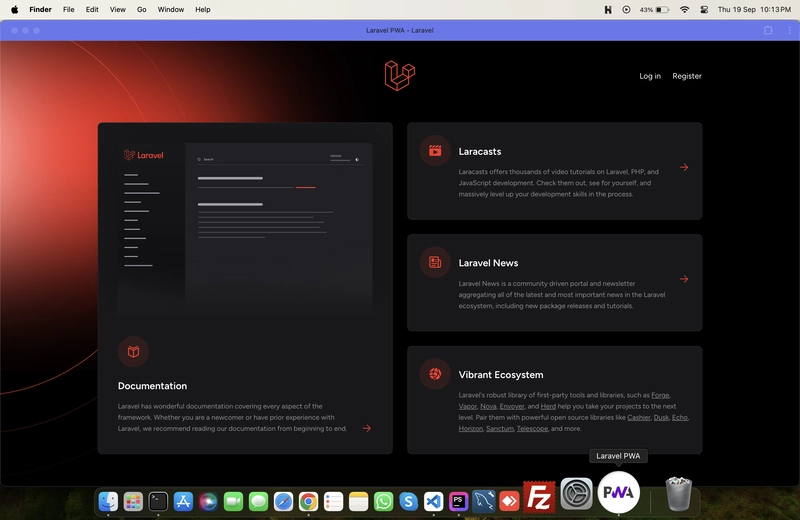 |
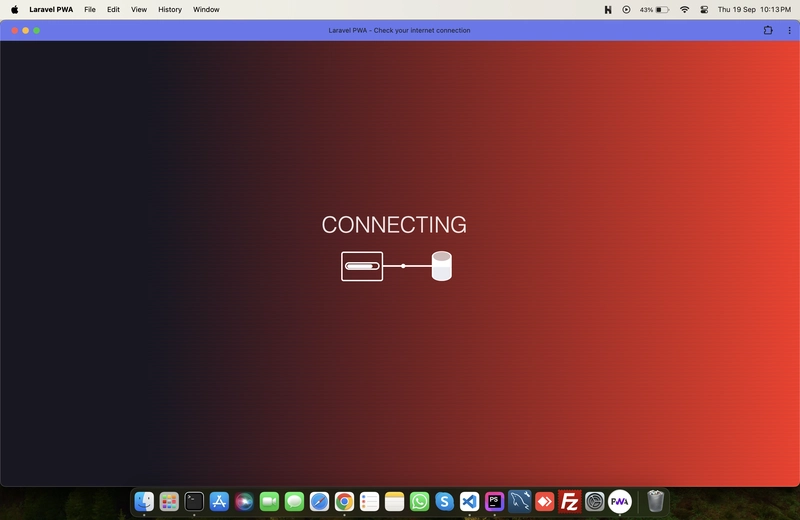 |
✅ Summary
| Step | Description |
|---|---|
| 1. | Install the package |
| 2. | Publish config and manifest |
| 3. | Customize config/pwa.php
|
| 4. | Use Blade directives |
| 5. | Upload a logo (optional) |
| 6. | Test the app |
💡 Pro Tips
- Always test on HTTPS (use Laravel Valet or services like Ngrok during local testing).
- Use Lighthouse Chrome DevTool to check PWA score.
- Don’t forget to update cache versions if you change service worker files.
- Laravel PWA setup
- Laravel PWA with Vue.js
- Make Laravel app installable
- Progressive Web App in Laravel
- Laravel PWA package guide

Top comments (1)
Good one, can this handle notifications.