Introduction
We now rely heavily on mobile applications in our daily lives. Mobile decentralised applications (dApps) have grown in popularity since the introduction of blockchain technology. A mobile-first strategy is offered by Celo, a blockchain platform that promises to make financial tools available to everyone. In this tutorial, we'll develop a Celo mobile dApp using React Native, Expo, and Hardhat.
Overview
In this tutorial, you will learn how to build a mobile dApp using React Native with Expo and Hardhat, and how to deploy a smart contract to the Celo blockchain network. The tutorial will cover the following steps:
Install Expo and create a new React Native project (bootstrapped from celo composer) to set up the development environment.
Install the necessary dependencies, such as Hardhat and the Celo SDK.
Using Hardhat, create a straightforward smart contract and publish it to the Celo network.Build a basic React Native app that interacts with the deployed smart contract to display the user's token balance and play the lottery.
Test the mobile dApp using Expo.
Prerequisite
Before we dive into building the Celo mobile dApp, here are some prerequisites that you should be familiar with:
Basic knowledge of React Native and Solidity programming languages.
Install the latest version of Node.js and npm on your computer.
Install Hardhat, You can install it globally by running
npm install -g hardhat.Install the Celo CLI, You can install it globally by running
npm install -g @celo/cli.Install Expo CLI, You can install it globally by running npm
install -g expo-cli.An understanding of the Celo blockchain network and the Celo SDK. You can find more information in the Celo documentation.
Step 1: Initialise your project using Celo CLI
Open up your terminal inside a directory of your choice create the project using
npx @celo/celo-composer@latest createFollow up the prompt in the image below:

Step 2: Writing the Lottery smart contract
- cd into the newly created project, navigate to hardhat:
cd celo-mobile-lottery
cd packages
cd hardhat
- Open the folder in your preferred code editor, open the contracts folder and create a solidity file name it Lottery.sol paste the code below in it.
//SPDX-License-Identifier: Unlicense
pragma solidity ^0.8.0;


contract Lottery {
    address public manager;
    uint256 public ticketPrice;
    bool public isOpened;
    address public winner;

    address[] public players;

    constructor () {
        manager = msg.sender;
        ticketPrice = 1 ether;
        isOpened = true;
    }

    function playLottery() public payable returns(bool) {
        require(msg.value == ticketPrice, "Invalid Bet Price");
        players.push(msg.sender);
        return true;

    }
    function getRandomNumber() internal view returns(uint256 randomNumber) {
        randomNumber = block.timestamp;
    }
    function openLottery() public  returns(bool) {
        isOpened = true;
        return isOpened;
    }
    function CloseLottery() public returns(bool){
        require(isOpened == true, "Already closed!");
         uint256 winnerIndex = getRandomNumber() % players.length;
         address lotteryWinner = players[winnerIndex];
         winner = lotteryWinner;
         uint256 pool = address(this).balance;
        payable(lotteryWinner).transfer(pool);
        isOpened = false;
        return true;


    }
    function getNumberOfPlayers() public view returns(uint){
        return players.length;
    }

   function getLotteryBalance() public view returns(uint256) {
       return address(this).balance;
   }

}
Here’s an overview of what’s happening in the code above :
Contract:
- The contract represents a lottery system where users can place bets and a winner is selected randomly.
The state variables:
- manager: Stores the address of the contract manager or the address that deploys the contract.
- ticketPrice: Represents the price of a single ticket in ether(cUSD).
- isOpened: Indicates whether the lottery is currently open for participation.
- winner: Stores the address of the winner of the lottery.
- players: An array that keeps track of all the participants in the lottery. Constructor:
- The constructor function is executed when the contract is deployed.
- It initializes the manager variable with the address of the contract deployer.
- Sets the ticketPrice to 1 ether.
- Sets the isOpened variable to true.
The Functions () :
The playLottery() function allows users to participate in the lottery by sending the required ticket price in Ether. The getRandomNumber() function generates a random number based on the current timestamp. The openLottery() function opens the lottery for participation. The CloseLottery() function closes the lottery, selects a random winner, transfers the contract balance to the winner, and marks the lottery as closed. The getNumberOfPlayers() function returns the number of participants in the lottery. The getLotteryBalance() function retrieves the current balance of the lottery contract. These functions collectively facilitate the operation of the lottery system, including ticket purchase, winner selection, and retrieving relevant information such as the number of participants and the contract balance.
Step 3: Deploy the smart contract on celo
Create a .env file in the hardhat root directory, get your private key from your metamask wallet.
Declare a variable PRIVATE_KEY and initialise it with the private key gotten from your metamask wallet.
NB: Before you proceed make sure to get some Alfajores Testnet in your metamask from the Celo Testnet Faucets. To connect your metamask to the testnet you can check Here.Open your terminal in the hardhat directory compile the lottery contract using
npx hardhat compile.To deploy the contract to the alfajores Celo Testnet :
npx hardhat deploy --network alfajores
Expected Output:
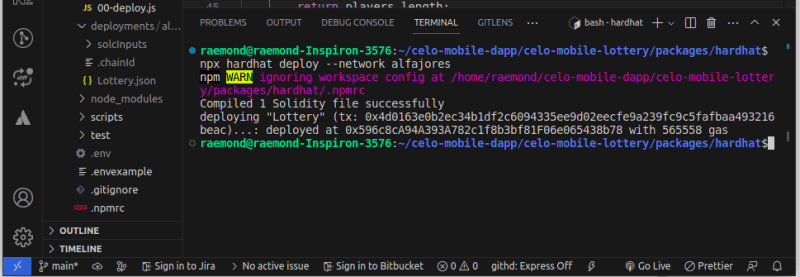
Welldone! we have our lottery contract deployed on the celo testnet.From your file structure you'd notice there is a deployments folder created after we deployed our contract, navigate to the folder deployments/alfajores/ then copy the the Lottery.json file. Go back to the root directory of our project (outside the hardhat folder).
Enter the react-native folder, create a folder contracts and paste our copied file there.
Step 4: Editing the lottery User interface
- Within the react-native folder, go to screens and rename the Docs.tsx file to Home.tsx and replace the code with the code below:
import { SafeAreaView } from "react-native-safe-area-context";
import Container from "../components/Container";
import { H1, H2, H3, H4, H5, H6 } from "../components/Headings";
import MonoText from "../components/MonoText";
import { Text, View } from "../components/Themed";
import Colors from "../constants/Colors";
import { Button } from "react-native";
import * as LotteryContract from "../contracts/Lottery.json"
import { useWalletConnect } from "@walletconnect/react-native-dapp";
import { useEffect, useState } from "react";
import Web3 from "web3";

const web3 = new Web3("https://alfajores-forno.celo-testnet.org");

const Home = () => {

    const abi = LotteryContract.abi;
    const lotteryAddress = LotteryContract.address;

    const connector = useWalletConnect();
    const [lotteryPool, setLotteryPool] = useState('');
    const [winner, setWinner] = useState("Naan");
    const [lotteryBets, setLotteryBets] = useState('');
    const [lotteryStatus, setLotteryStatus] = useState(true);
    const contract = LotteryContract
    ? new web3.eth.Contract(abi, lotteryAddress)
    : null;

    const placeBets = async () => {

        try {
            let txData = await contract?.methods
                .playLottery()
                .encodeABI();

            await connector.sendTransaction({
                from: connector.accounts[0],
                to: lotteryAddress,
                data: txData,
                value: web3.utils.toWei('1', 'ether'),
            });
        } catch (e) {
            console.log(e);
        } finally {
            return
        }
    };

    const openLottery = async () => {

        try {
            let txData = await contract?.methods
                .openLottery()
                .encodeABI();

            await connector.sendTransaction({
                from: connector.accounts[0],
                to: lotteryAddress,
                data: txData,
            });
        } catch (e) {
            console.log(e);
        } finally {
            return
        }
    };

    const closeLottery = async () => {

        try {
            let txData = await contract?.methods
                .CloseLottery()
                .encodeABI();

            await connector.sendTransaction({
                from: connector.accounts[0],
                to: lotteryAddress,
                data: txData,
            });
            getLotteryStatus();
            alert('Lottery closed! winner selected')
        } catch (e) {
            console.log(e);
        } finally {
            return
        }
    };

    const getLotteryPool = async () => {

        try {
            const result = (await contract?.methods.getLotteryBalance().call());
           const pool =  web3.utils.fromWei(result, 'ether');
            setLotteryPool(pool);
        } catch (e) {
            console.log(e);
        } finally {
            return
        }
    };
    const getLotteryBets = async () => {

        try {
            const result = (await contract?.methods.getNumberOfPlayers().call()) as string;

            setLotteryBets(result);
        } catch (e) {
            console.log(e);
        } finally {
            return
        }
    };
    const getLotteryWiner = async () => {

        try {
            const result = (await contract?.methods.winner().call()) as string;

            setWinner(result);
        } catch (e) {
            console.log(e);
        } finally {
            return
        }
    };
    const getLotteryStatus = async () => {

        try {
            const result = (await contract?.methods.isOpened().call()) as boolean;

            setLotteryStatus(result);
        } catch (e) {
            console.log(e);
        } finally {
            return
        }
    };
    useEffect(() => {
        getLotteryPool();
        getLotteryBets();
        getLotteryStatus();
        if(!lotteryStatus) {
            getLotteryWiner();
        }
    }, [lotteryPool, lotteryBets, lotteryStatus]);


    return (
        <View
            style={{
                height: "100%",
                padding: 10,
            }}
        >
            <View
                style={{
                    flex: 1,
                    margin: 1,
                    alignItems: "center",
                    justifyContent: "center",
                    borderRadius: 10,
                }}
            >
                <H4
                    additionalStyles={{
                        marginTop: -90,
                        fontFamily: "Inter-Medium",
                    }}
                >
                   Play and Win Lottery on Celo
                </H4>
                <Container style={{ marginTop: 15 }}>
                    <MonoText
                        additionalStyles={{
                            textAlign: "center",
                            color: Colors.brand.brown,
                            fontSize: 13,
                        }}
                    >
                        {
                            `Lottery Pool: ${lotteryPool} cUSD\n`
                        }

                        {
                            "Lottery Price: 1 cUSD "
                        }
                    </MonoText>
                </Container>

                <Container style={{ marginBottom: 215 }}>
                    <MonoText
                        additionalStyles={{
                            textAlign: "center",
                            color: Colors.brand.brown,
                            fontSize: 13,
                        }}
                    >
                        {
                            `Lottery Bets:  ${lotteryBets} \n`
                        }

                        {
                          ` Latest Lottery Winner: ${winner} \n`
                        }
                         {
                            `Lottery Status: ${lotteryStatus ? 'Inprogress': 'Closed'} `
                        }
                    </MonoText>
                    <Container style={{ marginTop: 15 }}>
                    <Button onPress={placeBets}   title={`Place Bets (1 cUSD)`}></Button>

                    </Container>
                </Container>

                <View style={{backgroundColor: 'yellow', marginTop: 1}}>
                    <Button onPress={closeLottery}  color={'red'} title={`close lottery`}></Button>

                </View>
                <View  style={{marginTop: 5}}>
                    <Button onPress={openLottery}   title={`Open Lottery`}></Button>
                </View>


            </View>
        </View>
    );
};

export default Home;
Here’s an overview of what’s happening in the code above :
It is a component of a React Native application that communicates with our lottery smart contract, which is running on the Celo blockchain. It has a number of hooks and functions that handle contract interaction and control application state.
- We import several React Native components along with custom ones like Container, Headings, and MonoText.
- In order to communicate with the Celo blockchain, we additionally import the LotteryContract and set up a web3 instance.
- The primary screen of the application is represented by the Home functional component, which is defined.
A few functions inside the Home component communicate with the smart contract such as:
placeBets: Calls the playLottery method while
passing the necessary information and value to send a
transaction to the smart contract to take part in the
lottery.Invoking the openLottery method sends a
transaction to the smart contract to start the
lottery.Invoking the CloseLottery method sends a
transaction to the smart contract to halt the lottery.
Additionally,when the lottery is closed, a warning is
displayed and the application status is updated.These functions, getLotteryPool,
getLotteryBets, getLotteryWinner, and
getLotteryStatus, obtain data from the smart
contract, including the balance of the lottery pool,
the number of bets, the lottery winner, and the
lottery's status.The lottery pool balance, total number of bets, and lottery status are automatically fetched when the component mounts using the useEffect hook. It also retrieves the winner if the lottery is closed.
To show and interact with the lottery data, the Home component creates a view with a variety of elements, including headings, text, and buttons.
Overall, it functions as the user interface for a lottery application, enabling users to take part, examine lottery data, and conduct operations like placing bets, launching the lottery, and shutting it.
- Sure you'd be seeing some errors already, don't panic- it's because we renamed the Docs file, next we'd have to change all instances where Docs was initiated / declared.
Step 5: Adding React-Navigation Screen for the lottery
- Head over to the Navigation folder open the index.tsx folder and replace the code with the below:
/**
 * If you are not familiar with React Navigation, refer to the "Fundamentals" guide:
 * https://reactnavigation.org/docs/getting-started
 *
 */
import { SafeAreaProvider } from "react-native-safe-area-context";
import { createBottomTabNavigator } from "@react-navigation/bottom-tabs";
import {
    NavigationContainer,
    DefaultTheme,
    DarkTheme,
} from "@react-navigation/native";
import { createNativeStackNavigator } from "@react-navigation/native-stack";
import * as React from "react";
import { ColorSchemeName, Button } from "react-native";
import { useWalletConnect } from "@walletconnect/react-native-dapp";
import Colors from "../constants/Colors";
import useColorScheme from "../hooks/useColorScheme";
import ModalScreen from "../screens/ModalScreen";
import NotFoundScreen from "../screens/NotFoundScreen";
import { RootStackParamList, RootTabParamList } from "../types";
import LinkingConfiguration from "./LinkingConfiguration";
import LoginScreen from "../screens/LoginScreen";
// import deployedContracts from "@celo-composer/hardhat/deployments/hardhat_contracts.json";
import Account from "../screens/Account";
import Home from "../screens/Home";

export default function Navigation({
    colorScheme,
}: {
    colorScheme: ColorSchemeName;
}) {
    return (
        <NavigationContainer
            linking={LinkingConfiguration}
            theme={colorScheme === "dark" ? DarkTheme : DefaultTheme}
        >
            <RootNavigator />
        </NavigationContainer>
    );
}

/**
 * A root stack navigator is often used for displaying modals on top of all other content.
 * https://reactnavigation.org/docs/modal
 */
const Stack = createNativeStackNavigator<RootStackParamList>();

function RootNavigator() {
    const connector = useWalletConnect();
    return (
        <Stack.Navigator>
            {connector.connected ? (
                <Stack.Screen
                    name="Root"
                    // the Root path renders the component mentioned below.
                    component={BottomTabNavigator}
                    options={{ headerShown: false }}
                />
            ) : (
                <Stack.Screen
                    name="Root"
                    component={LoginScreen}
                    options={{ headerShown: false }}
                />
            )}
            <Stack.Screen
                name="NotFound"
                component={NotFoundScreen}
                options={{ title: "Oops!" }}
            />
            <Stack.Group screenOptions={{ presentation: "modal" }}>
                <Stack.Screen name="Modal" component={ModalScreen} />
            </Stack.Group>
        </Stack.Navigator>
    );
}

/**
 * A bottom tab navigator displays tab buttons on the bottom of the display to switch screens.
 * https://reactnavigation.org/docs/bottom-tab-navigator
 */
const BottomTab = createBottomTabNavigator<RootTabParamList>();

function BottomTabNavigator() {
    const theme = useColorScheme();

    // const contracts = deployedContracts["44787"]?.["alfajores"]?.contracts;

    return (
        <SafeAreaProvider>
            <BottomTab.Navigator
                // first screen visible after login
                initialRouteName="Docs"
                screenOptions={{
                    headerShown: false,
                    tabBarActiveTintColor: Colors["brand"].light.text,
                    tabBarActiveBackgroundColor:
                        Colors["brand"][theme].background,
                    tabBarLabelPosition: "beside-icon",
                    tabBarIconStyle: { display: "none" },
                    tabBarLabelStyle: { textAlign: "center" },
                }}
            >
                {/* <BottomTab.Screen
                    name="Greeter"
                    children={(props) => (
                        <Greeter contractData={contracts.Greeter} {...props} />
                    )}
                    options={() => ({
                        title: "Greeter Contract",
                        headerShown: false,
                        // render icons if any
                        tabBarIcon: ({
                            focused: boolean,
                            color: string,
                            size: number,
                        }) => {
                            return <></>;
                        },
                        tabBarLabelPosition: "beside-icon",
                    })}
                />
                <BottomTab.Screen
                    name="Storage"
                    children={(props) => (
                        <Storage contractData={contracts.Storage} {...props} />
                    )}
                    options={{
                        title: "Storage Contract",
                        headerShown: false,
                        tabBarIcon: ({
                            focused: boolean,
                            color: string,
                            size: number,
                        }) => {
                            return <></>;
                        },
                        tabBarLabelPosition: "beside-icon",
                    }}
                /> */}
                <BottomTab.Screen name="Home" component={Home} />
                <BottomTab.Screen
                    name="Account"
                    component={Account}
                    options={() => ({
                        title: "Account",
                        headerShown: false,
                        tabBarIcon: ({
                            focused: boolean,
                            color: string,
                            size: number,
                        }) => {
                            return <></>;
                        },
                        tabBarLabelPosition: "beside-icon",
                    })}
                />
            </BottomTab.Navigator>
        </SafeAreaProvider>
    );
}
code overview: We are setting the Navigation and the screens to be displayed on our mobile lottery dApp (remember we edited the Docs file to => Home file).
- We import necessary dependencies, components, and screens from various modules.
- The Navigation component is the entry point that wraps the entire app's navigation logic. It uses NavigationContainer from React Navigation and determines the theme based on the provided color scheme.
- Inside the Navigation component, there is a RootNavigator component defined as a stack navigator. It checks if the user is connected via WalletConnect. If connected, it renders the BottomTabNavigator component; otherwise, it renders the LoginScreen component.
- The RootNavigator also includes a NotFoundScreen component for handling routes not found in the navigation stack and a ModalScreen component for rendering modal screens.
The BottomTabNavigator component represents the bottom tab navigation within the app. It uses the createBottomTabNavigator function to create the navigator.It includes screens like Home and Account to display the main functionality of the app.
Each screen within the BottomTabNavigator has options for customizing its appearance, such as the title, icon, and label position.
Overall, the code sets up the navigation structure for the app, allowing users to navigate between screens using a bottom tab navigation pattern and handle different scenarios such as authentication and error handling.
- Also open the linkConfigurations.ts file and replace it with the code below:
/**
 * Learn more about deep linking with React Navigation
 * https://reactnavigation.org/docs/deep-linking
 * https://reactnavigation.org/docs/configuring-links
 */

import { LinkingOptions } from "@react-navigation/native";
import * as Linking from "expo-linking";

import { RootStackParamList } from "../types";

const linking: LinkingOptions<RootStackParamList> = {
    prefixes: [Linking.makeUrl("/")],
    config: {
        screens: {
            Root: {
                screens: {
                    Docs: {
                        screens: {
                            Home: "home",
                        },
                    },
                    Account: {
                        screens: {
                            Account: "account",
                        },
                    },
                },
            },
            Modal: "modal",
            NotFound: "*",
        },
    },
};

export default linking;
Step 6: Testing our Celo Lottery Mobile DApp
Make sure you have the Alfajores app installed in your mobile device. and also create a wallet and collect Testnet funds from the faucet.
Make sure you have the Expo Go app installed on your mobile device.
Open your terminal and enter the following command:
npx expo start
Scan the QR code using your Expo Go application to test the mobile app.
NB: Make sure your pc and mobile device are connected to one Network.
Expected output:
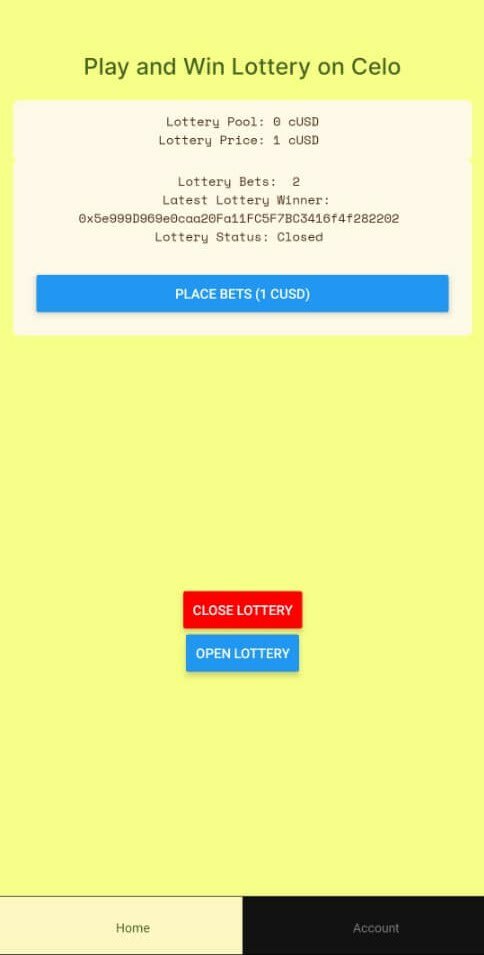
Go ahead and Test our Lottery app:
- Connect Your wallet
- Place Lottery Bet as many times as you want as far as you have enough Testnet funds, you could also use multiple devices to make the lottery competitive.
- Close Lottery- To select a winner and send funds to the winner from the Prize Pool.
- reOpend the Lottery.
Have any Question reply to this post or DM me on Twitter for support

Top comments (1)
Thank you so much for sharing this detailed guide for developing the application! This information is incredibly valuable, even though I'm not a developer myself. On a personal note, I have a keen interest in various types of gambling, including lotteries, though I often lean towards online games. Speaking of online gambling, I recently stumbled upon an interesting article at netnewsledger.com/2023/06/26/a-mis.... As a player, I found myself curious about the aspects surrounding the legalization of gambling in South Africa. Thought it might be interesting to share with the community.