
Hello, again appwriters. Yes, this is another one of “those” appwrite tutorials, and yes one on how to install software on a server. But hey if it helps someone, great! If you have read my other tutorial on how to install appwrite on Hetzner you will see some similarities on how to install appwrite on Linode servers as they are both Linux cloud server providers.
But why Linode? Well, simply Linode can be considered like the Ryanair or Easyjet of cloud computing but without any of those hidden fees. You pay for what you get, it’s proven and most of all it’s secure and cheap. Also, they sponsor lots of YouTubers meaning that there are tons of affiliate links with free credit allowing you to get started for free with free credit. In terms of pricing Linode is about on par with Hetzner in terms of cost and specifications but way cheaper than an AWS EC2 instance with the same specifications. The Linode server starts at $5/month (5 euros for us Europeans) and the AWS server starts at $11/month which is far more expensive than Linode.

But there are some downsides to using Linode for hosting appwrite. First, the server you are getting has a shared CPU compared to some of the cloud computing providers' dedicated CPU offerings. The other downsides of using Linode are that the servers take longer to allocate and provision than the big-name cloud providers (Although it’s still within 10 minutes normally) and that Linode has fewer cloud offerings than other cloud providers.
While at it you may also ask why appwrite? Well appwrite allows you to build a secure backend in a very quick and affordable manner. Appwrite allows you to do things such as databases, authenticating users, managing storage functions and running your own functions. With basically little to no code needed. If you are unsure about what you can do with appwrite check out the awesome appwrite repository on GitHub for lots of helpful guides and examples (Like this one!).
Another thing that I would like to mention about this tutorial is that in this tutorial we use the package-managed version of the docker project. This means in turn that docker will not automatically update this can be a good and bad thing. The good thing about it is that docker will not break the install of appwrite easily. But in turn just like OS updates if you don’t update you miss out on important security updates which could leave your server vulnerable to malicious actors.
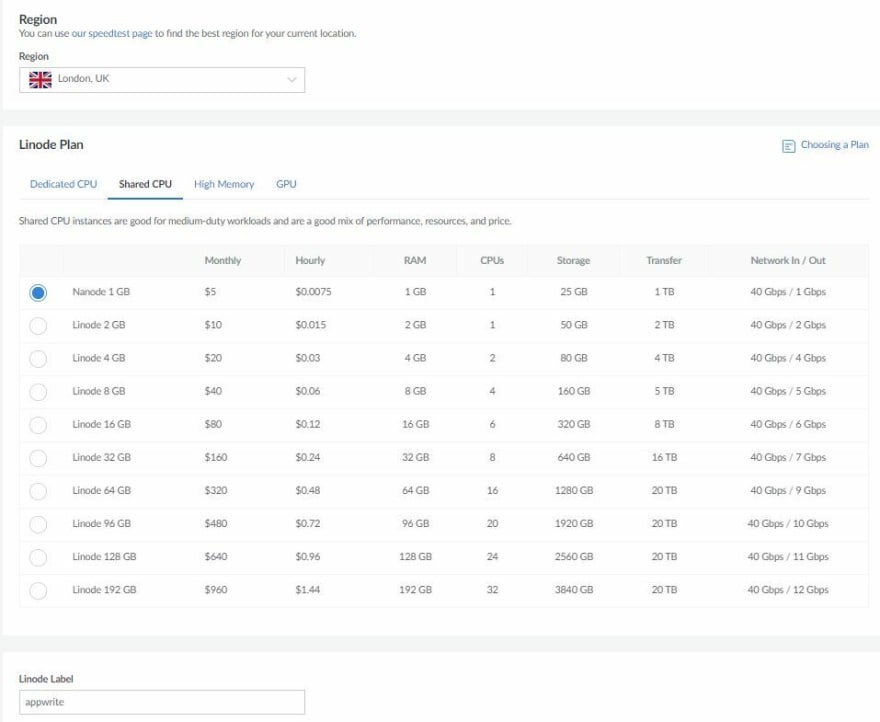
Okay, let’s begin, Head over to the Linode website at: https://www.linode.com/ and create an account personally I just signed up with my GitHub account just because it’s quicker. Make sure you have your phone handy as you will need to verify your phone number. As well as a payment method handy to input your payment details (Linode currently supports google pay, PayPal and credit cards). This step may take some time as they need to verify your account for me it took 10 minutes.

Once this step is done let’s create a server for my server I chose these specs: Debian 11 for the OS/image (This is very important as the commands in this tutorial are focused on Debian), A shared CPU server (Nano 1), I named my server Appwrite (You can name it whatever you want), I generated a strong root password using my password manager (A strong password is very important otherwise your server may become comprised see comic below for strong password tips) and I added an SSH Key. Then clicked the create linode button to deploy my server.

(Comic courtesy of xkcd)
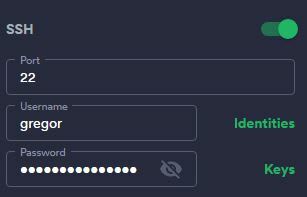
After I have my SSH key I connected to my server with my favourite SSH client in this case it’s Termius as it has a clean UI and a free tier.
Now that we have connected to our server let’s update it to make sure we have all the security patches. We can do this with this command:
sudo apt-get update
(This may take some time)

The next step is to install all the prerequisites required to make docker work properly. Let’s do this with this command:
sudo apt install apt-transport-https ca-certificates curl gnupg2 software-properties-common
Once that step is done we are going to get and apply the required GPG key (The public key of docker to make sure that our docker install hasn’t been tampered with) This can be done with just one command:
curl -fsSL https://download.docker.com/linux/debian/gpg | sudo apt-key add -
Brilliant! Let’s now add the docker repository to the apt sources:
sudo add-apt-repository "deb [arch=amd64] https://download.docker.com/linux/debian $(lsb_release -cs) stable"
And we need to update the package database with this command again:
sudo apt update
We also need to specify where the server should try and fetch the docker package from. In this case, we want it to fetch it from the official docker repository, not the Debian one. This can be done with this command:
apt-cache policy docker-ce
Finally, after jumping over all these hurdles we can install the actual docker package:
sudo apt install docker-ce
(This may take some time, just be patient.)
Once that’s done let’s check if we have installed it correctly, just in case we made a mistake:
sudo systemctl status docker
If it returns something about docker then that’s this part done. On to the appwrite installation.
Just a heads up you might want to copy and paste this command as it’s a very long one!
docker run -it --rm \ --volume /var/run/docker.sock:/var/run/docker.sock \ --volume "$(pwd)"/appwrite:/usr/src/code/appwrite:rw \ --entrypoint="install" \ appwrite/appwrite:1.0.3
This command tells docker to install, run and assign a volume to our appwrite installation like magic.

Once the installation is done that’s it! You have successfully managed to install appwrite! Pat yourself on the back and start building amazing things with appwrite! If you get stuck leave a comment I might be able to help. Also while at it make sure to join the appwrite discord to get product updates before anyone else https://discord.gg/z8KjVahZJK.


Top comments (0)