In this tutorial, you will create the game Pong in MonoGame using C#. We will be able to play pong with a friend, and more importantly, learn how to build games in MonoGame.
MonoGame is an open-source, cross-platform game development framework capable of building 2D and 3D games. It is built from the now-expired Microsoft XNA framework, which was popular back in the Xbox 360 days for creating games on the Xbox and PC.
As a game developer, using MonoGame might seem backward in the world of advanced game engines like Unity and Unreal Engine, which provide many tools and components for you that we'd otherwise have to program ourselves. However, building components of the engine that are specific to your game requires you to understand the code at a far deeper level, which will make you better at identifying programming patterns.
In this tutorial, you will learn how to create a Pong game using MonoGame and C#. This tutorial covers setting up the environment, creating the Paddle and Ball classes, handling collisions, and displaying the score. A basic knowledge of object-oriented programming languages such as C# or C++ is assumed. By the end of this tutorial, you will have a fully functional Pong game to play with a friend and a deeper understanding of MonoGame's framework.
Let's get started!
DISCLAIMER: This walkthrough assumes a basic knowledge of any OOP (Object Oriented Programming) Language, such as C# or C++.
GitHub Repo: https://github.com/HadiCya/Pong-MonoGame
YouTube Version:
What you'll need
Let's get set up. We'll need a couple of things to get started:
First things first, make sure .NET 6.0 SDK is installed on your computer matching your operating system (Windows, MacOS, or Linux).
The recommended way to install MonoGame is by using Visual Studio 2022, because there is already an extension you can use directly in the IDE. Creating a project is a lot more simplified in this way. Follow this guide by MonoGame to install it for your specific operating system. You will also be able to run it in the command line without an IDE, if you prefer Visual Studio Code, vim, or some other code editor.
Now that you have it installed, let's create a project.
If you're using Visual Studio 2022 , create a new project, select the MonoGame Cross Platform Desktop Application option, and name the project Pong.

If you're using the command line , navigate to where you'd like to create a project and type:
dotnet new mgdesktopgl -o Pong
This will create a new dotnet project called Pong.
Now that you've created a MonoGame project, you'll see that a lot of files have been generated where you created the project. If you're using Visual Studio 2022, go ahead and run the program with the debug button or by pressing F5. If you're using the command line, type dotnet run. When you run the project, a blue window should pop up.

If you see this, you're ready to get started with MonoGame!
Preparing the code
The project that is automatically generated has a lot of files in it, so it may be overwhelming to look at first glance. But, we'll go through the important ones right now and try to understand how the code is structured. This is the general file structure:

While there are ways we can reorganize that make sense for a project you'd be working on long term, right now we can use the default structure since we're just making Pong. That being said, the only file we will concern ourselves with (right now) is Game1.cs which is our game runs.
In Game1.cs we are defining the class Game1. Let's break it down:
Game1()is the constructor for our class. This is run when we create the instance of our game. The default code is just defining some basic things for the code to run.Initialize()is where we will initialize objects inside our game. When we create our paddle class, we will initialize our players here.LoadContent()is where we can load content, such as sprites, fonts, audio, and other content.Update(GameTime gameTime)is called every frame, and it is where we will update our game logic.Draw(GameTime gameTime)is where we will draw our objects to the screen.
As you can see, everything is broken up into clear functions, and we're going to try and keep things clean in this manner while we create our game.
We're going to try and avoid running too much game logic in the Game1 class, as we want to have clear roles for all the objects in the game. For this project, we can simplify the classes we will make as just Paddle and Ball. It may be more intelligent to organize more so there is more separation and more flexibility to change things about the game in the future, but for this tutorial, we're going to just worry about getting a working Pong.
Before we start coding, let's prepare the existing code for our game.
Create a file called Globals.cs so that we can store global variables for our game.
using Microsoft.Xna.Framework.Content;
using Microsoft.Xna.Framework.Graphics;

namespace Pong
{
    class Globals
    {
        public static SpriteBatch spriteBatch;
        public static int WIDTH = 640, HEIGHT = 480;
    }
}
In our Globals class, we want to store some public global variables, so that we can access them from anywhere in our game. For now, we're going to store the width and height of our screen, as well as SpriteBatch, which is going to make drawing things to the screen possible.
Because we've created a global variable spriteBatch, we can replace all instances of the local private one with the global version. Go into your Game1 class, and delete the _spriteBatch class variable that was automatically created.
Replace any mention of _spriteBatch in Game1 with our newly created Globals.spriteBatch
Let's also update our constructor to use the WIDTH and HEIGHT variables we defined earlier.
public Game1() {
    _graphics = new GraphicsDeviceManager(this);
    _graphics.PreferredBackBufferWidth = Globals.WIDTH;
    _graphics.PreferredBackBufferHeight = Globals.HEIGHT;
    Content.RootDirectory = "Content";
    IsMouseVisible = true;
}
The last thing we'll need to do is update our Draw() function:
protected override void Draw(GameTime gameTime) {
    GraphicsDevice.Clear(Color.Black);

    Globals.spriteBatch.Begin();
    // TODO: Add your drawing code here
    Globals.spriteBatch.End();

    base.Draw(gameTime);
}
We need to change the Color from Color.CornflowerBlue to Color.Black (unless you want your background to be some other color).
To draw game objects on the screen, start the drawing process by using the Begin() method on the Globals.spriteBatch object. This sets up everything needed to show our game elements. After finishing all drawing tasks, end the process by using the End() method on the Globals.spriteBatch object. This makes sure all drawing operations are done and the elements show up on the screen.

Not much has changed, but now it will be easier to create objects and draw to the screen. Next, we're going to create the Paddle.
Creating the Paddle
Let's go ahead and create a file called Paddle.cs and define our Paddle class. In this class, create a constructor, a Update() and a Draw() function.
We're also going to want to define a Rectangle object, which will represent the paddle.
This is how our class should look:
using Microsoft.Xna.Framework;
using Microsoft.Xna.Framework.Input;

namespace Pong {
    public class Paddle {
        public Rectangle rect;

        public Paddle() {}
        public void Update(GameTime gameTime) {}
        public void Draw() {}
    }
}
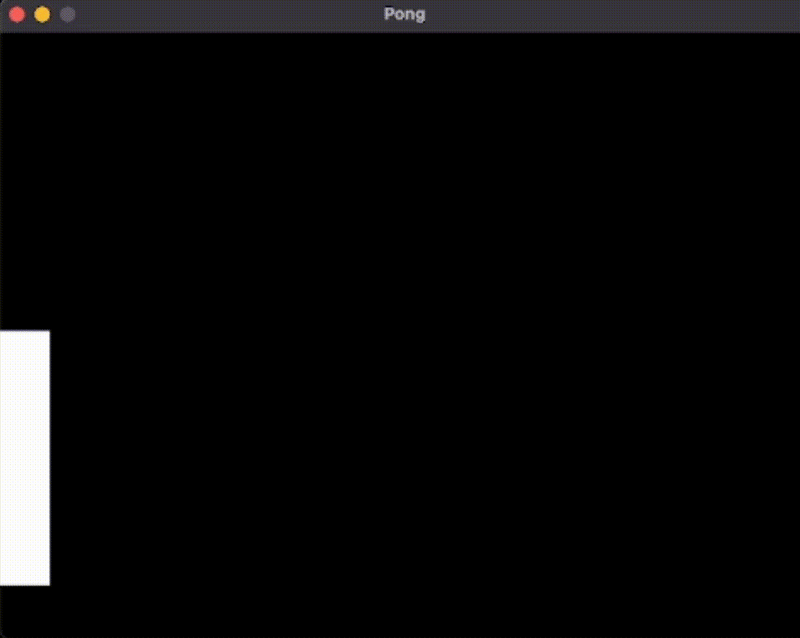
Now that we've set up the Paddle class, let's try just getting a rectangle on the screen.
In the constructor, let's define what rect is. The parameters for the MonoGame Rectangle class is: Rectangle(int x, int y, int width, int height)
As you can see, we need to fill in the position of the rectangle, x and y, as well as the width and height.
In computer graphics, we use a different coordinate system than the usual one from math class. The top-left corner of the screen is the starting point (0,0). The x-axis shows the horizontal position, and the y-axis shows the vertical position. This system makes it easier to work with graphics on screens and in programming.

So, let's go to the constructor, and define our rect variable:
rect = new Rectangle(0, 140, 40, 200)
Now we're going to want to draw the paddle onto the screen, but before we write anything in the Draw() function, we need to define a Texture2D for our rectangle.
In Globals.cs, add public static Texture2D pixel; to the instance variables.
In Game1.cs, update the LoadContent() function to this:
protected override void LoadContent() {
    Globals.spriteBatch = new SpriteBatch(GraphicsDevice);

    Globals.pixel = new Texture2D(GraphicsDevice, 1, 1);
    Globals.pixel.SetData<Color>(new Color[] { Color.White });
}
What we're doing here is defining the pixel variable we just created in our Globals class. Through our code, we're basically just creating a white texture.
Now, we can go back to our Paddle.cs class, and update our Draw() function to this:
public void Draw() {
    Globals.spriteBatch.Draw(Globals.pixel, rect, Color.White);
}
Here, we are accessing the global spriteBatch variable, and drawing our rectangle to it with our essentially empty texture, with the color white. Because our pixel variable is white, we can set our Color to any color we want, but in this case, we'll just keep it white to stay true to the original Pong.
To get things onto the screen, we need to initialize, update, and draw our Paddle in the Game1 class. For every matching function, we need to call it in Game1.
In Game1:
In the class variables, add
Paddle paddle;In
Initialize(), addpaddle = new Paddle();right beforebase.Initialize();In
Update(), addpaddle.update(gameTime);right beforebase.Update(gameTime);In
Draw(), addpaddle.Draw();right beforeGlobals.spriteBatch.End();
Go ahead and run the project now

If you did everything correctly, we should be seeing our paddle on the screen! The code is now ready to add movement.
Back in the Paddle.cs file, add a new class variable float moveSpeed = 500f;
Now, let's fill in the Update() function so we can move the Paddle:
public void Update(GameTime gameTime) {
    KeyboardState kstate = Keyboard.GetState();
    if (kstate.IsKeyDown(Keys.W) && rect.Y > 0) {
        rect.Y -= (int)(moveSpeed * (float)gameTime.ElapsedGameTime.TotalSeconds);
    }
    if (kstate.IsKeyDown(Keys.S) && rect.Y < Globals.HEIGHT - rect.Height) {
        rect.Y += (int)(moveSpeed * (float)gameTime.ElapsedGameTime.TotalSeconds);
    }
}
Let's go through this line by line:
KeyboardState kstate = Keyboard.GetState(); is getting the current state of the Keyboard, which will give us information on what keys are being pressed.
if (kstate.IsKeyDown(Keys.W) && rect.Y > 0) { is checking to see if the player is pressing W to go up and that the paddle is not being clipped off the top of the screen.
rect.Y -= (int)(moveSpeed * (float)gameTime.ElapsedGameTime.TotalSeconds); is changing the Y position of the paddle, so that it can go up based on the moveSpeed multiplied by the time between the last frame and the current frame. We call this delta time (the difference between the previous and current frame).
Delta time helps make smooth movement and animations in games, no matter the frame rate or device performance.
if (kstate.IsKeyDown(Keys.S) && rect.Y < Globals.HEIGHT - rect.Height) { is checking to see if the player is pressing S to go down and that the paddle is not being clipped off the bottom of the screen.
rect.Y += (int)(moveSpeed * (float)gameTime.ElapsedGameTime.TotalSeconds); is changing the Y position of the paddle, so that it can go down, just as we did earlier with up.
If you've done everything correctly, we should have movement! All we have to do now is add a second player, which should be super easy now that we've made our Paddle class! We just need to allow the constructor to take in a parameter, if it's the second player or not, and then make modifications accordingly.
In the Paddle class, let's add a class variable bool isSecondPlayer;
In the constructor, we're going to need to take a boolean parameter so we can make changes based on if the instance of the Paddle class is the second player or not.
public Paddle(bool isSecondPlayer) {
    this.isSecondPlayer = isSecondPlayer;
    rect = new Rectangle((this.isSecondPlayer ? Globals.WIDTH - 40 : 0), 140, 40, 200);
}
Here, we're telling the computer to change the X variable, so that the paddle is on the right side if there is a second player.
Now, we need to change the Update() class to support a second player.
public void Update(GameTime gameTime) {
    KeyboardState kstate = Keyboard.GetState();
    if ((this.isSecondPlayer ? kstate.IsKeyDown(Keys.Up) : kstate.IsKeyDown(Keys.W)) && rect.Y > 0) {
        rect.Y -= (int)(moveSpeed * (float)gameTime.ElapsedGameTime.TotalSeconds);
    }
    if ((this.isSecondPlayer ? kstate.IsKeyDown(Keys.Down) : kstate.IsKeyDown(Keys.S)) && rect.Y < Globals.HEIGHT - rect.Height) {
        rect.Y += (int)(moveSpeed * (float)gameTime.ElapsedGameTime.TotalSeconds);
    }
}
We're adding a ternary expression again to change the movement key based on if the paddle is the second player or not.
Finally, we need to go into Game1 and add a second instance of Paddle, as well as updating the first Paddle instance to work with our new constructor.
In Game1:
In the class variables, add
Paddle paddle2;In
Initialize(), updatepaddle = new Paddle();topaddle = new Paddle(false);In
Initialize(), addpaddle2 = new Paddle(true);right beforebase.Initialize();In
Update(), addpaddle2.update(gameTime);right beforebase.Update(gameTime);In
Draw(), addpaddle2.Draw();right beforeGlobals.spriteBatch.End();
Now, let's run the code!

Wonderful! We now have 2 players on the screen. Now, we need to create the Ball class and then make the final touches!
Creating the Ball
Before we create the Ball class, we need to create a way to store the score. In the Globals class, create two new integer variables:
public static int player1_score, player2_score;
Create a file Ball.cs for the Ball class
A lot of the things we are going to do in terms of drawing the rectangle on the screen are extremely similar to how we did it for the Paddle, so we can use this as our starting point:
using Microsoft.Xna.Framework;

namespace Pong {
    public class Ball {
        Rectangle rect;
        int right = 1, top = 1, moveSpeed = 200;

        public Ball() {
            rect = new Rectangle(Globals.WIDTH / 2 - 20, Globals.HEIGHT / 2 - 20, 40, 40);
        }
        public void Update(Gametime gameTime, Paddle player1, Paddle player2) {}
        public void Draw() {
            Globals.spriteBatch.Draw(Globals.pixel, rect, Color.White);
        }
    }
}
We're using the Global WIDTH and HEIGHT variables to put the ball at the center of the screen.
Also, we are going to take in both Paddle instances, since we want to use the Ball for all game calculations. This isn't necessarily the best practice, but since it's a simple game like Pong, it's alright.
We also created three new integer class variables right = 1, top = 1, and moveSpeed = 200.
We will use right and top to store either 1 or -1 so that we can create conditionals for when the ball collides with something. We're going to want to keep it simple, so the ball will always move at a 45 angle. By adding the same values to the X and the Y of the ball, it will always bounce at the same 45 angle.
In the Update() function, we're going to add a bunch of if statements back to back to control the ball:
- Before any if statements, we're just going to move the ball based on its current trajectory. For every frame, we're multiplying the
moveSpeedwith the delta time, and then making it negative or positive based on the modifiersrightandtop.
int deltaSpeed = (int)(moveSpeed * (float)gameTime.ElapsedGameTime.TotalSeconds);
rect.X += right * deltaSpeed;
rect.Y += top * deltaSpeed;
- Our first conditional is going to be for the left paddle, the first player. Each value in this if statement is checking each side of the ball and paddle to make sure that if the ball hits the paddle at a valid position, the direction is reversed.
if (player1.rect.Right > rect.Left && rect.Top > player1.rect.Top && rect.Bottom < player1.rect.Bottom) {
    right = 1;
}
- The same thing is happening for the right paddle, except the right and left values are flipped so collisions make sense for it.
if (player2.rect.Left < rect.Right && rect.Top > player2.rect.Top && rect.Bottom < player2.rect.Bottom) {
    right = -1;
}
- We check to see if the ball hits the top of the window, and if it does we reverse the top direction so that it can bounce down.
if (rect.Y < 0) {
    top *= -1;
}
- Then we check to see if the ball hits the bottom of the screen and reverse the top direction, just like before.
if (rect.Y > Globals.HEIGHT - rect.Height) {
    top *= -1;
}
- For the X values, that means the ball went off the screen. This means we need to award a point to the opposite and reset the game. For this specific if statement, we're checking to see if the ball hits the left side of the screen.
if(rect.X < 0) {
    Globals.player2_score += 1;
    resetGame();
}
- And for this one, we're checking to see if the ball hits the right side of the screen, awarding a point to the first player.
if (rect.X > Globals.WIDTH - rect.Width) {
    Globals.player1_score += 1;
    resetGame();
}
We're calling a function resetGame() that we haven't made yet! We want this to put the ball back at the center of the game, which should be easy for us. Go ahead and create it as part of the Ball class.
public void resetGame() {
    rect.X = Globals.WIDTH / 2 - 20;
    rect.Y = Globals.HEIGHT / 2 - 20;
}
Now, just like we did for the paddles, we need to add an instance of Ball to the Game1 class.
In Game1:
In the class variables, add
Ball ball;In
Initialize(), addball = new Ball();right beforebase.Initialize();In
Update(), addball.update(gameTime, paddle, paddle2);right beforebase.Update(gameTime);In
Draw(), addball.Draw();right beforeGlobals.spriteBatch.End();
Let's run it and see our progress!

We now have a working Pong! The only thing missing now is a score.
Showing the Score
In MonoGame, displaying text on the screen requires loading a font resource, typically in the form of a SpriteFont. This allows you to present information such as scores, game instructions, and other textual elements in your MonoGame project.
For our project, we're going to use it to show the scores on the top.
If you're using Visual Studio 2022, go to your files, open the Content folder, right click the Content.mgcb file, and open it with the MGCB Editor.

If you're using the command line, type dotnet mgcb-editor to open up the editor.
Whichever way, it should open the MGCB editor, which is the UI interface for content management.

If your Content file isn't already there, go to the top, click File > Open..., and navigate to your Content.mgcb file.
After you add it, right-click the Content add click Add > New Item...

Create a SpriteFont Description called Score. This will generate a .spritefont file that we can use to apply settings for rendering to the screen.

Let's save and exit out of the MGCB Editor.
The Score.spritefont file we created is just a standard XML file, that defines properties of the font. By default, the font selected is Arial, which is fine, but you can go in there and make it any font you want, just make sure that you add the .ttf file to the Content folder if you don't already have it installed on your machine.
For me, I downloaded the Press Start Font , and put the file in the Content folder, then opened the Score.sprintefont file and changed it from Arial to the name of the .ttf file, in my case prstart. I chose this font because it has a nice 8-bit style.
To add our font to the game, open Game1.cs and:
In the class variables, add
SpriteFont font;In
LoadContent(), addfont = Content.Load<SpriteFont>("Score");at the bottom of the function.
Add two DrawString calls to our Draw() function, underneath Globals.spriteBatch.Begin():
Globals.spriteBatch.DrawString(font, Globals.player1_score.ToString(), new Vector2(100, 50), Color.White);
Globals.spriteBatch.DrawString(font, Globals.player2_score.ToString(), new Vector2(Globals.WIDTH - 112, 50), Color.White);
Let's save the file and run our project!

There we go! We now have a fully working version of Pong!
Great job on completing the Pong game tutorial using MonoGame and C#! This achievement has not only helped you build a classic game but also allowed you to gain hands-on experience in game development concepts. As you continue exploring new projects and honing your skills, you will become more proficient in game development.
Explore more advanced MonoGame features or other Game Engines/Frameworks, experiment with different game mechanics, learn about game design principles, and create a portfolio of game projects.
Keep up the good work and happy coding!

Top comments (0)